
- Prepare the Pork
Remove the pork shoulder from its packaging and pat it dry with paper towels. Moisture on the surface prevents proper browning if you decide to sear before slow cooking. Set the pork on a large cutting board and examine it for any large pieces of exterior fat.
Cut the pork into roughly two inch chunks. Try to make them similar in size so they cook evenly. Don't worry about being perfectly precise, close enough works fine. You should end up with about 16 to 20 chunks depending on the exact size of your roast.
In a small bowl, mix together the salt, black pepper, cumin, and chili powder. This creates your seasoning blend. Making the blend first ensures even distribution across all the meat rather than sprinkling spices randomly.
Place the pork chunks in a large bowl. Sprinkle the spice mixture over the pork and use your hands to toss everything together. Make sure every piece gets coated with seasoning. Really work it in with your hands so the spices adhere to the meat.
- Building Layers of Flavor
Place your quartered onion at the bottom of the slow cooker. The onion creates a aromatic base and prevents the pork from sitting directly on the hot surface. As it cooks, the onion will practically dissolve into the braising liquid, adding sweetness and depth.
Add the minced garlic on top of the onions. Fresh garlic makes a huge difference compared to jarred or powdered. Six cloves might seem like a lot, but remember this is seasoning four pounds of meat. The garlic flavor mellows considerably during the long cooking process.
Arrange the seasoned pork chunks in the slow cooker, fitting them in as snugly as possible without cramming. You want them to fit in a single layer if possible, but it's okay if they're stacked slightly. They'll shrink as they cook and settle into the liquid.
Drop the bay leaves into the slow cooker, nestling them between the pork pieces. Bay leaves add this subtle, almost tea like flavor that's hard to describe but definitely noticeable. Don't skip them even though they seem insignificant.
- Adding the Liquids
Zest your orange directly over the slow cooker so the aromatic oils fall onto the pork. Use a microplane or the small holes on a box grater. You want just the orange colored part of the peel, not the white pith which tastes bitter.
Cut the orange in half and squeeze the juice over the pork. Let the juice pool around and under the meat. One orange should yield about a third to half a cup of juice. If your orange seems dry, use two smaller oranges.
Cut the limes in half and squeeze their juice over the pork as well. Really squeeze them to get every drop. The lime juice adds brightness that balances the rich pork. Fresh lime juice is essential, the bottled stuff just doesn't taste right.
Pour the chicken broth around the pork, not directly on top. You want the liquid to come about halfway up the sides of the meat. The pork will release its own juices as it cooks, adding to the liquid level. If you completely submerge the meat, you'll end up boiling it instead of braising.
- The Slow Cooking Process
Put the lid on the slow cooker and make sure it's seated properly. Any gaps let heat escape and increase cooking time. Set your slow cooker to low. Resist every temptation to lift the lid and check on things for at least the first six hours.
Every time you lift the lid, you release heat and add 20 to 30 minutes to the cooking time. The slow cooker works by trapping heat and moisture. Breaking that seal interrupts the process. Trust your slow cooker to do its job without supervision.
After six hours, you can start checking for doneness. The pork should be extremely tender, almost falling apart when you poke it with a fork. If it's still tough, give it another hour or two. Different slow cookers run at different temperatures, so timing varies.
You'll know the pork carnitas are done when the meat shreds easily with minimal effort. Insert a fork and twist. If it falls apart immediately, you're ready to move on. If it holds together firmly, it needs more time. Eight hours is typical, but anywhere from seven to nine hours is normal.
The cooking liquid should be dark and richly flavored, full of rendered fat and meat juices. Don't discard this liquid. It's packed with flavor and can be used for all sorts of things later.
- Shredding the Meat
Use a slotted spoon or tongs to carefully transfer the pork chunks to a large bowl or baking sheet. Work gently because the meat is so tender it might fall apart before you want it to. Let the excess liquid drain back into the slow cooker.
Fish out the bay leaves and discard them. Also remove the onion pieces if you can find them, though they've probably mostly dissolved. Any large pieces of rendered fat should be discarded too, though some fat mixed in is fine and adds flavor.
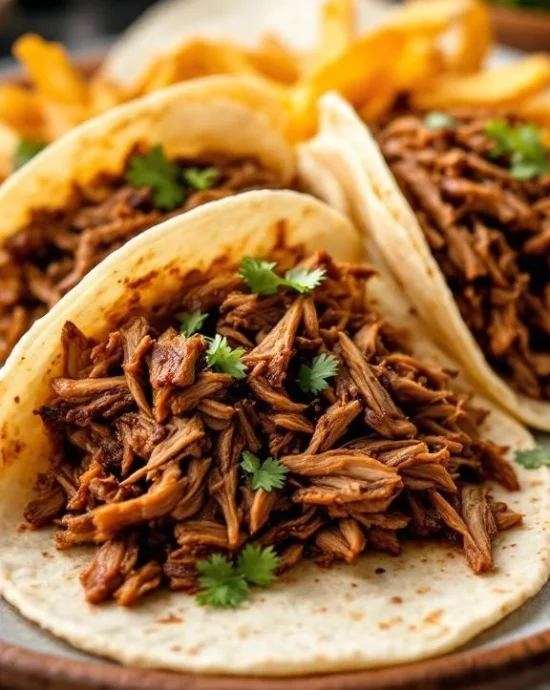
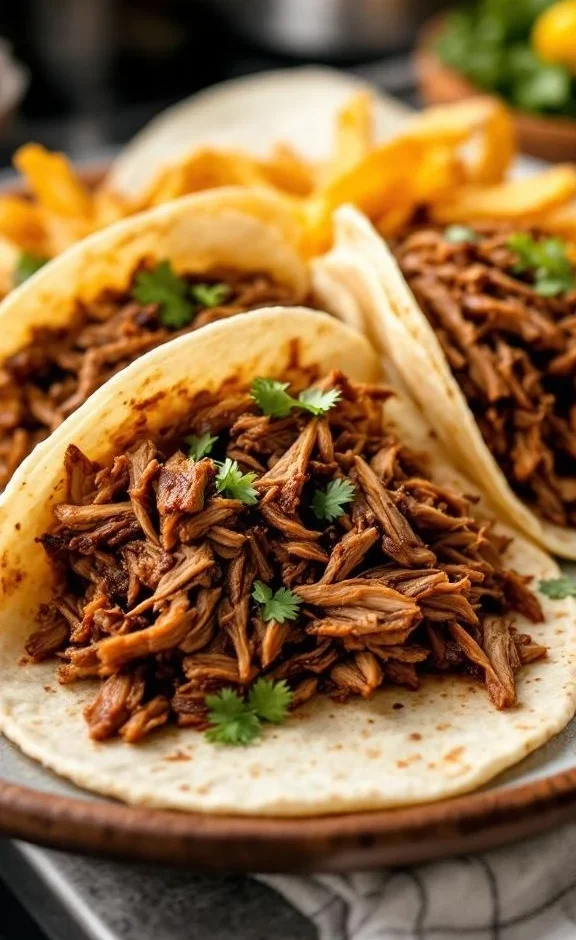
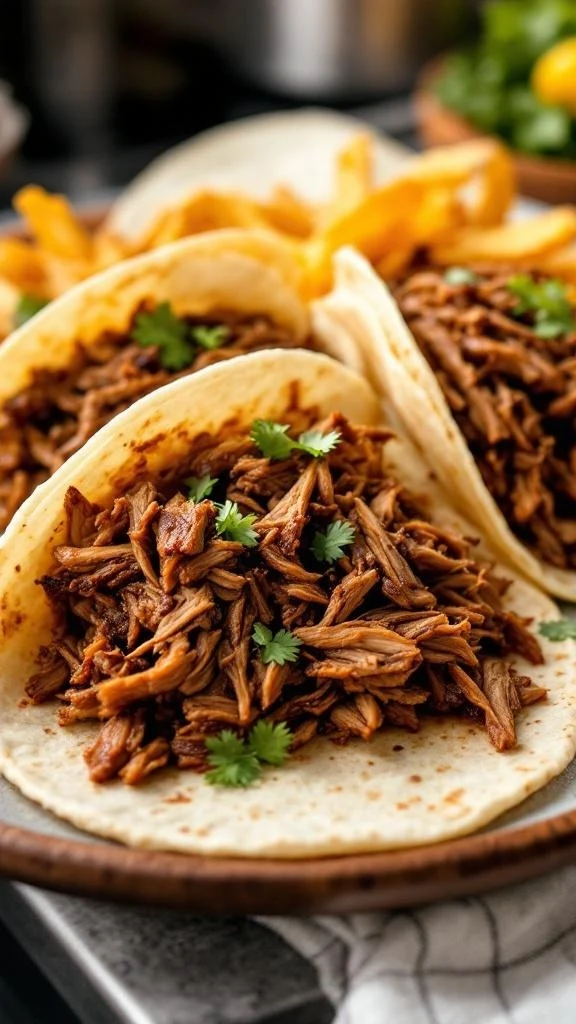
Use two forks to shred the pork, pulling in opposite directions. The meat should come apart with almost no resistance. Shred it into pieces about the size of your thumb. You want substantial chunks, not tiny shreds. The texture is more interesting when there's something to bite into.
Taste the shredded pork and adjust seasoning if needed. Sometimes it needs a pinch more salt or a squeeze of lime juice. This is your chance to make any final flavor adjustments before serving.
- Creating Crispy Edges (The Secret Step)
This optional step transforms good carnitas into legendary carnitas. Preheat your oven to broil or set it to 450°F. Line a large baking sheet with parchment paper or aluminum foil for easier cleanup.
Spread the shredded pork carnitas in a single layer on the baking sheet. Don't pile it up or the edges won't crisp. You might need two baking sheets depending on how much pork you have. Drizzle a few spoonfuls of the cooking liquid over the meat to keep it moist while crisping.
Place the baking sheet on the top rack of your oven, as close to the broiler as possible. Watch it carefully because things can go from perfectly crispy to burnt in seconds under the broiler. You're looking for golden brown, crispy edges while the interior stays tender.
After about 3 to 5 minutes, use tongs or a spatula to flip and stir the pork carnitas. Return to the oven for another 3 to 5 minutes. The edges should be dark brown and crispy while most of the meat stays tender. This contrast in texture is what makes carnitas special.
Remove from the oven when you're happy with the level of crispiness. Some people like just lightly crisped edges, others want maximum crunch. There's no wrong answer here. This is your carnitas, make it how you like it.
- Serving Your Carnitas
Warm your tortillas just before serving. Corn tortillas are traditional and have that authentic flavor. Flour tortillas are less traditional but still delicious. Heat them directly over a gas flame for a few seconds per side, or warm them in a dry skillet.
Pile the pork carnitas generously into each tortilla. Don't be shy about portions. These are meant to be stuffed tacos, not dainty appetizers. The meat is the star here, so give it the spotlight it deserves.
Add your chosen toppings. Fresh cilantro brings herby brightness. Diced raw onion adds crunch and sharp flavor. A squeeze of lime juice brightens everything. Salsa adds moisture and more flavor. Avocado or guacamole brings creamy richness.
Serve immediately while everything is hot. Carnitas tacos are best eaten right away when the pork is warm and the tortillas are soft. Set out all the toppings family style and let everyone build their own tacos exactly how they like them.
- Calories:320 kcals
- Fat:20 grams
- Proteins:28 grams
- Carbohydrates:2 grams
Five years ago, I walked into a tiny taqueria in San Diego that had a line snaking around the block. The place looked sketchy, the kind of spot that makes your mother worry. But that line told me everything I needed to know. When I finally got to the front and ordered carnitas tacos, the woman behind the counter just smiled and said “You’ll be back tomorrow.”
She was right. The pork practically dissolved on my tongue. Crispy edges gave way to impossibly tender meat that had soaked up every bit of citrus and spice. The flavor was complex but not overwhelming, rich but somehow bright at the same time. I ate four tacos standing at a wobbly table, then immediately got back in line for two more.
That experience haunted me for months until I finally decided to figure out how to make pork carnitas at home. My first attempt was a disaster involving dry pork and way too much cumin. The second try was better but still wrong. By attempt number seven, I’d cracked the code. Now I make pork carnitas that rival that little taqueria, and I’m going to show you exactly how to do the same.
Why Pork Shoulder Is Non Negotiable
Pork shoulder, also called pork butt or Boston butt, is the only cut that works for real carnitas. This comes from the upper part of the front leg and has the perfect balance of meat and fat. That marbling throughout the meat is what keeps everything moist during the long cooking process.
When shopping for pork shoulder, look for a piece with visible white streaks of fat running through the meat. Those fat deposits will render slowly during cooking, basting the meat from the inside and creating that melt in your mouth texture. A piece that’s too lean will turn out dry and stringy no matter how carefully you cook it.
The bone in versus boneless debate comes up a lot. Bone in adds flavor and helps the meat stay moist. Boneless is easier to cut and portion. I usually go boneless because I’m lazy and don’t want to deal with removing the bone after cooking. Either works fine, just adjust your cooking time slightly if using bone in.
Fresh pork should have a pinkish red color and smell clean, almost sweet. If it smells sour or looks gray, walk away. Ask your butcher when the pork arrived. Meat that’s been sitting in the case for a week won’t taste as good as something that came in yesterday.
The size of your chunks matters more than you might think. Two inch pieces are ideal because they’re big enough to stay intact during cooking but small enough to get thoroughly seasoned. Cutting them all roughly the same size ensures even cooking. Nobody wants some pieces falling apart while others are still tough.
Understanding the Spice Blend
Cumin is the backbone of carnitas seasoning. This earthy, warm spice has a slightly bitter quality that complements pork beautifully. Toasting whole cumin seeds and grinding them yourself takes the flavor to another level, but pre ground cumin works perfectly fine for weeknight cooking.
Chili powder adds mild heat and depth without making things spicy. Most chili powder is actually a blend of dried chiles, cumin, garlic powder, and oregano. Check your bottle because some brands are hotter than others. Start with the amount in the recipe and adjust for your heat tolerance.
Black pepper might seem basic but it adds a sharp bite that wakes up the other flavors. Freshly ground pepper tastes noticeably better than the pre ground stuff. The volatile oils in peppercorns start degrading as soon as they’re cracked, so grinding right before using maximizes flavor.
Salt does more than just make things taste salty. It helps tenderize the meat by breaking down proteins and draws out moisture that then gets reabsorbed along with all the seasonings. Don’t be shy with salt when seasoning pork shoulder. The large piece of meat can handle it.
The combination of these four basic spices creates a flavor profile that’s distinctly Mexican without being complicated. You’re not trying to make mole here. Simple seasonings let the pork shine while adding enough character to make things interesting.
The Magic of Citrus in Carnitas
Orange juice brings sweetness and acidity that tenderizes the pork while adding bright flavor. The natural sugars caramelize during cooking, creating depth and complexity. Fresh squeezed orange juice tastes noticeably better than carton juice, but use what you have. One large orange yields about a third to half a cup of juice.
Orange zest contains aromatic oils that smell incredible and taste even better. Those oils are concentrated in the colored part of the peel, not the white pith underneath. Use a microplane or fine grater to remove just the orange outer layer. A little goes a long way, so don’t overdo it.
Lime juice adds tartness and brightness that balances the rich pork. Limes are more acidic than oranges, providing that characteristic Mexican tang. Always use fresh lime juice, never the bottled stuff. The difference in flavor is enormous. Two limes usually yield about a quarter cup of juice.
The combination of orange and lime creates this citrus complexity that’s greater than the sum of its parts. The orange provides sweet fruity notes while the lime brings sharp acidity. Together they penetrate the pork and make every bite taste brighter and more interesting.
Citrus also helps tenderize meat through its acidity. The acid breaks down tough connective tissue, making the pork even more fall apart tender. This is why marinades often include citrus or vinegar. In carnitas, the citrus cooks with the meat for hours, maximizing its tenderizing effect.
Why Slow Cooking Makes Perfect Carnitas
Low, slow heat breaks down collagen in the pork shoulder into gelatin. Collagen is tough and chewy when raw but transforms into tender, succulent gelatin when cooked for hours. This process starts around 160°F and continues until the meat is fork tender, usually after seven to eight hours.
Cooking at low temperatures prevents the meat from drying out. High heat causes proteins to contract and squeeze out moisture. Low heat keeps proteins relaxed, allowing them to retain more juice. This is why slow cooked meat stays moist even after hours of cooking.
The long cooking time allows flavors to penetrate deeply into the meat. Spices and seasonings don’t just coat the surface, they actually infuse throughout. By the time cooking is done, every bite tastes seasoned all the way through.
Fat renders slowly during the cooking process, basting the meat continuously. As the fat melts, it carries fat soluble flavor compounds throughout the dish. This creates richness and helps distribute seasonings evenly.
Braising in liquid keeps everything moist and adds another layer of flavor. The cooking liquid becomes incredibly flavorful as it absorbs juices from the meat and aromatics. Some of this liquid gets reabsorbed by the pork, making it even more flavorful and juicy.
Common Mistakes That Ruin Carnitas
Using the wrong cut of meat is the biggest mistake. Pork loin, tenderloin, or chops are too lean and will dry out completely during the long cooking time. Only pork shoulder has enough fat to stay moist for eight hours. Don’t try to substitute.
Not seasoning the meat before cooking creates bland pork that no amount of toppings can fix. The seasoning needs to penetrate the meat itself. Seasoning only the outside or adding spices to the liquid won’t give you the same depth of flavor.
Cutting the pork too small means it’ll fall apart into mush before developing that perfect tender but still chunky texture. Cutting it too large means the center won’t get seasoned or cooked properly. Two inch chunks are the sweet spot.
Adding too much liquid turns carnitas into pork soup. The liquid should come about halfway up the meat, not cover it completely. Braising and boiling are different cooking methods that produce different results. You want to braise, not boil.
Skipping the crisping step means missing out on the textural contrast that makes carnitas special. The crispy edges against tender interior is part of what defines this dish. It’s technically optional but really shouldn’t be skipped.
Opening the slow cooker repeatedly to check on things extends cooking time significantly and lets moisture escape. Leave it alone for at least six hours. Your slow cooker doesn’t need supervision.
Storage and Meal Prep Magic
Pork carnitas keep beautifully in the refrigerator for up to 5 days. Store the meat in an airtight container with some of the cooking liquid. The liquid keeps everything moist and adds flavor as the pork sits. The flavors actually improve after a day or two.
Reheat gently in a skillet over medium heat with a splash of the reserved cooking liquid. You can also microwave portions, though the texture won’t be quite as good. Add a teaspoon of water to prevent drying out.
For meal prep, I portion carnitas into individual containers with rice, beans, and toppings separated. Grab one for lunch throughout the week. You can assemble tacos fresh or eat it as a bowl. The versatility makes meal prep less boring.
Freezing works exceptionally well with carnitas. Portion into freezer bags with some cooking liquid. Press out excess air and freeze flat for easy storage. Label with the date and use within 3 months for best quality.
To use frozen carnitas, thaw overnight in the refrigerator. Reheat in a skillet and crisp under the broiler if desired. The texture holds up surprisingly well after freezing, making this perfect for batch cooking.
The cooking liquid can be strained and frozen separately. Use it as a base for soups, cook rice or beans in it, or reduce it into a concentrated sauce. That liquid is packed with flavor and shouldn’t be wasted.
Flavor Profile That Hooks You
The first thing you notice when biting into pork carnitas is the textural contrast. Crispy, caramelized edges give way to tender, juicy interior. Your teeth barely have to work. The meat practically melts, releasing all those concentrated flavors.
Citrus brightness hits your palate immediately. The orange and lime have infused the pork with this sunny, fresh quality that prevents the rich meat from feeling heavy. There’s sweetness from the orange balanced by tartness from the lime.
Warm spices create a background of earthy, complex flavor. Cumin brings that distinctive Mexican taste. Chili powder adds gentle warmth and depth. Black pepper contributes a sharp bite. These spices complement the pork without overwhelming it.
Savory, meaty richness from the slow cooked pork is the foundation everything else builds on. Hours of braising concentrate the pork flavor and create that satisfying, almost buttery quality. The fat has rendered and basted everything, creating incredible richness.
Fresh toppings like cilantro, onion, and lime add brightness and crunch that balance the rich meat. Each bite is a combination of textures and temperatures. Crispy pork, soft tortilla, crunchy onion, creamy avocado. It all works together beautifully.
Serving Suggestions Beyond Tacos
Carnitas bowls layer rice, beans, carnitas, and toppings in a bowl for a fork friendly meal. This is perfect for people who don’t want to deal with tortillas or prefer eating with utensils. Add lettuce, cheese, sour cream, and salsa for a complete meal.
Carnitas burritos wrap everything up in a large flour tortilla for a portable meal. Add rice, beans, cheese, and whatever else you like. Roll it tight, grill it on both sides for a crispy exterior, and you’ve got a burrito that rivals any restaurant.
Carnitas nachos turn tortilla chips into an incredible appetizer or meal. Layer chips with carnitas, cheese, jalapeños, and other toppings. Bake until the cheese melts. Top with sour cream, guacamole, and salsa. This is party food that’ll make you a legend.
Carnitas quesadillas combine crispy tortillas with melted cheese and tender pork. Cook them in a skillet until golden brown on both sides. Cut into wedges and serve with sour cream and salsa. Kids especially love these.
Carnitas tortas are Mexican sandwiches on crusty rolls. Spread the roll with refried beans and mayo, add carnitas, avocado, jalapeños, and pickled onions. This is street food perfection between bread.
Serve over rice with beans on the side for a simple, complete meal. This is my go to weeknight dinner when I have leftover carnitas. Add a simple salad and you’ve covered all your bases nutritionally.
Seasonal and Regional Variations
Traditional Michoacán style carnitas are cooked in huge copper pots with lard until incredibly tender, then fried crispy. This method requires special equipment and tons of lard. The slow cooker method approximates this result with way less work and fat.
Yucatán style adds achiote paste and sour orange for a different flavor profile. Achiote brings an earthy, slightly peppery taste and bright orange color. Sour orange, called naranja agria, has a more complex flavor than regular oranges.
Some regions add Mexican Coke to the braising liquid for sweetness and a slight caramel flavor. The sugar caramelizes during cooking and adds depth. A can of Coke per four pounds of pork works well. Real sugar Coke tastes better than corn syrup versions.
Adding cinnamon and cloves creates a more aromatic, warming version perfect for fall and winter. Just a small cinnamon stick and three or four cloves is enough. These warm spices complement the pork beautifully without making it taste like dessert.
Some people add jalapeños or chipotle peppers for heat. This creates spicy carnitas that’ll appeal to people who like things hot. Start with one or two peppers and adjust based on your tolerance.
Understanding Mexican Culinary Tradition
Carnitas originated in Michoacán, Mexico, where they’re a source of regional pride. The word carnitas means “little meats” in Spanish. Traditional preparation involves simmering pork in lard in large copper pots until tender, then increasing the heat to crisp the exterior.
Making carnitas was traditionally a special occasion event, often for celebrations and festivals. The process took all day and required huge amounts of lard. Families would gather to cook together, making it as much about community as food.
Different parts of the pig are used in authentic carnitas. Not just shoulder, but also skin, organs, and other cuts. Each part has its own texture and appeal. In the US, we typically stick to shoulder for convenience and familiarity.
Serving carnitas is usually a casual, family style affair. Big platters of meat, warm tortillas, and various toppings get passed around the table. Everyone builds their own tacos exactly how they like them. This communal style of eating is central to Mexican food culture.
The slow cooker adaptation maintains the spirit of traditional carnitas while making it accessible for home cooks. You lose some authenticity but gain convenience. For most people, this trade off is worth it. The results are still delicious even if they’re not exactly traditional.
Why This Slow Cooker Method Works
The slow cooker creates a moist cooking environment that prevents meat from drying out. As the pork cooks, it releases juices that collect in the bottom. These juices steam, keeping the air inside humid. This humidity prevents moisture from evaporating from the meat’s surface.
Consistent, gentle heat breaks down tough connective tissue without overcooking the meat. Temperature fluctuations can make meat tough and dry. Slow cookers maintain steady heat that’s ideal for transforming collagen into gelatin.
The sealed lid traps volatile flavor compounds that would otherwise evaporate. These aromatic molecules stay in contact with the meat, getting absorbed and creating more complex flavors. Opening the lid releases these compounds, which is why you shouldn’t peek constantly.
Minimal monitoring means you can prep this in the morning and forget about it until dinner. No babysitting required. This makes carnitas accessible even on busy weekdays when you don’t have time for involved cooking.
The method is nearly foolproof. As long as you use pork shoulder and don’t drastically change cooking times, you’ll get good results. The slow cooker’s forgiving nature makes this recipe perfect for less experienced cooks.
Equipment for Better Results
A six to seven quart slow cooker is ideal for four pounds of pork. Smaller sizes work if you reduce the recipe. Larger ones are fine too, though the meat might cook slightly faster because it’s more spread out.
Programmable slow cookers that automatically switch to warm after cooking time ends prevent overcooking if you’re running late. This feature has saved me many times when work ran long or traffic was terrible.
A good sharp knife makes cutting pork shoulder much easier. Dull knives are dangerous because they slip instead of cutting cleanly. Invest in a decent chef’s knife and learn to keep it sharp.
A large baking sheet with raised edges is essential for crisping the carnitas. Flat cookie sheets don’t contain the rendered fat properly. Sheet pans with one inch sides work perfectly.
Tongs make transferring hot pork from slow cooker to baking sheet safer and easier. Long handled tongs keep your hands away from heat. Spring loaded tongs are easier to use than the scissor style.
A slotted spoon helps drain excess liquid when removing pork from the slow cooker. You want the meat itself, not pools of cooking liquid. The slots let liquid drain while keeping solids.
Troubleshooting Carnitas Problems
Dry carnitas usually mean you cooked them too long or used too lean a cut. If you catch it early, add more cooking liquid and continue cooking. If the pork is already done, mix in some of the cooking liquid to add moisture back.
Tough pork means it needs more cooking time. Pork shoulder becomes tender through long, slow cooking. If it’s still tough after eight hours, give it another hour or two. Patience is key with this dish.
Bland carnitas suggest underseasoning before cooking. You can add salt and spices to the shredded meat, but it won’t taste as good as if you’d seasoned properly initially. Learn from the mistake and season more generously next time.
Greasy carnitas happen when you don’t remove excess fat before serving. Skim fat off the cooking liquid and discard obvious chunks of rendered fat. A little fat adds flavor and moisture, but too much is unpleasant.
Mushy carnitas result from overcooking or cutting the meat too small. The pork should be tender but still have some structure. If it’s turned to mush, embrace it and serve as carnitas bowls where texture matters less.
If the cooking liquid is too salty, add more unsalted chicken broth or water. If it’s too bland, simmer it on the stove to reduce and concentrate flavors. This cooking liquid is versatile and can be adjusted.
The Art of Building the Perfect Taco
Start with a warm, soft tortilla as your foundation. Cold, stiff tortillas crack and tear when you try to fold them. Warm tortillas are pliable and taste better. Heat them just before serving for best results.
Add a generous portion of carnitas, but not so much that you can’t fold the taco. About a quarter cup of meat per taco is usually right. The meat should be the main component but leave room for other ingredients.
Layer on your toppings strategically. Cilantro and onion go directly on the hot meat so their flavors bloom from the heat. Avocado or guacamole adds creaminess. A squeeze of lime brightens everything. Salsa adds moisture and more flavor.
Don’t overstuff the taco. More isn’t always better. You should be able to fold the tortilla and take a bite without everything falling out. Overstuffed tacos are messy and frustrating to eat.
Eat tacos with your hands. That’s how they’re meant to be enjoyed. Have plenty of napkins available because good tacos are always a little messy. The mess is part of the experience.
Drink Pairings That Work
Mexican beer is the obvious choice and pairs beautifully with carnitas. Light lagers like Corona or Modelo are refreshing and won’t overwhelm the food. The crisp, clean flavor cleanses your palate between bites.
Margaritas are traditional and delicious with carnitas. The lime and tequila complement the citrus in the pork. Keep them simple with just tequila, lime juice, and a touch of orange liqueur. Frozen or on the rocks, both work.
Horchata provides a sweet, creamy non alcoholic option. This Mexican rice drink flavored with cinnamon is refreshing and balances the savory, spicy pork. The sweetness cools your palate if you’ve added hot sauce.
Fresh limeade or agua fresca offers fruity refreshment. These Mexican fruit drinks are light and not too sweet. Watermelon, cucumber, or hibiscus flavors all pair well with carnitas.
For wine lovers, a dry rosé has enough acidity and fruit to work with carnitas. The slight chill is refreshing and the wine won’t compete with the bold flavors. Spanish rosé is particularly good.
Even plain sparkling water with lime works perfectly. Sometimes simple hydration is all you need. The bubbles cleanse your palate and the lime ties in with the citrus in the pork.
Making Carnitas Kid Friendly
Most kids love carnitas because the tender meat is easy to chew and not too spicy. The mild seasoning appeals to developing palates. You can always reduce the spices even more if you have particularly picky eaters.
Serve deconstructed with toppings on the side. Let kids build their own tacos with only ingredients they like. This gives them control and makes them more likely to try new things.
Cut the meat into smaller pieces for young children who are still developing their chewing skills. Safety first, especially with meat that might be a choking hazard for toddlers.
Make carnitas quesadillas for kids who prefer melted cheese with everything. The familiar format of a grilled cheese style quesadilla makes the new ingredient less intimidating.
Let kids help with age appropriate tasks like squeezing limes or mixing spices. Children are more excited to eat food they helped prepare. Even small tasks give them ownership.
Final Thoughts on Perfect Carnitas
After making pork carnitas countless times, I’ve learned that the magic is in the method as much as the ingredients. Low, slow cooking transforms tough pork shoulder into something transcendent. The active cooking time is minimal but the wait is absolutely worth it.
This has become my signature dish for gatherings because it feeds a crowd effortlessly and everyone loves it. Vegetarians can load up on beans and rice while everyone else enjoys the carnitas. The build your own taco format makes it perfect for groups.
The leftovers are arguably better than the first serving. Something about sitting overnight lets flavors deepen and meld. I actually prefer day two carnitas, which is rare for me because I usually think fresh is best.
What makes this recipe truly special is its versatility. Tacos tonight, burritos tomorrow, nachos the next day. The same batch of meat transforms into completely different meals. This keeps meal prep from getting boring.
Making carnitas at home costs a fraction of restaurant prices and tastes better. You control the quality of ingredients and seasoning levels. Plus, your house smells absolutely incredible while it cooks. That aroma alone is worth making this dish.
So dust off that slow cooker and grab some pork shoulder. In eight hours, you’ll have carnitas that rival any taqueria. Your kitchen will smell like a Mexican restaurant and your family will think you’ve been secretly attending culinary school. That’s the kind of cooking win we all need.
This recipe features pork shoulder cooked low and slow with spices such as cumin, garlic, and lime juice, resulting in juicy, shredded meat. The cooking process takes about 8 hours on low heat and serves approximately 6 people.


