

The beauty of this ingredient list is its accessibility. You can find everything at any grocery store, and most of these items have a long shelf life, so you can stock up when they're on sale. Pro tip: buy the good vanilla pudding mix because it really does make a difference in the final flavor.
- Prepare the Pudding
In a large bowl, whisk together the instant vanilla pudding mix and milk until smooth. Let it sit for about 5 minutes to thicken.
- Fold in Whipped Topping
Gently fold the thawed whipped topping into the pudding mixture until well combined.
- Layer the Cake
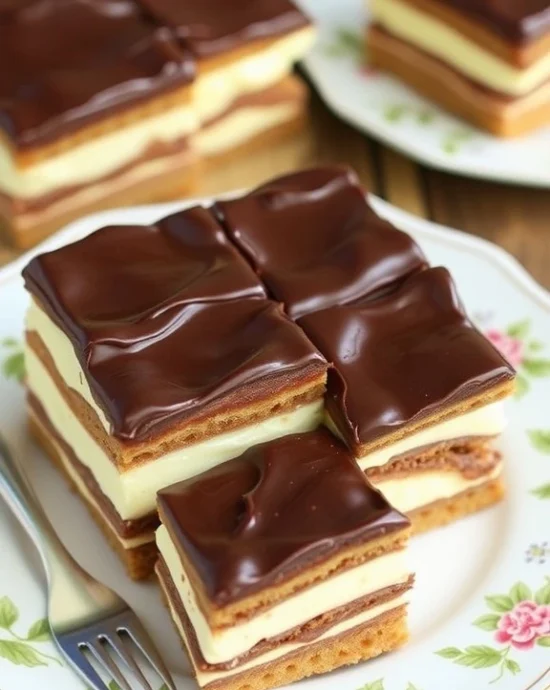
In a 9x13 inch baking dish, place a layer of graham crackers on the bottom. Spread half of the pudding mixture over the crackers. Repeat with another layer of graham crackers and the remaining pudding mixture. Top with a final layer of graham crackers.
- Make the Chocolate Frosting
In a separate bowl, beat together the softened butter, cocoa powder, powdered sugar, and vanilla extract. Gradually add milk until you reach a smooth and spreadable consistency.
- Frost the Cake
Spread the chocolate frosting evenly over the top layer of graham crackers.
- Chill
Cover the dish with plastic wrap and refrigerate for at least 4 hours, or overnight for best results. This allows the graham crackers to soften and the flavors to meld.
- Serve
Cut into squares and serve chilled. Enjoy your delicious chocolate eclair cake!
- Calories:320 kcals
- Fat:15 grams
- Proteins:3grams%
- Carbohydrates:45 grams
Picture this: you need a showstopper dessert, but your oven is broken, your baking skills are questionable, and you’ve got about fifteen minutes to spare. Enter the chocolate eclair cake, a dessert so brilliant in its simplicity that it practically makes itself. This no-bake wonder transforms humble graham crackers into something that tastes like it came from a fancy French patisserie.
Trust me, I’ve served this at dinner parties where guests have literally asked me which bakery I bought it from. The secret? Layers of creamy vanilla pudding, fluffy whipped topping, and graham crackers that magically transform into cake-like perfection after a night in the fridge. Plus, that glossy chocolate frosting on top makes it look like you spent hours crafting edible art.
Best part? You probably have most of these ingredients sitting in your pantry right now, judging you for not making this sooner.
Why This Recipe is Awesome
Let’s be real about why chocolate eclair cake deserves a permanent spot in your dessert rotation. First off, it’s foolproof in the most literal sense, even if you’re the type of person who can burn water (we’ve all been there). You could make this with your eyes closed, one hand tied behind your back, while simultaneously arguing with your teenager about their questionable music choices.
The genius lies in the transformation that happens overnight. Those boring graham crackers absorb moisture from the pudding and whipped topping, softening into something that mimics actual cake layers. It’s like culinary alchemy, except instead of turning lead into gold, you’re turning crackers into cake magic. Science has never tasted so good.
What really gets me excited about this dessert is how it scales beautifully for any occasion. Making it for two? Use a smaller dish and cut the recipe in half. Feeding an army? Double everything and use a massive pan. The proportions stay perfectly balanced, and you’ll still get those gorgeous, Instagram-worthy layers every single time.
The texture combination is absolutely divine, with creamy, smooth pudding contrasting against the now-tender graham crackers, all topped with rich, velvety chocolate frosting. Each bite delivers multiple textures and flavors that dance together like they were meant to be. Honestly, whoever invented this deserves some kind of dessert hall of fame award.
The Story Behind Chocolate Eclair Cake
This delightful dessert has its roots firmly planted in American comfort food tradition, specifically emerging from the Midwest where practical cooking meets serious sweet tooth satisfaction. The recipe gained popularity during the 1970s and 1980s when no-bake desserts were having their moment, mainly because busy families needed impressive desserts that didn’t require turning on the oven during sweltering summer months.
Origins of a Classic
The chocolate eclair cake belongs to the family of “icebox cakes,” which became popular in the early 20th century when home refrigeration became more common. These desserts were revolutionary because they required zero baking skills but delivered maximum impact. Smart home cooks realized they could layer simple ingredients and let time do the heavy lifting.
I first encountered this cake at my neighbor’s potluck barbecue about fifteen years ago. Mrs. Henderson, who was known for her legendary desserts, brought what she called her “cheater’s eclair cake.” One bite had me frantically scribbling down the recipe on a napkin because I needed this magic in my life immediately. She laughed and told me it was her mother’s recipe from the 1960s, passed down through generations of women who understood that sometimes the simplest solutions are the most brilliant.
Cultural Impact and Evolution
What’s fascinating about this recipe is how it reflects American ingenuity in the kitchen. During post-war America, convenience foods were becoming mainstream, and creative home cooks figured out how to transform these products into something special. The chocolate eclair cake represents this perfectly, taking instant pudding mix, packaged graham crackers, and frozen whipped topping to create something that tastes homemade and sophisticated.
The recipe has evolved over the decades, with some versions using homemade pudding (if you’re feeling fancy), others incorporating cream cheese for extra richness, and some adventurous bakers adding layers of fresh fruit. Regional variations exist too, with Southern cooks sometimes adding a layer of banana pudding, and West Coast versions incorporating different flavor combinations.
Personal Connection and Mastery
Over the years, I’ve made this cake countless times, tweaking and perfecting my technique. I’ve served it at birthday parties, holiday gatherings, church potlucks, and random Tuesday dinners when I needed something sweet to lift everyone’s spirits. Each time, I’m reminded of why this dessert has endured for decades, it’s reliable, delicious, and makes people genuinely happy.
My kids now request this cake for their birthdays instead of traditional layer cakes, which initially wounded my baking pride but eventually made me appreciate the wisdom of choosing quality over complexity. Sometimes the best recipes are the ones that bring people together without causing the cook to have a nervous breakdown in the process.
Essential Equipment & Kitchen Tips
Must-Have Equipment
The equipment needed for this cake is refreshingly minimal. You’ll need a 9×13 inch baking dish (glass or ceramic works best for even chilling), a large mixing bowl, a whisk, and measuring cups. That’s literally it. No stand mixer, no special pans, no fancy gadgets that cost more than your monthly coffee budget.
A good whisk is crucial for getting that pudding perfectly smooth without lumps. I prefer a balloon whisk because it incorporates air better, but honestly, any whisk will work. If you’re making homemade frosting, an electric mixer will save your arm muscles, but you can absolutely do it by hand if you’re feeling like you need a workout.
Professional Tips for Success
The key to perfect layers lies in your assembly technique. Use a large spoon or offset spatula to spread the pudding mixture evenly, working from the center outward. Don’t worry if you break a few graham crackers during assembly, they’ll be covered with pudding and no one will ever know about your minor mishaps.
Temperature matters more than you might think. Make sure your milk is properly cold when mixing the pudding, this helps it set up correctly. Room temperature milk will give you a runnier consistency that won’t hold the layers as well. Similarly, ensure your whipped topping is fully thawed but still cold, it should be spreadable but not melty.
Alternative Equipment Options
Don’t have a 9×13 pan? No problem. You can use two 8×8 square pans, a large glass bowl for a trifle-style presentation, or even individual serving glasses for elegant personal desserts. The cooking time stays the same, you just adjust your serving sizes accordingly.
If you’re making this for a crowd, consider using a half-sheet pan lined with parchment paper. You’ll need to increase the recipe by about 50%, but you’ll have enough dessert to feed an army. Just make sure your refrigerator has enough space because this needs proper chilling time to reach its full potential.
Pro Chef Secrets & Advanced Techniques
The Science Behind the Magic
Understanding why this cake works helps you achieve consistent results every time. The graham crackers absorb moisture from the pudding layers through a process called osmosis, which gradually softens their texture. This transformation takes time, which is why the overnight chilling period isn’t optional, it’s absolutely crucial for achieving that cake-like consistency.
The key to professional-looking layers is patience during assembly. Take your time spreading each layer evenly, and don’t rush the process. Uneven layers will show in your final product, and while it’ll still taste amazing, you want those Instagram-worthy cross-sections that make people gasp when you cut the first slice.
Temperature control throughout the process ensures optimal texture. Keep everything cold but not frozen, and maintain consistent refrigerator temperature during the chilling period. Fluctuating temperatures can cause the pudding to weep or the crackers to soften unevenly, affecting your final results.
Advanced Flavor Development
For deeper chocolate flavor in your frosting, try using Dutch-processed cocoa powder instead of regular cocoa. It has a richer, more complex flavor profile that elevates the entire dessert. You can also add a tablespoon of instant coffee granules to the frosting for a subtle mocha undertone that pairs beautifully with the vanilla pudding.
Consider blooming your cocoa powder by whisking it with a small amount of hot milk before adding it to the frosting mixture. This technique, borrowed from professional baking, intensifies the chocolate flavor and creates a smoother texture in your finished frosting.
Texture Perfection Techniques
The secret to achieving uniform cake-like texture lies in your graham cracker arrangement. Overlap the crackers slightly rather than leaving gaps, this prevents pudding from seeping through and creating uneven layers. Some bakers lightly brush the crackers with milk before layering, which speeds up the softening process and creates more uniform texture.
Professional pastry chefs often score their graham crackers lightly with a knife before assembling, creating small channels that help the moisture distribute more evenly. This technique isn’t necessary, but it can improve your final texture consistency if you’re aiming for absolute perfection.
Presentation Excellence
For restaurant-quality presentation, warm your knife slightly before cutting each slice. A warm knife cuts through the layers more cleanly, preventing the crackers from cracking or the pudding from smearing. Wipe the knife clean between cuts to maintain sharp, professional-looking edges on each piece.
Consider chilling individual serving plates before plating, this helps maintain the cake’s structure and prevents the pudding from softening too quickly at room temperature. Small details like this separate good home cooks from great ones.
Common Mistakes to Avoid
The Pudding Pitfalls
Thinking you can skip the thickening time is rookie mistake number one. That five-minute rest period isn’t a suggestion, it’s chemistry in action. Without proper thickening, your pudding will be too thin to support the layers, resulting in a soggy mess instead of structured perfection. Trust the process and let that pudding do its thing.
Using warm milk is another common error that’ll haunt your dessert dreams. Cold milk is essential for proper pudding formation, warm milk creates a thin, runny mixture that never quite sets up correctly. Keep that milk properly chilled, and your pudding will thank you with perfect consistency.
Assembly Anxieties
Overmixing the pudding and whipped topping combination deflates all that lovely airiness you want in your finished cake. Fold gently with a rubber spatula, not a whisk, and stop as soon as everything is combined. Think of it like folding laundry, gentle motions that preserve the structure rather than aggressive mixing that destroys it.
Leaving gaps between graham crackers seems harmless but creates structural weaknesses in your finished cake. Those gaps allow pudding to seep through, creating uneven layers and making clean cuts nearly impossible. Fit those crackers together like pieces of a delicious puzzle.
Timing Troubles
Trying to serve this cake too early is like opening your Christmas presents in November, technically possible but completely missing the point. The overnight chilling period allows the magic transformation to occur. Serve it too early, and you’ll have crunchy crackers swimming in pudding instead of cake-like layers that slice beautifully.
Conversely, leaving it in the refrigerator for more than three days starts working against you. The crackers can become too soft and lose their structural integrity, creating a mushy texture that’s still tasty but lacks the perfect balance you’re aiming for.
Frosting Fiascos
Making your chocolate frosting too thin turns your beautiful top layer into a drippy mess that slides off the sides. Start with less liquid and add gradually until you achieve the perfect spreading consistency. It should hold its shape but spread easily without tearing the crackers underneath.
On the flip side, frosting that’s too thick will tear your graham crackers when you try to spread it. Nobody wants cracker crumbs in their smooth chocolate topping. Find that sweet spot where the frosting glides on smoothly but doesn’t run off the edges.
Alternatives & Substitutions
Dietary Adaptations Made Simple
Creating a gluten-free version is totally doable with the right cracker substitutions. Look for gluten-free graham crackers, or try using vanilla wafers for a different but equally delicious texture. Some bakers swear by using gluten-free ladyfinger cookies, which create an even more authentic eclair-like experience.
For our dairy-free friends, this cake adapts beautifully with plant-based alternatives. Use coconut or almond milk for the pudding, dairy-free whipped topping, and ensure your graham crackers are dairy-free (many brands actually are, but always check). The texture remains remarkably similar to the original version.
Sugar-conscious bakers can substitute sugar-free pudding mix and reduced-sugar whipped topping without dramatically affecting the final result. The crackers still soften properly, and you’ll save significant calories without sacrificing much flavor. Just be aware that sugar-free versions may have slightly different setting properties.
Flavor Profile Variations
Swapping vanilla pudding for different flavors opens up endless possibilities. Chocolate pudding creates a double-chocolate experience that’s absolutely divine, while butterscotch pudding adds caramel notes that complement the graham crackers beautifully. White chocolate pudding creates an elegant, sophisticated flavor profile that’s perfect for special occasions.
French vanilla pudding offers a more complex vanilla flavor with subtle custard notes, while banana pudding brings tropical vibes to your dessert table. Pistachio pudding might sound weird, but it creates a surprisingly sophisticated dessert that’s perfect for adventurous palates.
Creative Cracker Alternatives
While graham crackers are traditional, experimenting with different bases can yield exciting results. Vanilla wafers create a more delicate texture, while chocolate graham crackers intensify the chocolate experience. Shortbread cookies add buttery richness, though they take longer to soften properly.
For a more adult-oriented dessert, try using gingersnap cookies for warm spice notes, or amaretti cookies for an almond-flavored twist. Each alternative changes the character of the dessert while maintaining the basic structure and preparation method.
Ingredient Quality Upgrades
Upgrading to premium vanilla extract instead of imitation vanilla makes a noticeable difference in flavor depth. Similarly, using high-quality cocoa powder for your frosting elevates the entire dessert. These small improvements in ingredient quality create big improvements in final flavor.
Consider making homemade whipped cream instead of using frozen whipped topping for a more natural, less processed final product. The extra effort is minimal, but the improvement in taste and texture is significant. Just make sure it’s properly stabilized to maintain structure during the chilling period.
Flavor Variations & Creative Twists
Seasonal Adaptations
Transform this classic into a summer sensation by adding fresh berry layers between the pudding and crackers. Strawberries work beautifully, as do raspberries or blueberries. The fruit adds natural sweetness and gorgeous color contrast that makes each slice look like edible art.
Fall versions can incorporate pumpkin pudding with gingersnap cookies, creating an autumn-themed dessert that’s perfect for Thanksgiving or Halloween gatherings. Add a sprinkle of cinnamon to the frosting for extra seasonal warmth that’ll make your kitchen smell like happiness.
Winter variations might include peppermint extract in the pudding or frosting, creating a refreshing contrast to rich holiday meals. Crushed candy canes on top add festive color and delightful crunch that both kids and adults absolutely love.
International Inspiration
Create an Italian-inspired version using espresso-flavored pudding and ladyfinger cookies, essentially turning your cake into a simplified tiramisu. Add a touch of coffee liqueur to the pudding for authentic flavor depth that’ll transport you straight to a Roman café.
French variations might incorporate lavender extract for sophisticated floral notes, or use coconut pudding with vanilla wafers for tropical vibes that feel like a Caribbean vacation. Each international twist maintains the easy preparation while delivering completely different flavor experiences.
Decadent Upgrades
For special occasions, consider adding thin layers of Nutella between the crackers and pudding. The hazelnut-chocolate spread adds richness and complexity that transforms this simple dessert into something truly luxurious. Just warm it slightly for easier spreading.
Caramel sauce drizzled between layers creates a salted caramel experience that’s absolutely divine. Use store-bought for convenience, or make homemade for maximum flavor impact. Either way, your guests will think you’ve spent hours crafting this masterpiece.
Another indulgent variation involves adding crushed cookies to the pudding mixture, creating additional texture and flavor complexity. Oreos work wonderfully, as do chocolate chip cookies or even crushed candy bars for ultimate decadence.
Serving Suggestions & Pairings
Perfect Occasions
This cake shines brightest at casual gatherings where you want impressive results without kitchen stress. Potluck dinners, backyard barbecues, and family reunions are perfect venues because the cake travels well and serves a crowd beautifully. Plus, it actually improves during transport as the layers continue melding together.
Birthday parties benefit from this cake’s universal appeal, kids love the familiar flavors while adults appreciate the nostalgic comfort food vibes. It’s sophisticated enough for adult celebrations but approachable enough that even picky eaters will dive in enthusiastically.
Beverage Pairings
Coffee pairs naturally with chocolate eclair cake, the bitter notes balancing the sweet, creamy layers perfectly. Try serving with freshly brewed French roast or a rich espresso for an authentic café experience. Cold brew coffee works beautifully too, especially during warmer months.
For non-coffee drinkers, cold milk remains the classic pairing that never goes out of style. The cool, creamy milk cleanses the palate between bites, allowing you to fully appreciate each layer’s distinct flavor contribution.
Wine enthusiasts might enjoy pairing this dessert with a sweet dessert wine like Moscato or a rich Port. The wine’s acidity cuts through the richness while complementing the chocolate flavors beautifully. Just remember that a little goes a long way with these pairings.
Presentation Ideas
Individual serving glasses create elegant presentations perfect for dinner parties or romantic dinners. Layer the components in clear glasses to showcase the beautiful striations, creating a restaurant-quality dessert presentation that looks incredibly sophisticated.
For casual family meals, serve directly from the pan with a large serving spoon, allowing everyone to dig in family-style. This approach embraces the comfort food nature of the dessert while encouraging seconds (and thirds) without any guilt.
Special occasions might call for garnishing each slice with fresh berries, a dollop of whipped cream, or a drizzle of chocolate sauce. These small additions elevate the presentation while maintaining the dessert’s approachable, homestyle character.
Storage & Reheating Guide
Refrigerator Storage Best Practices
Proper storage keeps your chocolate eclair cake at peak quality for up to four days, though honestly, it rarely lasts that long before disappearing completely. Cover the entire pan tightly with plastic wrap, ensuring no air gaps that could cause the frosting to form a skin or the pudding to develop an off-flavor.
Individual slices can be stored in airtight containers, making them perfect for grab-and-go treats throughout the week. Layer parchment paper between slices to prevent them from sticking together, maintaining that beautiful presentation you worked so hard to achieve.
Temperature Maintenance Tips
This dessert is meant to be served cold, so resist the temptation to let it come to room temperature before serving. The chilled temperature maintains the structural integrity of the layers while providing that refreshing contrast between cool, creamy filling and rich chocolate frosting.
If you’re transporting the cake, use a insulated cooler with ice packs to maintain proper temperature. The cake can sit at room temperature for about two hours maximum before the pudding starts losing its structure and becoming unsafe to consume.
Freezing Guidelines
While not traditional, chocolate eclair cake can be frozen for up to one month if properly wrapped. Wrap individual slices in plastic wrap, then aluminum foil, then place in freezer-safe containers. This triple protection prevents freezer burn and maintains flavor quality during storage.
Thaw frozen slices in the refrigerator overnight for best texture results. Never thaw at room temperature or in the microwave, as this can cause the pudding layers to separate or become watery. Patience during thawing ensures you maintain that perfect cake-like consistency.
Nutritional Benefits & Health Notes
Understanding the Nutritional Profile
Each serving of chocolate eclair cake contains approximately 320 calories, 15 grams of fat, 3 grams of protein, and 45 grams of carbohydrates. While this isn’t exactly health food, understanding the nutritional content helps you make informed decisions about portion sizes and frequency of enjoyment.
The calcium content from the milk and dairy components provides some nutritional benefit, supporting bone health and muscle function. The pudding also contains some protein, though this dessert is definitely more about pleasure than nutrition, and that’s perfectly okay.
Mindful Indulgence Strategies
Portion control becomes easier when you cut the cake into smaller squares, allowing you to satisfy your sweet tooth without overindulging. The rich, satisfying nature of this dessert means a smaller portion often feels more satisfying than larger portions of less indulgent treats.
Consider serving this cake alongside fresh fruit or a light salad to add nutritional balance to your meal. The contrast between the rich dessert and fresh, light accompaniments creates a more balanced eating experience overall.
Ingredient Quality Considerations
Using organic dairy products when possible reduces your exposure to hormones and antibiotics while supporting more sustainable farming practices. Similarly, choosing pudding mixes with fewer artificial ingredients, though they cost slightly more, can improve both flavor and nutritional quality.
The graham crackers provide some whole grain benefits, though minimal. Look for brands made with whole wheat flour for slightly better nutritional content, or consider making your own graham crackers if you’re feeling particularly ambitious and health-conscious.
FAQ (Frequently Asked Questions)
Can I make this cake ahead of time? Absolutely! In fact, this cake actually improves with time as the flavors meld and the crackers continue softening. Make it up to two days ahead for optimal results, any longer and you risk over-softening.
What happens if I use regular pudding instead of instant? Regular pudding requires cooking and cooling time, which complicates the process significantly. Stick with instant pudding for foolproof results and the convenience that makes this recipe so appealing in the first place.
Can I use homemade whipped cream instead of Cool Whip? Sure, but stabilize it properly with a bit of gelatin or cornstarch to prevent deflation during the long chilling period. Unstabilized whipped cream will weep and affect your cake’s texture negatively.
Why are my graham crackers still crunchy after overnight chilling? This usually means your pudding mixture was too thin or you didn’t use enough of it between layers. The crackers need adequate moisture to soften properly, so ensure you’re spreading the pudding mixture generously.
Can I double this recipe for a larger crowd? Absolutely! Use a half-sheet pan or two 9×13 pans, and increase all ingredients proportionally. The chilling time remains the same, but you’ll have enough dessert to feed a small army of grateful cake lovers.
What’s the best way to get clean slices? Use a sharp knife warmed in hot water, wiping it clean between each cut. This prevents the layers from dragging and creates those perfect, Instagram-worthy slices that show off all your beautiful layers.
Can I add fruit to this recipe? Fresh berries work wonderfully between layers, but avoid high-water content fruits like watermelon that could make the cake soggy. Strawberries, raspberries, and blueberries are perfect choices that complement the vanilla and chocolate flavors beautifully.
Is it safe to leave this cake out during a party? Two hours maximum at room temperature is the safety limit for dairy-based desserts. After that, bacteria growth becomes a concern, so keep it refrigerated and only bring out portions as needed during your gathering.
Can I make individual servings instead of one large cake? Absolutely! Use glasses, small bowls, or ramekins to create elegant individual presentations. The layering technique remains the same, just scaled down to single-serving size for sophisticated presentation.
What should I do if my frosting is too thin or thick? Too thin? Add more powdered sugar gradually until you reach the right consistency. Too thick? Add milk one tablespoon at a time until it spreads easily but doesn’t run off the sides of your cake.
Troubleshooting Guide
Texture Problems and Solutions
When your finished cake turns out soggy instead of having distinct layers, the culprit is usually too much liquid in your pudding mixture or insufficient chilling time. Next time, make sure your pudding has properly thickened before folding in the whipped topping, and always allow for full overnight chilling.
Overly firm or dry texture typically results from using too little pudding mixture between layers or storing the cake too long. The graham crackers need adequate moisture to transform properly, so be generous with your pudding layers and consume within the recommended time frame.
Appearance Issues
Cracked or broken graham crackers in your finished cake usually happen during assembly or cutting. Handle crackers gently during layering, and always use a sharp, clean knife for serving. Minor cracks disappear under the pudding layers, so don’t stress too much about perfection during assembly.
Uneven layers create an unprofessional appearance but don’t affect taste significantly. Take time during assembly to spread each layer evenly, using an offset spatula if you have one. Even spreading creates those gorgeous cross-sections that make people think you’re a dessert wizard.
Frosting Frustrations
Frosting that won’t spread smoothly usually indicates it’s either too cold (if homemade) or the wrong consistency. Let homemade frosting come to proper spreading temperature, or adjust the liquid content until it glides on easily without tearing the crackers underneath.
Frosting that slides off the cake edges is too thin and needs more powdered sugar to thicken it up. Add sugar gradually until you achieve the perfect balance between spreadable and stable. Nobody wants their beautiful chocolate topping pooling around the edges of the pan.
Flavor Balance Problems
Overly sweet results often come from using regular whipped topping when the recipe calls for lite versions, or from adding extra sugar to homemade components. This dessert walks a fine line between indulgent and cloying, so stick to the recipe proportions for optimal balance.
Bland or flat flavors usually indicate you’ve skimped on vanilla extract or used imitation vanilla instead of pure extract. Quality vanilla makes a significant difference in desserts with simple flavor profiles like this one, so invest in the good stuff.
Final Thoughts
There’s something deeply satisfying about creating a dessert that looks incredibly impressive but requires zero advanced baking skills. This chocolate eclair cake represents everything I love about comfort food cooking, it’s approachable, reliable, and guaranteed to make people happy. You don’t need fancy equipment, exotic ingredients, or years of culinary training to pull this off perfectly.
What makes this recipe truly special is how it brings people together around the dessert table. I’ve watched shy kids at birthday parties bond over second helpings, seen grandparents’ faces light up with nostalgia, and witnessed grown adults literally fight over the last slice (in a loving way, of course). Food that creates those kinds of connections is precious and worth preserving.
The beauty of mastering this cake lies not just in the final product, but in the confidence it builds in the kitchen. Once you realize you can create something this delicious with such simple techniques, it opens doors to exploring other no-bake desserts and building your repertoire of reliable crowd-pleasers.
Remember, cooking should be fun, not stressful. This chocolate eclair cake embodies that philosophy perfectly, offering maximum reward for minimal effort. So gather your ingredients, embrace the simplicity, and prepare to become someone’s hero at the next potluck.
Now go impress someone (or yourself) with your new culinary skills. You’ve earned it, and more importantly, you deserve every single delicious bite of your homemade masterpiece.


