- Making the Patties
Start by taking your ground beef out of the fridge about 15 minutes before you plan to work with it. Cold meat is harder to shape and more likely to get overworked. Place it in a large mixing bowl and resist every urge to start squishing it immediately.
Add your kosher salt, black pepper, and garlic powder directly to the meat. Drizzle the Worcestershire sauce over everything. Now here's where people mess up: they treat the meat like it's bread dough and knead it for five minutes. Don't do this. Use your hands to gently mix everything together, folding and turning just until the seasonings are distributed. The whole process should take maybe 30 seconds.
Divide the meat into four equal portions. Each should be about 8 ounces. Form each portion into a ball first, then gently press it into a patty about 3/4 inch thick. Make the edges slightly thicker than the center because burgers puff up as they cook.
Here's a game changing tip: use your thumb to press a shallow dimple into the center of each patty. This prevents the dreaded burger dome and keeps your patty flat as it cooks. The dimple should be about half an inch deep and two inches wide.
- Cooking Your Burgers
Preheat your grill or cast iron skillet over medium high heat. You want it hot enough that a drop of water sizzles immediately but not so hot that it smokes like crazy. If you're using a skillet, don't add any oil. The fat in the burgers will render out and that's all you need.
Place your patties on the cooking surface and walk away. Seriously, just leave them alone. No pressing, no poking, no constantly checking. Let them cook undisturbed for 4 minutes. During this time, a beautiful crust is forming on the bottom that's packed with flavor.
After 4 minutes, flip the burgers once. Only once. Use a sturdy spatula and flip with confidence. Cook for another 3 to 4 minutes depending on your desired doneness. For medium burgers, aim for an internal temperature of 145°F. Medium well should hit 155°F.
If you're adding cheese, place a slice on each patty about 1 minute before they're done cooking. Cover the pan or close the grill lid to help the cheese melt evenly. The steam created will give you that perfectly gooey cheese situation.
- Toasting the Buns
While your burgers rest (yes, burgers need to rest too), split your buns and place them cut side down on the grill or in a clean skillet. Toast them for about 1 minute until they're golden brown. This step prevents soggy buns and adds a nice textural contrast.
- Assembly Time
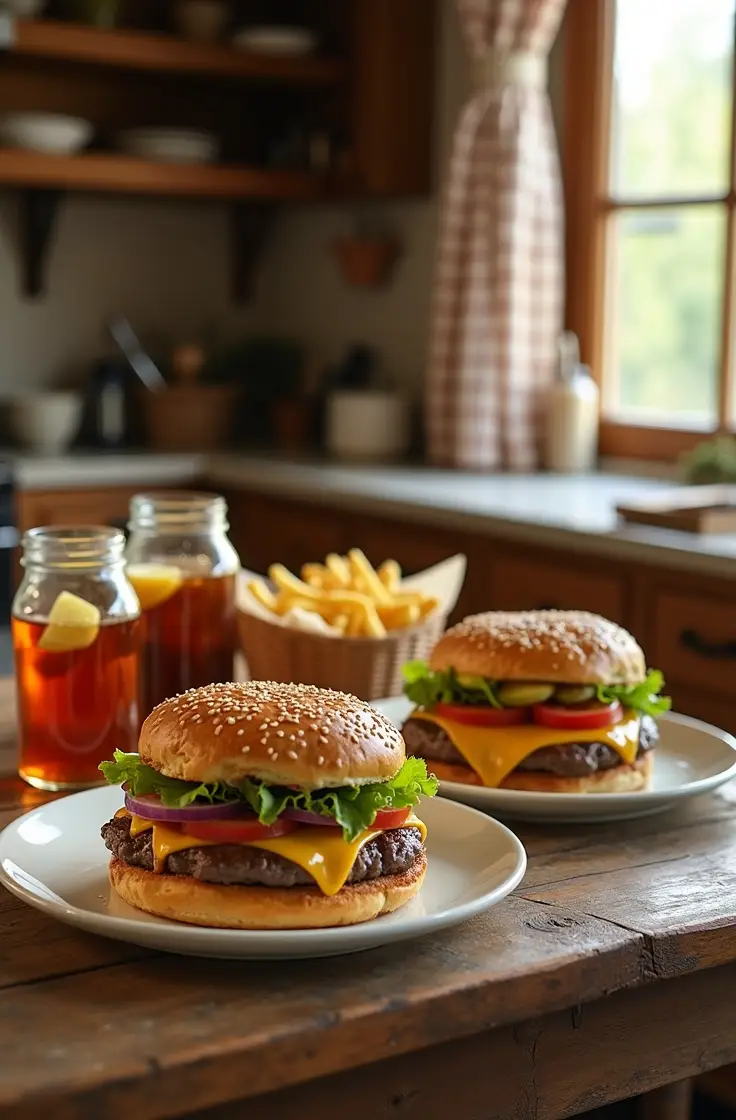
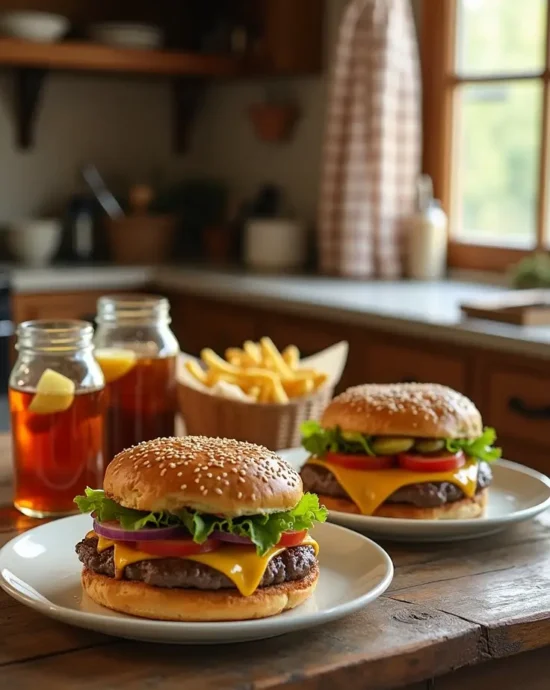
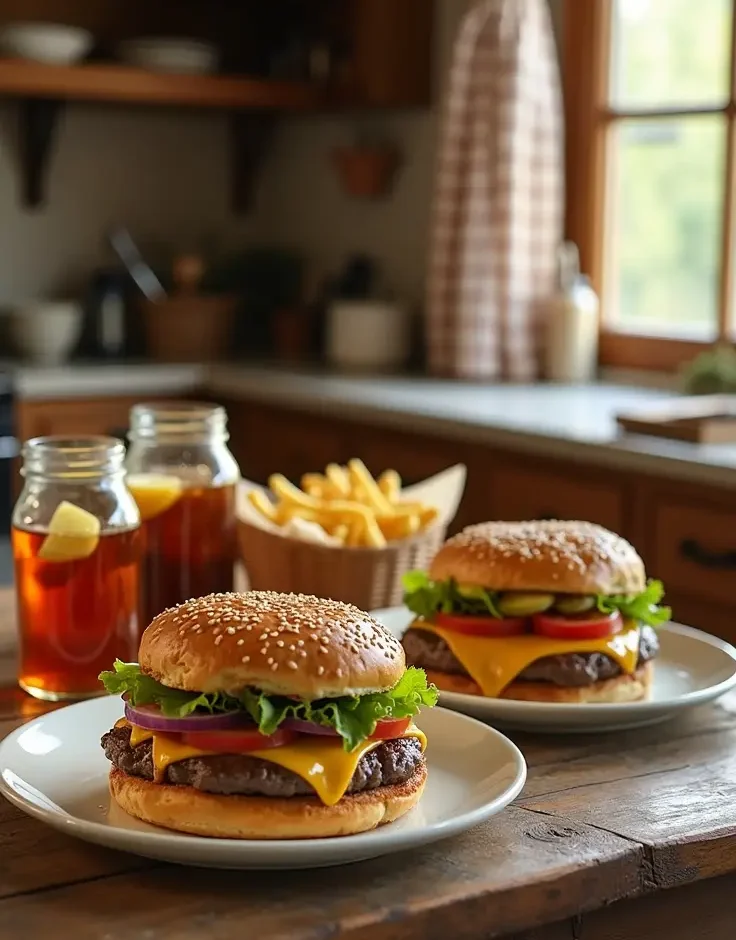
Spread your chosen condiments on both sides of each bun. Start building from the bottom: place the patty directly on the bottom bun, then add your cheese laden glory. Layer on the lettuce, tomato slices, onions, and pickles. Top with the other half of the bun and press down gently.
- Calories:645 kcal
- Fat:38 grams
- Proteins:42 grams
- Carbohydrates:32 grams
I’ll never forget the first time I realized store bought burgers were lying to me. It was a random Tuesday evening, and I’d just bitten into what I thought would be another forgettable dinner. But this homemade hamburger, this glorious creation I’d made from scratch, changed everything. The juice ran down my chin in the most undignified way possible. My kitchen smelled like a high end steakhouse. That moment taught me something crucial: homemade hamburgers aren’t just food, they’re an experience.
Here’s the thing about making burgers at home. Most people think it’s complicated or that you need fancy equipment. Wrong on both counts. What you actually need is good meat, a gentle hand, and the willingness to leave things alone while they cook. I’ve spent years perfecting my homemade hamburger technique, testing different meat blends and cooking methods until my family started requesting burger night three times a week.
This particular version strikes the perfect balance between juicy and flavorful without being overly complicated. No exotic ingredients or weird techniques. Just pure, unadulterated burger goodness that’ll make you wonder why you ever bought those sad frozen patties. The secret isn’t in doing more, it’s in doing less but doing it right.
The Secret to Juicy Perfection
Temperature control separates good burgers from legendary ones. I resisted buying a meat thermometer for years because I thought I could tell doneness by touch. I was wrong, and I made a lot of dry burgers before admitting it. A good instant read thermometer costs about fifteen dollars and will change your burger game forever.
Room temperature meat cooks more evenly than cold meat straight from the fridge. This isn’t just food safety theater, it’s science. When the outside of a cold patty hits a hot surface, the interior stays cold longer. This means you end up overcooking the outside while trying to cook the inside, resulting in a dry, tough exterior and an underdone center.
The single flip rule exists for a reason. Every time you flip a burger, you lose some of those precious juices. You also prevent that gorgeous crust from forming properly. I know it’s tempting to fiddle with your food, but restraint is key here. Set a timer if you have to.
Never, ever press down on your burgers with a spatula while they’re cooking. I see people do this at every backyard barbecue and it makes me want to cry. When you press down, all those flavorful juices that should stay in the meat squirt out onto the cooking surface. You’re literally squeezing the flavor out of your burger.
Resting isn’t just for fancy steaks. After you take your burgers off the heat, let them sit for 2 to 3 minutes before assembling. This allows the juices to redistribute throughout the meat instead of running out the second you bite in. I usually toast my buns during this resting period to maximize efficiency.
What Makes This Version Special
My homemade hamburger recipe stands out because of its simplicity. I’ve tried versions with breadcrumbs, eggs, diced onions, and seventeen different spices. They all tasted fine, but they didn’t taste like pure burger. When you start adding fillers and binders, you’re making meatloaf on a bun, not a hamburger.
The minimal seasoning approach lets the beef shine. Good quality meat doesn’t need to be masked with a bunch of extras. Salt, pepper, and a touch of garlic powder enhance rather than overwhelm. That splash of Worcestershire adds complexity without announcing itself. This is what makes a homemade hamburger so much better than frozen patties.
I’ve tested this recipe with different fat ratios, and 80/20 consistently produces the best results for homemade hamburgers. Leaner beef makes dry burgers that lack flavor. Fattier blends (like 70/30) can be too greasy and cause flare ups if you’re grilling. The 80/20 ratio is the sweet spot where you get maximum flavor and juiciness without excess grease.
My Testing Journey
Creating the perfect homemade hamburger took more attempts than I’d like to admit. My first attempts at making burgers from scratch were dense hockey pucks that could probably stop a bullet. I’d mixed the meat way too much and packed the patties too tightly. They were essentially beef leather.
Then I went through a phase where I added everything but the kitchen sink to my burger meat. Breadcrumbs, eggs, onions, peppers, three types of cheese mixed in. They tasted okay but fell apart on the grill. I realized I was overcomplicating things.
The breakthrough came when I watched a professional chef make burgers at a local restaurant. He barely touched the meat, formed the patties with the lightest touch, and seasoned generously but simply. His burgers were perfect: crispy exterior, juicy interior, beefy flavor front and center. I went home and tried his technique with my homemade hamburgers, and suddenly everything transformed.
I also learned that different cooking methods produce different results. Cast iron skillets create an incredible crust because they retain heat so well. Grills add that smoky char flavor that’s hard to replicate indoors. I’ve even made great burgers in a regular non stick pan when that’s all I had available.
Chef’s Tips for Burger Success
Handle the meat as little as possible. Your hands are warm, and warm hands melt the fat in the meat before it even hits the pan. This leads to tough, dense burgers. I use a light touch and work quickly to minimize contact time.
Season generously but simply. Don’t be shy with the salt and pepper. A lot of it will stay on the cooking surface rather than in the burger, so you need more than you think. I season both sides of each patty right before cooking rather than mixing seasonings into the meat.
Create that dimple in the center of each patty. This is the easiest trick that makes the biggest difference. Without it, your burgers will puff up into little domes and slide around on the bun awkwardly.
Let your cooking surface get properly hot before adding the burgers. If you put meat on a cool surface, it’ll stick and tear when you try to flip it. A properly heated surface creates an immediate sear that actually helps prevent sticking.
Don’t crowd the pan or grill. Burgers need space around them for proper heat circulation and to let steam escape. If you pack them in too tightly, they’ll steam instead of sear. Cook in batches if necessary.
Use a spatula that’s actually sturdy enough for the job. Those flimsy things bend under the weight of a burger and make flipping a nightmare. I have a heavy metal spatula with a good wide surface that makes flipping effortless.
Common Mistakes to Avoid
Overworking the meat is mistake number one. When you knead and compress ground beef too much, you’re developing the proteins in a way that makes the final product tough and dense. Mix just until combined and stop.
Using lean meat might seem healthier, but it results in dry, flavorless burgers. Fat is not the enemy here. A burger should be an indulgence, and trying to make it virtuous defeats the purpose. If you want a healthy meal, make a salad. If you want a burger, embrace the fat.
Cooking over heat that’s too high will char the outside before the inside cooks through. Conversely, heat that’s too low won’t develop that crucial crust. Medium high heat is your friend. You should hear a good sizzle when the meat hits the surface.
Flipping multiple times is unnecessary and counterproductive. One flip is all you need. I see people flipping burgers every 30 seconds like they’re making pancakes. Stop it.
Adding cheese too early means it’ll either burn or slide right off. Wait until the last minute or two of cooking so it melts perfectly without overcooking.
Skipping the resting period means all those juices you worked so hard to keep in the burger will immediately run out. A few minutes of patience pays off in every bite.
Understanding Your Beef
The cut of beef used for grinding matters more than most people realize. Chuck comes from the shoulder area and has the ideal fat to meat ratio for burgers. It’s flavorful, relatively inexpensive, and readily available. This is what most grocery stores use for their ground beef.
Sirloin is leaner and has a slightly different flavor profile. Some people mix sirloin with chuck to get a balance of beefiness and fat content. I’ve tried this and it’s good, but honestly, straight chuck is hard to beat.
Brisket makes incredible burgers if you can find ground brisket or convince your butcher to grind some for you. It’s rich, fatty, and has this deep beef flavor that’s amazing. The downside is price, brisket is expensive compared to chuck.
Short rib is another premium option that some burger enthusiasts swear by. The meat is well marbled and produces an incredibly juicy burger. Again, you’re paying a premium, but for a special occasion, it’s worth considering.
Whatever cut you choose, freshness is paramount. Ground beef has more surface area exposed to air than whole cuts, which means it spoils faster. Buy it the day you plan to use it, or freeze it immediately if you’re meal prepping.
The color of ground beef can be misleading. The outside might be bright red while the interior is more brown or gray. This is normal and doesn’t mean the meat is bad. It’s just a reaction to oxygen exposure. Give it a smell test, fresh ground beef should smell clean and slightly metallic, not sour or ammonia like.
Flavor Profile and Taste Experience
A properly made homemade hamburger delivers layers of flavor that unfold with each bite. The first thing you notice is that crispy, slightly charred exterior. It has a deep, caramelized taste from the Maillard reaction, that magical process where proteins and sugars transform under heat.
Next comes the juicy, tender interior. The beef should be moist but not greasy, with a satisfying give when you bite down. The seasoning enhances rather than masks the natural beef flavor. You taste salt first, then pepper, then that subtle umami depth from the Worcestershire sauce.
The texture contrast is crucial to the overall experience. Crispy seared crust gives way to tender interior. Soft bun provides a neutral backdrop that lets the meat shine. Fresh vegetables add crunch and freshness that cuts through the richness.
Cheese melts into all the nooks and crannies, adding creaminess and its own flavor dimension. American cheese is classic for a reason, it melts beautifully and has a mild flavor that doesn’t compete. Cheddar brings sharpness. Swiss adds nuttiness. Choose based on your mood.
The smell is almost as important as the taste. When these homemade hamburgers are cooking, your whole house fills with this incredible aroma that makes everyone suddenly appear in the kitchen asking when dinner will be ready. It’s primal and comforting all at once.
Serving Suggestions That Actually Work
French fries are the obvious pairing, and I’m not here to argue with tradition. Crispy, salty fries complement a juicy burger perfectly. I usually make oven fries because they’re easier and less messy than deep frying. Toss potato wedges with oil and salt, then roast at 425°F for 30 to 35 minutes.
Sweet potato fries offer a nice variation with their subtle sweetness balancing the savory burger. They’re also less likely to make you feel like you need a nap after eating.
Coleslaw provides a cool, crunchy contrast to a hot, rich burger. The acidity cuts through the fat and refreshes your palate between bites. I prefer vinegar based slaw over mayo based because it’s lighter and tangier.
Onion rings are another classic that brings textural variety to the plate. The crispy coating and sweet onion interior make them irresistible. If you’re feeling ambitious, make them from scratch. If not, the frozen ones are perfectly acceptable.
For drinks, a cold beer is hard to beat. The carbonation and slight bitterness complement rich, fatty foods beautifully. An IPA brings hoppy bitterness that cuts through grease. A lager is crisp and refreshing. Even a stout works if you want something more substantial.
If you’re not drinking alcohol, a classic cola is actually a great choice. The sweetness and acidity work well with burgers. Iced tea, especially slightly sweet tea, is another excellent option. Even plain sparkling water with lemon provides enough contrast to cleanse your palate.
Seasonal Serving Ideas
Summer is peak burger season for obvious reasons. Fire up the grill, eat outside, enjoy the sunshine. I like to add fresh tomatoes from the farmers market when they’re at their peak in July and August. They’re juicy, sweet, and a million times better than grocery store tomatoes.
Fall calls for heartier toppings. Caramelized onions, mushrooms, and bacon turn a regular burger into something more substantial. The cooler weather makes you crave richer flavors anyway.
Winter might seem like an odd time for burgers, but cooking them in a cast iron skillet turns your kitchen into a cozy haven. Plus, comfort food hits different when it’s cold outside. I sometimes add a fried egg on top for extra richness during winter months.
Spring is perfect for lighter, fresher toppings. Think arugula instead of iceberg, avocado slices, and herb aioli. The longer days and nicer weather make outdoor grilling appealing again after a long winter.
Presentation Tips from Experience
A burger’s appearance matters more than you might think. Toasting the buns adds visual appeal with those golden brown grill marks. It also creates a better texture that holds up to juices without getting soggy.
Stack your toppings strategically. Lettuce goes directly on the bottom bun to create a barrier between the hot meat and the bread. This prevents the bottom bun from getting soggy. Tomatoes and pickles go on top of the patty where their moisture won’t affect the structural integrity.
Cut the burger in half before serving. This serves two purposes: it’s easier to eat, and it shows off all those beautiful layers. The cross section of a well made burger is genuinely appealing.
Serve burgers on plates slightly larger than the burger itself. Crowding a big burger onto a small plate looks messy and makes eating difficult. Give it room to breathe.
If you’re entertaining, set up a topping bar and let people customize their own burgers. Provide a variety of condiments, cheeses, and vegetables so everyone can build their perfect burger. This also takes pressure off you as the host.
Recipe Variations Worth Trying
The bacon cheeseburger variation is so popular it’s basically its own category. Cook 2 to 3 strips of bacon per burger until crispy, then layer them on top of the cheese. The salty, smoky bacon adds another dimension of flavor and textural contrast.
Mushroom swiss burgers are my go to when I want something a little fancier. Sauté sliced mushrooms in butter with a bit of garlic until golden brown. Pile them on your burger along with Swiss cheese. The earthy mushrooms and nutty cheese create this amazing umami bomb.
Jalapeño cheddar burgers bring the heat. Mix diced fresh jalapeños into the meat before forming patties, or just layer sliced jalapeños on top with sharp cheddar. The spice cuts through the richness and wakes up your taste buds.
BBQ burgers are perfect when you want something sweet and tangy. Brush your patties with barbecue sauce during the last minute of cooking, add cheddar cheese, and top with crispy onion strings. It’s messy and indulgent and absolutely worth it.
For a breakfast burger, top your patty with a fried egg, bacon, and a hash brown. It sounds over the top but it’s genuinely delicious. The runny yolk acts as a sauce and takes the whole thing to another level.
Dietary Adaptations I’ve Actually Tested
Turkey burgers can be good if you adjust your expectations. Turkey is much leaner than beef, so you need to add moisture back in. I mix in a tablespoon of olive oil per pound of turkey and use dark meat if possible. Season more aggressively than you would beef because turkey is milder.
Lamb burgers offer a rich, slightly gamey flavor that’s really special. Use the same technique as beef burgers but consider adding mint or feta cheese for a Mediterranean twist. Ground lamb usually has good fat content, so it stays juicy.
For vegetarian options, black bean burgers are my favorite. They’re hearty and satisfying without trying to imitate meat. Mix mashed black beans with breadcrumbs, egg, and seasonings, then pan fry until crispy. Don’t expect them to taste like beef, appreciate them for what they are.
Portobello mushroom caps make surprisingly good burger substitutes. Marinate them in balsamic vinegar and olive oil, then grill until tender. They’re meaty in texture and absorb flavors beautifully.
If you’re avoiding gluten, lettuce wraps work better than gluten free buns in my experience. Most gluten free buns fall apart under the weight and moisture of a burger. Crispy iceberg or butter lettuce leaves hold up well and add a refreshing crunch.
Scaling for a Crowd
When cooking for a group, I make the patties ahead of time and keep them separated by parchment paper in the fridge. This lets me cook them off quickly when guests arrive without frantically forming burgers while people are waiting.
For large gatherings, a griddle or large cast iron skillet lets you cook multiple burgers at once. I can fit four burgers in my 12 inch skillet, so for eight people, two batches gets everyone fed quickly.
Set up an assembly station with all the toppings arranged buffet style. This keeps the kitchen less chaotic and lets people customize their burgers. Put out small bowls for condiments so people can spread or squeeze as they prefer.
Make extra patties beyond what you think you’ll need. Burgers have a way of disappearing faster than expected. I usually plan for people to eat 1.5 burgers each if they’re the main attraction.
Keep cooked burgers warm in a 200°F oven if you’re cooking in batches. Place them on a wire rack over a baking sheet so air circulates and they don’t steam. They’ll stay hot and juicy for about 20 minutes.
Storage and Meal Prep Strategies
Uncooked patties freeze beautifully and make weeknight dinners incredibly easy. Form your patties, place them on a parchment lined baking sheet, and freeze until solid. Transfer to a freezer bag with parchment paper between each patty so they don’t stick together.
Frozen patties can go straight from freezer to cooking surface. Just add a minute or two to each side of the cooking time. Don’t thaw them first or you’ll end up with mushy, overhandled meat that makes tough burgers.
Cooked burgers can be refrigerated for up to 3 days. Reheat them gently in a skillet over medium heat or in the oven at 350°F for about 10 minutes. They won’t be quite as juicy as fresh, but they’re still good.
Ground beef itself is best used within 1 to 2 days of purchase if kept refrigerated. The increased surface area makes it more susceptible to bacterial growth than whole cuts. If you’re not using it immediately, freeze it.
For meal prep, I sometimes cook a batch of burgers on Sunday and eat them throughout the week. They’re great crumbled over salads, stuffed into wraps, or eaten as is with different toppings each day.
Troubleshooting Common Issues
If your burgers are falling apart, you either didn’t use enough fat in the meat or you flipped them too early. The crust needs time to form properly before you flip, otherwise the patty will stick and tear. Be patient and resist the urge to flip early.
Dry burgers usually result from overcooking or using meat that’s too lean. Invest in a meat thermometer and pull your burgers off the heat at the right temperature. Remember they’ll continue cooking slightly as they rest.
If your burgers are puffing up despite the dimple, make the dimple deeper and wider. Some meat blends are more prone to puffing than others. You might also be cooking over heat that’s too high.
Burgers that are charred outside but raw inside mean your heat is too high. Lower the temperature and give them more time to cook through. It’s better to cook them a bit slower and get even doneness.
If the cheese isn’t melting properly, cover the pan or grill for the last minute of cooking. The trapped heat will melt the cheese faster. You can also add a tablespoon of water to the pan and cover it, the steam helps.
Soggy buns are preventable by toasting them and creating a barrier layer. Spread mayo or mustard on the bun, then add lettuce before the burger. The fat in the mayo and the lettuce leaves protect the bread from burger juices.
Equipment That Makes a Difference
A good cast iron skillet is my number one recommendation for indoor burger cooking. It gets screaming hot, retains heat when you add cold meat, and creates an incredible crust. Mine is 12 inches and I use it almost daily.
An instant read meat thermometer takes the guesswork out of doneness. I like the fold up style that’s easy to store and quick to use. It should read temperature in 2 to 3 seconds for maximum efficiency.
A sturdy metal spatula with a wide surface is essential. Those flimsy plastic ones bend under the weight of a burger and make flipping frustrating. I have a heavy stainless steel spatula that’s lasted me years.
If you grill often, a good quality grill brush keeps your grates clean. Leftover gunk from previous cooking sessions can make burgers stick and adds off flavors. I clean my grill grates before and after every use.
A kitchen scale helps if you want perfectly equal sized burgers. Weigh out 8 ounce portions for each patty and you’ll get consistent cooking times and doneness across all your burgers.
The Science Behind Juicy Burgers
When meat cooks, proteins contract and squeeze out moisture. This is why overcooked meat is dry. The key is cooking to just the right temperature where the meat is safe to eat but hasn’t expelled too much juice.
Fat melts as it heats, basting the meat from the inside and keeping it moist. This is why fatty beef makes juicier burgers. As fat renders, it also carries flavor compounds throughout the meat.
The Maillard reaction occurs when proteins and sugars are exposed to high heat. This chemical reaction creates hundreds of new flavor compounds that give cooked meat its characteristic taste and aroma. It’s why seared meat tastes different from boiled meat.
Resting allows the proteins to relax after cooking. When meat is hot, the proteins are tightly contracted and holding moisture in a small area. As it rests and cools slightly, the proteins loosen and moisture redistributes evenly.
Salt draws moisture to the surface of meat through osmosis. This moisture then dissolves the salt, creating a brine that gets reabsorbed. This is why salting ahead of time can make meat juicier, though with burgers I prefer to salt just before cooking.
Cultural Context and History
The hamburger as we know it evolved in America, though ground meat patties existed in various forms across many cultures. German immigrants brought hamburger steaks to the US in the 19th century. These were ground beef patties served on plates with utensils.
Someone, and history is unclear exactly who, had the brilliant idea to put that patty between two pieces of bread. This made it portable and easier to eat, perfect for the increasingly mobile American lifestyle. Food historians argue about whether it happened at the 1904 St. Louis World’s Fair or earlier at a restaurant in Connecticut.
By the 1920s, White Castle had standardized the hamburger and made it available nationwide. They created the template we still follow today: small patty, bun, minimal toppings. Fast food chains that followed built their empires on variations of this formula.
The homemade hamburger recipe has always been part of American home cooking too. It’s economical, feeds a crowd, and is endlessly customizable. Backyard barbecues became synonymous with grilled burgers, especially after World War II when suburban living took off.
Different regions developed their own burger styles. California added fresh vegetables and avocado. The South loves pimento cheese burgers. New Mexico puts green chile on everything. The Midwest keeps it simple with classic American cheese and pickles.
Why This Recipe Works Every Time
Simplicity is the foundation of reliability. When a recipe has fewer variables, there are fewer things that can go wrong. This homemade hamburger approach strips away unnecessary complications and focuses on technique.
The 80/20 beef ratio is forgiving. It has enough fat to stay juicy even if you slightly overcook it. Leaner meat has almost no margin for error. One minute too long and it’s dry.
Minimal mixing prevents tough burgers. Since we’re barely handling the meat, the proteins don’t develop too much and the texture stays tender. This is foolproof as long as you exercise restraint.
The dimple technique solves the puffing problem that plagues many homemade burgers. It’s one simple step that makes a big difference in the final result.
Generous but simple seasoning means the flavor is there but not overwhelming. Salt and pepper are classics for a reason. They work with everything and never go out of style.
My Final Thoughts on Burger Perfection
After years of making homemade hamburgers, I’ve learned that perfection isn’t about fancy techniques or expensive ingredients. It’s about respecting the simplicity of a great burger and executing the basics flawlessly.
Good ingredients matter, but they don’t have to be exotic. Quality ground beef from a reputable source beats wagyu treated carelessly. Fresh buns from your local bakery beat brioche that’s three days old.
Technique matters more than most people realize. The difference between a good burger and a great burger often comes down to not pressing down with the spatula or flipping one time instead of three. These small details separate average homemade hamburgers from exceptional ones.
This recipe works because it’s been tested and refined through countless burger nights. I’ve made these homemade hamburgers for picky kids, food snobs, and everyone in between. They always get positive reviews because the fundamentals are solid.
The beauty of mastering this basic homemade hamburger is that it gives you a foundation to build on. Once you nail the technique, you can experiment with toppings, seasonings, and variations while knowing your base is sound.
Making burgers at home connects you to your food in a way that takeout never can. You control the quality, the seasoning, the doneness. You create something with your hands that brings people together around the table. That’s the real magic of a homemade hamburger, and it’s worth way more than convenience.
So fire up your grill or heat up that skillet. Mix your meat with a gentle hand. Season generously. Cook with patience. Your perfect homemade hamburger is waiting, and it’s going to be better than anything you can buy.