

- Sauté Aromatics
In a large skillet, heat olive oil over medium heat. Add diced onion, garlic, and ginger, sautéing until fragrant (about 2-3 minutes).
- Cook Chicken
Add chicken pieces to the skillet, cooking until browned on all sides (about 5-7 minutes).
- Pour in Coconut Milk
Add the coconut milk and stir to combine. Bring to a simmer and let cook for about 10 minutes, until the chicken is cooked through and the vegetables are tender.
- Season and Serve
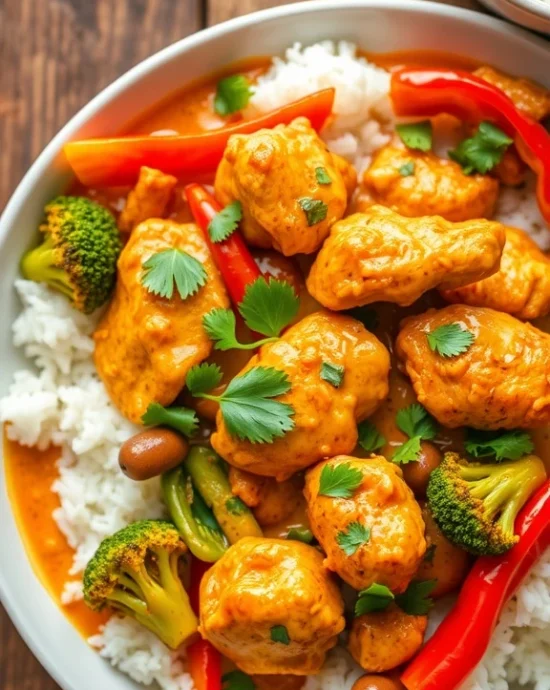
Taste and adjust seasoning with salt and pepper. Garnish with fresh cilantro and serve over rice or quinoa.
This curry is basically a health food disguised as comfort food. Coconut milk provides healthy medium-chain fatty acids, the vegetables deliver fiber and vitamins, and chicken provides lean protein. The turmeric and ginger provide anti-inflammatory benefits, while the various vegetables add essential vitamins and minerals. Coconut milk contains lauric acid, which has antimicrobial properties. For lighter versions, use light coconut milk (though you'll sacrifice some richness) or extend the curry with extra vegetables. Adding more veggies increases the fiber and nutrient content while reducing calories per
- Calories:350 kcal
- Fat:20 grams
- Protein:30 grams
- Carbohydrates:15 grams
When you need dinner that feels like a warm hug from your kitchen, this chicken coconut curry with veggies swoops in to save the day. This isn’t just another weeknight meal, it’s a one-pan masterpiece that transforms humble ingredients into something that’ll make your taste buds think you’ve been secretly taking cooking classes from a curry master.
Picture this: tender chunks of chicken swimming in a luscious, creamy coconut sauce, studded with colorful vegetables and perfumed with aromatic spices that make your entire house smell like paradise. The best part? It all comes together in one pan, which means minimal cleanup and maximum flavor.
This recipe takes the intimidation factor out of curry-making and delivers restaurant-quality results with ingredients you can actually pronounce and find at your regular grocery store. No hunting down obscure spices or mastering complex techniques, just pure, satisfying deliciousness.
Why This Recipe is Awesome
Let me tell you why this chicken coconut curry with veggies is about to become your new weeknight hero. First off, it’s ridiculously versatile, got leftover vegetables hanging out in your fridge? Toss them in. Prefer chicken thighs over breasts? Go for it. This recipe adapts to whatever you’ve got on hand like a culinary chameleon.
The coconut milk here isn’t just for creaminess (though it definitely delivers on that front), it’s what transforms this from ordinary curry to something extraordinary. That rich, slightly sweet coconut flavor balances the warm spices perfectly, creating a sauce so good you’ll want to drink it straight from the pan. (I won’t judge if you do.)
What really sets this apart is the one-pan cooking method. Everything builds flavor in the same skillet, which means those delicious browned bits from the chicken get incorporated into the sauce, and you’re not juggling multiple pots like some sort of kitchen circus performer.
Plus, this curry actually improves with time, the flavors meld and deepen as it sits, making it perfect for meal prep. Make a big batch on Sunday and you’ve got lunch sorted for the week. Your future self will thank you when you’re reheating this liquid gold instead of standing in line at yet another sad sandwich shop.
The Story Behind Chicken Coconut Curry with Veggies
This style of curry has incredibly rich roots, particularly in East African and Southeast Asian cuisines. Chicken coconut curry is known as Kuku Paka in Swahili and represents a beautiful fusion of African, Indian, and Arabian cooking traditions. Kenya, Tanzania, and Uganda have embraced this dish as a beloved staple, where both Swahili families and Indian communities have made it their own.
The name “Kuku Paka” literally translates to “chicken” and “coconut sauce” in Swahili, which pretty much sums up why this dish is so universally appealing, it’s straightforward but incredibly satisfying. This curry even traveled across oceans to Malaysia, where they call their version “masak lemak,” proving that good food really knows no boundaries.
My own journey with coconut curry started during a particularly brutal winter when I was craving something warm, comforting, and exotic enough to transport me somewhere tropical. I’d always been intimidated by curry recipes with their long ingredient lists and unfamiliar techniques, but desperation (and a can of coconut milk staring at me from the pantry) finally pushed me to try.
The first version I made was… well, let’s call it “rustic.” Too much curry powder, not enough coconut milk, and vegetables that were either mushy or still crunchy in all the wrong places. But there was something there, a potential for greatness that kept me experimenting.
After countless weekend cooking sessions (my family was very patient with my curry obsession), I finally cracked the code. The secret isn’t in exotic ingredients or complex techniques, it’s about building layers of flavor, balancing the richness of coconut with the warmth of spices, and getting the timing right so everything finishes perfectly together.
This recipe represents the culmination of all those experiments, a foolproof method that delivers complex flavors without requiring a PhD in spice combinations or access to specialty grocery stores.
Essential Equipment & Kitchen Tips
You need surprisingly little equipment for this curry masterpiece: a large, heavy-bottomed skillet or wide saucepan, a wooden spoon for stirring, and a sharp chopping knife. That’s it. No special curry pots, no exotic cooking vessels, just good old-fashioned cookware.
Here’s a game-changer tip: use a cast iron skillet if you have one. Cast iron holds heat beautifully and gives you excellent browning on the chicken, which translates to deeper flavor in your final dish. If you don’t have cast iron, any heavy-bottomed pan will work, just avoid thin, flimsy pans that heat unevenly.
Coconut milk quality matters more than you think. Always use full-fat coconut milk, the light stuff is mostly water and won’t give you that rich, creamy texture you’re after. Don’t shake the can before opening it. If the cream has separated from the liquid, that’s normal and actually good, you can use the thick cream to sauté your aromatics for extra coconut flavor.
Fresh vs. ground spices make a difference, but don’t stress if you only have ground. If you do have whole spices, toast them lightly in the dry pan before adding oil, this releases their essential oils and intensifies the flavors dramatically.
Prep everything before you start cooking. This dish moves quickly once you begin, and having everything chopped and measured means you won’t be scrambling to mince garlic while your onions are burning.
Pro Chef Secrets & Advanced Techniques
Here’s the secret that separates good curry from extraordinary curry: brown your chicken properly. Don’t overcrowd the pan, and let each piece develop a nice golden crust before moving it. Those caramelized bits add incredible depth to your final sauce. If your pan isn’t big enough, brown the chicken in batches, it’s worth the extra step.
The bloom technique is your flavor friend. After adding the spices, cook them for a minute or two before adding liquid. This “blooms” the spices, releasing their essential oils and preventing that raw spice taste that can ruin an otherwise good curry.
Coconut milk layering creates restaurant-level richness. Don’t dump all the coconut milk in at once. Start with half, let it reduce slightly, then add the rest. This concentrates the flavors and creates a silkier sauce texture.
Temperature control is crucial. Keep the heat at medium or medium-low once you add the coconut milk. High heat can cause the coconut milk to curdle or separate, and nobody wants chunky curry sauce.
For next-level flavor complexity, add a tablespoon of tomato paste with the spices. It might sound weird in curry, but it adds umami depth and helps create that gorgeous, rich color you see in restaurant curries.
The resting technique works magic here. Let the finished curry sit off the heat for 5-10 minutes before serving. This allows the flavors to meld and the sauce to thicken slightly, resulting in a more cohesive dish.
Common Mistakes to Avoid
Overcrowding the pan when browning chicken, rookie mistake number one. Cramming too much chicken into the pan creates steam instead of browning, and you miss out on all those delicious caramelized flavors. Give each piece room to breathe, even if it means cooking in batches.
Adding vegetables at the wrong time. Dense vegetables like carrots need more time than quick-cooking ones like spinach. Bell peppers and broccoli can go in with the coconut milk, but leafy greens should wait until the last few minutes.
Using light coconut milk thinking you’re being healthy. Look, I get it, but light coconut milk in curry is like using skim milk in ice cream, technically possible but missing the entire point. Full-fat coconut milk is what makes this curry creamy and luxurious.
Overcooking the vegetables until they’re mushy. Nobody wants sad, gray broccoli floating in their curry. Vegetables should be tender but still have some bite to them. Remember, they’ll continue cooking in the hot sauce even after you remove the pan from heat.
Forgetting to taste and adjust seasoning. Curry is all about balance, sweet coconut, warm spices, salty elements, and bright acidity. Always taste before serving and adjust with salt, a squeeze of lime, or a pinch more spice as needed.
Serving immediately instead of letting it rest. Patience, grasshopper. Let that curry sit for a few minutes off the heat, the flavors will marry and improve dramatically.
Alternatives & Substitutions
No coconut milk? Houston, we have options. Heavy cream mixed with a tablespoon of coconut extract can pinch-hit, though it won’t be quite the same. Cashew cream made from soaked cashews and water also works for a dairy-free alternative.
Chicken alternatives abound: turkey, shrimp, firm tofu, chickpeas, or even chunks of sweet potato for vegetarian versions. Each protein has different cooking times, so adjust accordingly. Shrimp takes just a few minutes, while sweet potato might need 15-20 minutes to become tender.
Vegetable flexibility is this recipe’s superpower. Zucchini, spinach, green beans, cauliflower, snap peas, basically any vegetable you need to use up can find a home in this curry. Just consider cooking times and add accordingly.
Spice substitutions for curry powder: if you’re out of curry powder, make your own with 1 tablespoon each of coriander and cumin, 1 teaspoon turmeric, 1/2 teaspoon each of ginger and cinnamon, and a pinch of cayenne. Not identical, but it’ll get you in the right flavor neighborhood.
Fresh ginger vs. ground: fresh is always better, but if you only have ground, use about 1 teaspoon instead of the tablespoon of fresh. Ginger paste from a tube works beautifully too and saves chopping time.
Flavor Variations & Creative Twists
Thai-inspired version: add lemongrass, kaffir lime leaves, and fish sauce instead of curry powder. Use Thai red curry paste for deeper, more complex heat. Swap the broccoli for Thai eggplant and bamboo shoots for authenticity.
Indian-style twist: include garam masala, cardamom, and cinnamon. Add diced tomatoes with the coconut milk and finish with fresh mint instead of cilantro. Paneer cheese cubes make an excellent protein addition.
Caribbean variation: use scotch bonnet peppers (carefully!), add diced sweet potato, and include allspice and thyme. Finish with a squeeze of lime and serve with rice and beans.
Mediterranean fusion: add sun-dried tomatoes, olives, and fresh basil. Use chicken thighs and include artichoke hearts. This sounds weird but tastes amazing, trust the process.
Protein power-up: add a can of chickpeas or white beans in the last 5 minutes for extra protein and fiber. Perfect for stretching the recipe to feed more people or making it more filling.
Serving Suggestions & Pairings
Rice is the classic base, and for good reason, it soaks up that gorgeous sauce like a delicious sponge. Basmati rice is traditional and aromatic, but jasmine, brown rice, or even cauliflower rice all work beautifully.
Quinoa transforms this into a protein powerhouse with a slight nutty flavor that complements the coconut beautifully. For carb-conscious folks, serve it over zucchini noodles or spaghetti squash.
Bread game is strong with curry. Naan is obvious and delicious, but don’t overlook pita, flatbread, or even crusty sourdough for sopping up every drop of sauce. Warm the bread slightly for best results.
Garnish possibilities are endless: fresh cilantro is classic, but try mint, basil, sliced green onions, or even toasted coconut flakes. A squeeze of lime brightens everything up and adds that perfect acidic balance.
Beverage pairings: cold beer works surprisingly well with the rich, spicy flavors, or try a crisp white wine like Riesling or Gewürztraminer. For non-alcoholic options, iced tea or coconut water complement the tropical flavors perfectly.
Storage & Reheating Guide
This curry is a meal prep champion. Store in the refrigerator for up to 4 days in airtight containers. The flavors actually improve overnight as everything has time to meld together. It’s like curry magic happening in your fridge.
For reheating, gentle is the keyword. Microwave on 50% power, stirring every minute, or reheat slowly on the stovetop over low heat. High heat can cause the coconut milk to separate, which isn’t dangerous but doesn’t look pretty.
Freezing works beautifully for up to 3 months. Cool completely before freezing, and leave some headspace in containers because the liquid expands. Thaw overnight in the refrigerator before reheating.
Pro meal prep tip: cook the curry slightly underdone if you’re planning to freeze it. The vegetables will finish cooking when you reheat, preventing mushy veggies in your reheated meals.
FAQ (Frequently Asked Questions)
Q: Can I use chicken thighs instead of breast meat? A: Absolutely! Thighs actually work better because they stay juicier during the longer cooking time. Just adjust cooking time accordingly, thighs might take a few minutes longer.
Q: My curry is too spicy. How can I cool it down? A: Add more coconut milk, a spoonful of sugar or honey, or some diced potatoes (which absorb heat). A dollop of plain yogurt when serving also helps tame the fire.
Q: Can I make this ahead of time? A: Yes! This curry actually improves with time. Make it up to 2 days ahead and reheat gently. The flavors will be even more developed and delicious.
Q: What vegetables work best in this curry? A: Almost anything! Bell peppers, broccoli, snap peas, spinach, zucchini, cauliflower, just adjust cooking times. Dense vegetables go in early, tender greens go in at the end.
Q: Can I double this recipe? A: Absolutely, just make sure your pan is big enough. You might need to brown the chicken in batches to avoid overcrowding, and cooking time might increase slightly.
Q: Is this curry gluten-free? A: Yes, as written this recipe is naturally gluten-free. Just make sure your curry powder doesn’t contain any gluten-containing additives (most don’t).
Q: Can I use frozen vegetables? A: Sure! Just add them directly from frozen and increase cooking time by a few minutes. They might release more water, so you may need to simmer uncovered to reduce the sauce.
Q: How do I know when the chicken is fully cooked? A: Chicken should reach an internal temperature of 165°F. It should be white throughout with no pink areas, and the juices should run clear.
Q: Can I make this dairy-free? A: It already is! Coconut milk is naturally dairy-free, making this perfect for those avoiding dairy products.
Q: What’s the best way to cut up the chicken? A: Cut against the grain into uniform, bite-sized pieces (about 1-inch chunks). This ensures even cooking and tender results.
Troubleshooting Guide
Curry turned out watery instead of creamy? This usually happens when you use light coconut milk or don’t let the curry reduce enough. Next time, use full-fat coconut milk and simmer uncovered for the last few minutes to concentrate the sauce.
Coconut milk separated or looks curdled? Don’t panic, this often happens when the heat is too high. Remove from heat, whisk vigorously, and it usually comes back together. To prevent this, keep heat at medium or lower once you add coconut milk.
Vegetables are mushy and overcooked? Different vegetables need different cooking times. Hard vegetables like carrots should go in early, while quick-cooking ones like spinach should wait until the last few minutes. Make notes for next time about timing.
Curry tastes flat or bland? Usually this means it needs more salt, acid (lime juice), or spices. Taste and adjust, curry should be a balance of rich, salty, sweet, and bright flavors. Sometimes a pinch of sugar helps balance everything out.
Chicken is tough or dry? Don’t overcook the chicken, and consider using thighs instead of breasts. Also, cutting against the grain helps ensure tender bites even if the cooking was less than perfect.
Final Thoughts
Look, weeknight dinners don’t have to be boring, and this chicken coconut curry with veggies is proof that you can have something exotic, comforting, and absolutely delicious without spending hours in the kitchen or hunting down specialty ingredients.
This recipe represents everything I love about one-pan cooking: maximum flavor with minimum fuss, ingredients that are easy to find and customize, and results that make you feel like a culinary genius even when you’re just winging it after a long day.
The beauty of this curry lies in its adaptability. Got different vegetables? Use them. Prefer different proteins? Go for it. Need it spicier or milder? Adjust accordingly. It’s less of a rigid recipe and more of a delicious template for creating something amazing with whatever you have on hand.
Whether you’re meal prepping for the week, impressing dinner guests, or just trying to add some excitement to your usual rotation, this curry delivers every single time. Now go grab that can of coconut milk and get ready to transform your kitchen into your own personal curry house.


