

- Prepare the Cinnamon Rolls
Cut the cinnamon rolls into quarters and place them evenly in a greased 9x13 inch baking dish.
- Make the Custard Mixture
In a large bowl, whisk together the eggs, milk, vanilla extract, ground cinnamon, and salt until well combined.
- Combine
Pour the egg mixture over the cinnamon roll pieces in the baking dish, ensuring all pieces are soaked. If desired, drizzle with maple syrup and sprinkle with cinnamon sugar.
- Cover and Refrigerate
Cover the baking dish with plastic wrap and refrigerate overnight to allow the flavors to meld.
- Bake
The next morning, preheat the oven to 350°F (175°C). Remove the plastic wrap and bake for 25-30 minutes, or until the top is golden and the center is set.
- Glaze
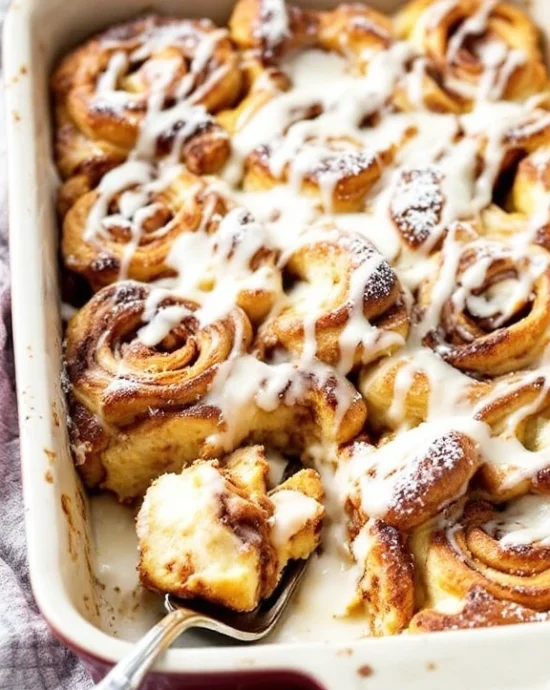
While the bake is cooling, warm the icing from the cinnamon roll cans in the microwave. Drizzle it over the warm bake.
- Serve
Slice into squares and serve warm, optionally topped with fresh fruit or whipped cream.
- Calories:320 kcal
- Fat:15 grams
- Protein:6 grams
- Carbohydrates:42 grams
These homemade cinnamon rolls are about to completely transform your weekend mornings and probably ruin you for store bought versions forever. Picture this: soft, pillowy spirals of yeast dough swirled with buttery cinnamon sugar, baking to golden perfection while filling your entire house with an aroma that should honestly be bottled and sold as happiness.
I’m talking about the kind of cinnamon rolls that make people stop mid conversation when they walk into your kitchen. The kind that turn regular Saturday mornings into special occasions, and the kind that’ll have your neighbors mysteriously finding reasons to drop by whenever you’re baking.
You know what’s amazing? These aren’t some impossible bakery secret that requires a culinary degree. They’re made with ingredients you probably have in your kitchen right now, and while they do take some time, most of it is hands off rising time that you can spend doing literally anything else.
Why This Recipe is Awesome
Let’s be honest here, most people think homemade cinnamon rolls are too intimidating to attempt. They imagine complicated yeast procedures, perfect temperature control, and the possibility of epic failure. This recipe laughs in the face of all that fear and proves that amazing cinnamon rolls are absolutely achievable in any home kitchen.
The secret weapon here is technique over perfection. You don’t need professional equipment or years of baking experience. You just need to understand a few key principles, follow the steps, and trust the process. The yeast does most of the hard work while you go about your day.
What makes these particularly special is the texture balance. The dough is soft enough to pull apart easily but sturdy enough to hold all that cinnamon sugar goodness without falling apart. The filling melts into the dough just enough to create those gorgeous swirls without making everything soggy.
And can we talk about that cream cheese frosting for a minute? It’s not just sweet, it’s got that perfect tangy balance that cuts through the richness and makes every bite absolutely addictive. This isn’t just breakfast; this is an experience that creates memories.
The Story Behind Cinnamon Rolls
The beloved cinnamon roll traces its roots back to Sweden, where it’s known as “kanelbulle” and is so culturally significant that October 4th is officially Cinnamon Bun Day. Swedish bakers have been perfecting the art of yeasted sweet breads for centuries, creating treats that balance spice, sweetness, and that perfect tender crumb.
The concept traveled across Europe and eventually to America, where it evolved into the generously frosted, super sweet version we know and love today. American cinnamon rolls tend to be larger, more indulgent, and definitely more cream cheese forward than their Scandinavian ancestors.
My personal cinnamon roll journey started in college when I was desperately homesick and craving the comfort foods my grandmother used to make. I spent an entire semester experimenting with different recipes, failing spectacularly more times than I care to admit, but slowly learning what makes the difference between good and absolutely incredible cinnamon rolls.
The breakthrough came when I realized that patience is the secret ingredient. Rushing the rises, using water that’s too hot, or skipping the proper kneading all lead to dense, disappointing results. But when you give the dough the time and attention it needs, magic happens.
I’ve made these cinnamon rolls for birthday breakfasts, holiday mornings, stressed out friends, and quiet Sunday mornings when I just needed something therapeutic to do with my hands. Each batch teaches me something new about dough behavior, temperature control, or timing.
What I love most about this recipe is its generous spirit. Cinnamon rolls are meant to be shared, meant to bring people together around a table, meant to create those perfect moments where conversation flows as easily as the cream cheese frosting dripping down the sides.
Essential Equipment & Kitchen Tips
You don’t need a professional bakery setup, but having the right tools makes this process so much smoother and more enjoyable:
A stand mixer with dough hook makes kneading effortless, but don’t worry if you don’t have one. These can absolutely be made by hand, you’ll just get a little arm workout in the process. The key is developing the gluten properly, whether by machine or muscle power.
Large mixing bowls are essential for the rising process. The dough doubles in size, so make sure your bowl can handle that expansion without overflowing onto your counter like some sort of bread volcano.
Rolling pin for creating that perfect rectangle of dough. If you don’t have one, a clean wine bottle works surprisingly well. The goal is even thickness so your rolls bake uniformly.
9×13 inch baking pan provides the perfect space for a dozen rolls with just enough room for them to expand and touch each other as they bake. This creates those soft sides that make cinnamon rolls so irresistible.
Instant read thermometer takes the guesswork out of milk temperature. Too hot kills the yeast, too cool slows down activation. Getting it right the first time saves frustration later.
Temperature awareness is crucial throughout this entire process. Room temperature ingredients mix more easily and create better texture. Cold butter doesn’t incorporate well, cold eggs can shock the dough, and cold milk won’t activate yeast properly.
Pro Chef Secrets & Advanced Techniques
After making hundreds of batches, I’ve discovered the insider tricks that separate good cinnamon rolls from absolutely mind blowing ones. These techniques are the difference between “nice homemade rolls” and “where did you learn to bake like that?”
Yeast activation is everything. That warm milk needs to be exactly the right temperature, around 110°F feels like a warm bath on your wrist. Too hot kills the yeast, too cold doesn’t activate it properly. When you add the yeast to properly warmed milk, it should foam within 5-10 minutes. No foam means dead yeast or wrong temperature.
Dough texture mastery comes from understanding what properly developed gluten looks like. After kneading, the dough should be smooth, slightly tacky but not sticky, and when you stretch a small piece, it should form a thin “window” without tearing. This gluten development is what creates that perfect tender yet structured crumb.
Rolling technique affects the final shape and baking. Roll from the center outward to maintain even thickness. The dough should be about 1/4 inch thick, too thin and it tears, too thick and the rolls are dense. Don’t flour too heavily as you roll; you want the dough to grip itself slightly as you form the spiral.
Filling distribution strategy prevents those sad, filling free spots. Spread the butter mixture all the way to the edges except for that sealing strip. Press gently after spreading to ensure good contact with the dough. This creates better adherence and prevents filling from oozing out during baking.
Cutting perfection requires the right tool and technique. Dental floss slices cleanly without squashing the delicate rolls. Slide it under the log, cross over the top, and pull, clean cut every time. A serrated knife works too, but use a gentle sawing motion rather than pressing down.
Common Mistakes to Avoid
Let me save you from the cinnamon roll disasters I’ve witnessed (and occasionally created myself). These mistakes are more common than you’d think, and avoiding them is the difference between success and disappointment:
Using milk that’s too hot is the fastest way to kill your yeast and end up with dense, sad rolls that never rise properly. If you can’t comfortably hold your finger in the milk for several seconds, it’s too hot. Let it cool down, patience here saves hours of frustration later.
Rushing the rises because you’re excited to eat cinnamon rolls will leave you with dense, heavy results. Rising times are guidelines, not absolutes. The dough is ready when it’s visibly doubled and springs back slowly when gently poked. Cold kitchens take longer, warm ones move faster.
Over flouring during rolling creates dry, tough dough that doesn’t stick to itself properly. You want just enough flour to prevent sticking, the dough should still have a slight tackiness that helps it grip as you roll.
Cutting rolls with a regular knife and pressing straight down squashes all that beautiful rise and creates misshapen rolls. Use that dental floss trick or a very sharp serrated knife with a gentle sawing motion.
Baking too early before the second rise is complete results in rolls that don’t achieve their full potential. They should look puffy and nearly touching each other in the pan before they go in the oven.
Frosting too soon on piping hot rolls causes the frosting to melt completely and disappear. Let them cool for 10-15 minutes, they’ll still be warm enough to slightly melt the frosting, but not so hot that it vanishes instantly.
Not checking for doneness can mean overcooked, dry rolls or undercooked centers. They should be golden brown on top and sound slightly hollow when tapped. Internal temperature should reach around 190°F.
Alternatives & Substitutions
Life happens, dietary needs change, and sometimes you need to work with what you’ve got. Here’s how to adapt this recipe without sacrificing the soul of cinnamon roll perfection:
Flour alternatives can work with some adjustments. Bread flour creates chewier texture thanks to higher protein content, use the same amount but expect slightly different handling. Whole wheat flour can replace up to half the all purpose flour, but add an extra 2-3 tablespoons of liquid since whole wheat absorbs more moisture.
Milk substitutions are totally doable. Dairy free options like oat milk, almond milk, or soy milk work beautifully, just make sure they’re unsweetened and warmed to the same temperature. Buttermilk adds tanginess and creates incredibly tender crumb, but reduce the salt slightly to compensate.
Egg alternatives for vegan baking include flax eggs (1 tablespoon ground flaxseed mixed with 3 tablespoons water, let sit 5 minutes) or commercial egg replacer. The texture will be slightly different but still delicious.
Sugar swaps can reduce refined sugar content. Coconut sugar works measure for measure in the dough, though it adds slight caramel notes. Maple syrup can replace some sugar, but reduce other liquids accordingly.
Butter substitutes for dairy free baking include vegan butter or coconut oil. If using coconut oil, make sure it’s solid but soft, the consistency of softened butter. The flavor will be subtly different but still wonderful.
Yeast considerations matter for timing. Instant yeast can be mixed directly with flour and doesn’t need proofing, use the same amount but reduce rising times slightly. Fresh yeast requires tripling the amount and different handling.
Flavor Variations & Creative Twists
Once you’ve mastered the basic version, the world of cinnamon roll creativity opens up. These variations have all been tested and earned approval from my toughest critics:
Orange cinnamon rolls add bright citrus notes that cut through the richness beautifully. Add 2 tablespoons orange zest to the filling and 1 tablespoon to the frosting. The combination is like sunshine in pastry form.
Maple pecan version screams autumn comfort. Replace half the brown sugar with maple syrup (reduce milk in dough by 2 tablespoons) and sprinkle chopped pecans over the filling before rolling. Top with maple cream cheese frosting using maple syrup instead of vanilla.
Apple cinnamon rolls incorporate diced apples sautéed with butter and a pinch of salt until slightly soft. Cool completely before adding to the filling. The apples add moisture and fresh fruit flavor that balances the richness.
Chocolate cinnamon rolls satisfy serious chocolate cravings. Add 2 tablespoons cocoa powder to the filling and mini chocolate chips sprinkled over the butter mixture. The result is like chocolate cinnamon roll cookies in pastry form.
Pumpkin spice variation for fall obsessions involves adding 1/2 cup pumpkin purée to the dough (reduce milk accordingly) and using pumpkin pie spice instead of just cinnamon. It’s autumn in every bite.
Serving Suggestions & Pairings
These cinnamon rolls aren’t just breakfast, they’re the centerpiece of memorable mornings and special occasions. How you serve them can transform a simple treat into an event:
Coffee pairings are absolutely essential. The richness of the rolls begs for coffee’s bitter balance. Medium roast coffees complement without overwhelming, while dark roasts provide bold contrast. Cold brew on ice cuts through the sweetness beautifully on warm mornings.
Brunch presentation elevates these from everyday treat to special occasion centerpiece. Arrange on a beautiful platter, dust with extra powdered sugar, garnish with fresh berries or orange slices. The visual appeal matches the incredible taste.
Temperature serving options each offer different experiences. Warm rolls have soft, gooey centers and slightly melted frosting, pure comfort. Room temperature rolls showcase the texture and allow flavors to fully develop. Some people even prefer them cold the next day.
Portion considerations depend on the occasion. These are rich, so one roll per person is usually plenty when served with other breakfast items. For special occasions or when they’re the main event, people definitely go back for seconds.
Storage & Reheating Guide
Proper storage techniques mean you can enjoy these cinnamon rolls for days, and honestly, they’re almost as good reheated as they are fresh:
Room temperature storage works for 2-3 days when properly wrapped. Cover tightly with plastic wrap or store in airtight containers. The frosting will set but the rolls remain soft and delicious.
Refrigerator storage extends life up to a week. The cold actually helps the flavors meld together, though the texture becomes slightly denser. Many people prefer the flavor after a day or two in the fridge.
Freezing options are fantastic for make ahead situations. Freeze unfrosted baked rolls up to 3 months wrapped tightly in plastic wrap and aluminum foil. Thaw at room temperature and warm in the oven before frosting.
Reheating methods can restore that fresh baked experience. Oven reheating at 300°F for 8-10 minutes wrapped in foil brings back warmth and softness. Microwave works for individual rolls, 15-20 seconds makes them warm and soft again.
Make ahead strategies are perfect for special occasions. You can prepare through the first rise, refrigerate overnight, then continue with rolling and second rise the next morning. The slow cold rise actually improves flavor development.
Nutritional Benefits & Health Notes
While cinnamon rolls are definitely an indulgent treat, they’re not completely without merit from a nutritional standpoint. Understanding what you’re eating helps you enjoy them as part of a balanced approach to eating:
Cinnamon benefits include antioxidants and potential blood sugar regulation properties. Real cinnamon (not just cinnamon flavor) provides these benefits, making your indulgence slightly more justified.
Protein content from eggs, milk, and flour provides some satiety factor. A single roll contains enough protein to help stabilize blood sugar compared to straight sugar treats.
Calcium boost from milk and cream cheese contributes to bone health. It’s not a significant amount, but every bit helps, especially when it tastes this good.
Portion awareness is key with rich treats like this. One roll is satisfying and provides energy for active days. The key is savoring every bite rather than mindlessly consuming multiple rolls.
FAQ (Frequently Asked Questions)
Can I make these without a stand mixer? Absolutely! Hand kneading takes 8-10 minutes but creates the same results. The key is developing smooth, elastic dough regardless of method. Your arms will get a workout, but it’s totally doable.
Why didn’t my dough rise properly? Check your yeast expiration date first, expired yeast is the most common culprit. Also verify your milk temperature wasn’t too hot (which kills yeast) or too cold (which prevents activation). Room temperature affects rise time too.
Can I prepare these the night before? Yes! After shaping the rolls in the pan, cover tightly and refrigerate overnight. Let them come to room temperature and complete the second rise the next morning before baking.
My frosting is too thick/thin, how do I fix it? Too thick? Add milk one tablespoon at a time. Too thin? Add powdered sugar gradually until you reach desired consistency. Make sure cream cheese and butter are properly softened for smooth mixing.
Can I freeze the unbaked rolls? Definitely! After shaping, place on baking sheet and freeze solid, then transfer to freezer bags. Bake from frozen, adding 5-10 extra minutes to baking time.
What if I don’t have dental floss for cutting? A sharp serrated knife works fine, just use gentle sawing motions instead of pressing straight down. Some people use unflavored dental floss, but any clean string works similarly.
How do I know when they’re fully baked? They should be golden brown on top and spring back lightly when touched. Internal temperature should reach about 190°F. Underbaked rolls will be doughy in center.
Can I reduce the sugar? You can reduce sugar in the dough by up to half, but it affects texture and browning. The filling sugar is harder to reduce without affecting consistency. Consider using less frosting instead.
Why are my rolls tough instead of soft? Usually from too much flour during kneading/rolling, over kneading, or insufficient rising time. The dough should be slightly tacky, not dry, and fully risen before baking.
What’s the best way to cut perfect spirals? Roll the dough evenly to consistent thickness, spread filling completely, roll tightly but not aggressively, and use that dental floss cutting technique for clean cuts.
Troubleshooting Guide
Even experienced bakers encounter issues sometimes. Here’s how to diagnose and fix the most common problems before they ruin your cinnamon roll dreams:
Dense, heavy rolls usually indicate insufficient rise time, dead yeast, or over floured dough. If your first rise didn’t double the dough, start over with fresh yeast. Cold kitchens need more time, be patient.
Filling leaked everywhere happens from rolling too tightly, cutting too soon after rolling, or spreading filling too close to edges. Leave that sealing strip clean, roll snugly but not aggressively, and let the log rest 5 minutes before cutting.
Uneven browning suggests oven hot spots or incorrect rack position. Rotate the pan halfway through baking and ensure you’re baking in the center of the oven. Dark pans brown faster than light ones.
Dry, overcooked rolls result from baking too long or at too high temperature. Start checking at 20 minutes and look for golden brown color. Remember they continue cooking slightly after removal from oven.
Frosting won’t stay put means the rolls are still too hot. Let them cool 10-15 minutes until warm but not steaming. The slight warmth helps frosting spread smoothly without completely melting.
Gummy, undercooked centers happen from insufficient baking time or oven temperature too low. Use an instant read thermometer, centers should reach 190°F. Don’t be afraid to bake a few extra minutes.
Final Thoughts
There’s something deeply magical about pulling a pan of golden, fragrant cinnamon rolls from your own oven. The transformation from simple ingredients to something that creates instant happiness never gets old, no matter how many times you’ve made them.
What started as intimidating yeast baking has become one of my most treasured weekend rituals. There’s meditation in the kneading, anticipation in the rising, and pure joy in watching people’s faces when they bite into warm, frosted perfection.
These aren’t just cinnamon rolls, they’re memory makers, comfort providers, and proof that the best things in life really do take time. The patience required becomes part of the pleasure, and the results speak for themselves in every pull apart, gooey bite.
Now go impress someone (or yourself) with your new culinary skills. You’ve earned it!


