

- Mix the Dough
In a large mixing bowl, combine the flour, salt, and instant yeast. Add the warm water and stir until a shaggy dough forms. The dough will be sticky and wet.
- First Rise
Cover the bowl with plastic wrap or a clean kitchen towel and let it rise at room temperature for 2 hours, or until it has doubled in size.
- Shape the Dough
After the first rise, turn the dough out onto a floured surface. With floured hands, gently shape it into a ball without kneading. Let it rest for 15 minutes.
- Preheat the Oven
About 30 minutes before baking, place a Dutch oven (with the lid) in the oven and preheat to 450°F (232°C).
- Second Rise
While the oven is preheating, cover the dough with a towel and let it rise for another 30 minutes.
- Bake the Bread
Carefully remove the hot Dutch oven from the oven. Dust the bottom with cornmeal if desired, then gently place the dough inside. Cover with the lid and bake for 30 minutes.
- Finish Baking
After 30 minutes, remove the lid and bake for an additional 15-20 minutes, or until the bread is deep golden brown and sounds hollow when tapped on the bottom.
- Cool
Remove the bread from the Dutch oven and let it cool on a wire rack for at least 30 minutes before slicing.
- Calories:120 kcals
- Fat:0.5 grams
- Proteins:3 grams
- Carcohydrates:24 grams
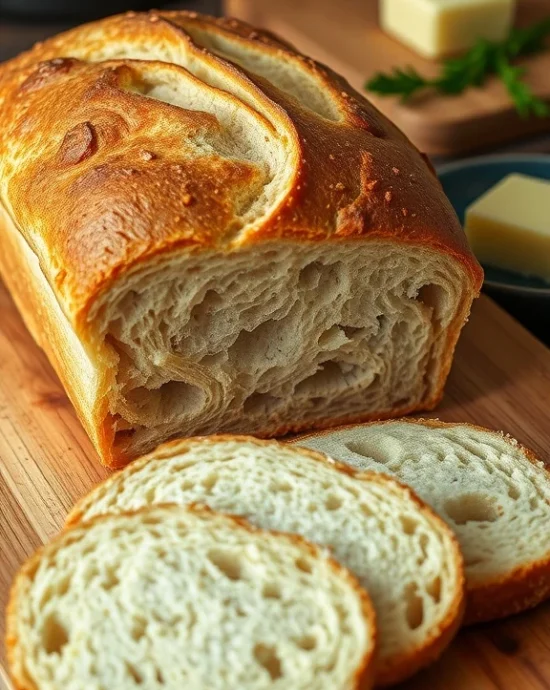
Crusty bread might just be one of life’s simplest pleasures, right up there with finding matching socks on laundry day. Picture this: golden crust that crackles when you tap it, steam escaping as you slice through that perfect exterior, revealing pillowy soft bread inside that practically begs for butter.
Making homemade crusty bread transforms your kitchen into a bakery, filling every corner with that irresistible aroma that makes neighbors mysteriously start dropping by around dinnertime. The best part? You only need four basic ingredients and a Dutch oven to create bread that rivals anything from fancy artisan bakeries.
Forget those intimidating bread recipes that require a science degree to understand. This crusty bread recipe proves that sometimes the most magnificent things come from the most humble beginnings.
Why This Recipe is Awesome
Let’s be honest, most people assume bread making is some mystical art reserved for people who wear aprons without getting them dirty and somehow never have flour in their hair. This recipe throws that notion right out the window alongside yesterday’s sourdough starter disaster.
What makes this crusty bread absolutely brilliant is its foolproof nature. The dough is more forgiving than your best friend when you forget their birthday, and the technique is so straightforward that even kitchen disasters can master it. No fancy equipment, no kneading until your arms feel like noodles, and definitely no mysterious ingredients that cost more than your monthly coffee budget.
The magic happens with just flour, salt, yeast, and water. Four ingredients that probably live in your pantry right now, patiently waiting to become something extraordinary. This recipe proves that complexity doesn’t equal quality, and sometimes the most impressive results come from embracing simplicity.
Plus, there’s something deeply satisfying about creating actual bread from scratch. Your kitchen becomes a theater of transformation where humble flour turns into something that makes people stop mid-conversation and ask, “Wait, did you actually make this?” The answer, thankfully, is always a confident yes.
The Story Behind Crusty Bread
Crusty bread traces its roots back to ancient civilizations, where bakers discovered that high heat and steam created those coveted crispy exteriors. French bakers perfected this technique centuries ago, developing what we now recognize as classic artisan bread baking methods.
The Dutch oven technique we use today actually mimics traditional stone ovens, where bakers would slide loaves onto hot stone surfaces and inject steam to create that signature crust. Modern home bakers stumbled upon this genius method by accident, discovering that a heavy pot with a tight lid recreates those professional bakery conditions perfectly.
I first encountered this technique during a particularly ambitious phase of my cooking journey, armed with nothing but determination and a Dutch oven that had been collecting dust since my last camping trip. The first loaf emerged from the oven looking like something from a European bakery, and I genuinely questioned whether I had somehow transported to another dimension where I possessed actual baking skills.
My Personal Crusty Bread Journey
What started as a weekend experiment quickly became an obsession. There’s something almost meditative about the simplicity of mixing four ingredients and watching time work its magic. The first time I heard that telltale hollow sound when tapping the bottom of a finished loaf, I felt like I had unlocked some ancient baking secret.
Friends began requesting “that bread you make” for dinner parties, and suddenly I found myself in the position of being the designated bread person in my social circle. Not a bad reputation to have, honestly. The recipe became my go-to contribution for potlucks, holiday gatherings, and those moments when I needed to make a good impression on new neighbors.
Essential Ingredients Breakdown
Understanding your ingredients makes the difference between good bread and bread that makes people close their eyes and make little happy sounds. Each component plays a specific role in creating that perfect balance of crispy exterior and tender crumb.
Flour: The Foundation
All-purpose flour works beautifully for this recipe, providing just enough protein to create structure without making the bread tough. Bread flour can certainly be substituted if you prefer a chewier texture, but honestly, all-purpose delivers consistently excellent results. The key is measuring accurately, either by weight if you have a kitchen scale or by spooning flour into your measuring cup and leveling it off.
Salt: The Flavor Enhancer
Never underestimate salt’s power in bread making. Beyond adding taste, salt strengthens gluten structure and controls yeast activity, preventing your dough from rising too quickly and developing off-flavors. Use fine sea salt or regular table salt, avoiding coarse varieties that might not distribute evenly throughout the dough.
Yeast: The Magic Maker
Instant yeast is the star performer here, working its fermentation magic to create those beautiful air pockets that make bread light and airy. Unlike active dry yeast, instant yeast can be mixed directly with flour without proofing, making this recipe even more straightforward. Store your yeast in the refrigerator or freezer to maintain potency, because expired yeast leads to flat, dense loaves that nobody wants.
Water: The Binding Agent
Room temperature or slightly warm water activates the yeast and brings everything together into a cohesive dough. Too hot, and you’ll kill the yeast. Too cold, and the rising process slows to a crawl. Aim for water that feels neutral to the touch, around 70-75°F if you want to be precise about it.
Essential Equipment & Kitchen Tips
Success with crusty bread depends more on technique than fancy equipment, but having the right tools certainly makes the process smoother and more enjoyable.
The Dutch Oven: Your Secret Weapon
A heavy Dutch oven with a tight-fitting lid is absolutely essential for achieving that perfect crust. The thick walls retain heat evenly, while the lid traps steam during the first phase of baking. Cast iron works best, but enameled Dutch ovens perform excellently too. Size matters here, aim for at least 5-6 quart capacity to give your loaf room to expand.
Mixing and Rising Equipment
A large mixing bowl gives you plenty of room to combine ingredients without flour flying everywhere like some kind of kitchen snow globe. Plastic wrap or clean kitchen towels work perfectly for covering rising dough. Some bakers swear by proofing baskets, but honestly, a bowl lined with a floured towel works just as well.
Measuring and Timing Tools
Accurate measuring makes the difference between success and disappointment. A kitchen scale eliminates guesswork if you have one, but measuring cups work fine with proper technique. A timer becomes your best friend during rising and baking phases, because crusty bread waits for no one.
Alternative Equipment Solutions
No Dutch oven? A heavy pot with an oven-safe lid can work in a pinch, though results might vary slightly. Some adventurous bakers use pizza stones with steam pans, but the Dutch oven method consistently produces superior results with less fuss and fewer opportunities for steam burns.
Pro Chef Secrets & Advanced Techniques
After making countless loaves of crusty bread, certain techniques separate good bread from absolutely spectacular bread. These professional tips transform your kitchen into a bakery-level operation.
The Autolyse Advantage
Professional bakers often use a technique called autolyse, letting flour and water rest together before adding salt and yeast. This 20-30 minute rest period allows flour to fully hydrate, developing better gluten structure and flavor. Simply mix flour and water, cover, and wait before adding remaining ingredients.
Steam Management Mastery
The Dutch oven creates its own steam environment, but understanding steam timing elevates your results. During the covered baking phase, moisture from the dough creates steam that keeps the crust soft, allowing maximum expansion. Removing the lid at precisely the right moment allows moisture to escape, creating that golden, crispy exterior.
Temperature and Timing Precision
Oven temperatures can vary significantly from the dial setting. An oven thermometer helps ensure accuracy, because even 25-degree variations affect crust development and interior texture. Preheating the Dutch oven for a full 30 minutes ensures even heat distribution and optimal steam generation.
Dough Handling Techniques
Gentle handling preserves the gas bubbles created during fermentation, maintaining that light, airy crumb structure. When shaping, use just enough flour to prevent sticking without incorporating excess flour into the dough. Think of the dough as something delicate that deserves respect rather than aggressive manipulation.
The Hollow Sound Science
That hollow sound when tapping the bottom indicates proper internal temperature, usually around 200-210°F. The sound occurs because steam has escaped, creating air spaces that resonate when tapped. It’s an ancient baker’s technique that remains remarkably accurate for determining doneness.
Common Mistakes to Avoid
Even simple recipes have potential pitfalls, but knowing what to watch for keeps your bread baking on track. These mistakes range from obvious disasters to subtle issues that affect final quality.
The Impatient Baker’s Downfall
Rushing the rising process produces dense, poorly flavored bread that resembles expensive doorstops more than actual food. Time allows yeast to work its magic, developing flavors and creating proper texture. Cold kitchens slow rising, while warm environments speed things up, but patience always pays off.
Flour Measurement Mayhem
Scooping flour directly from the bag packs it into measuring cups, resulting in too much flour and tough, dry bread. Always spoon flour into measuring cups and level with a straight edge, or better yet, weigh ingredients for consistent results every single time.
The Kneading Confusion
This no-knead recipe specifically avoids traditional kneading, relying instead on time and folding techniques to develop gluten. Over-handling the dough destroys the delicate structure you’re trying to create, so resist the urge to knead just because other bread recipes require it.
Steam Escape Disasters
Opening the oven door during the covered baking phase releases precious steam, preventing proper crust formation. Trust the process and keep that door closed for the full 30 minutes, no matter how tempting it becomes to peek at your masterpiece.
Premature Slicing Syndrome
Cutting into hot bread seems like a reward for your hard work, but it actually ruins texture by releasing steam before the crumb has set properly. The internal structure needs cooling time to achieve that perfect balance of crispy exterior and tender interior.
Salt Distribution Problems
Uneven salt distribution creates pockets of bland or overly salty bread. Mix dry ingredients thoroughly before adding water, ensuring salt disperses evenly throughout the flour. This simple step prevents flavor inconsistencies that can ruin an otherwise perfect loaf.
Yeast Vitality Issues
Using expired yeast guarantees flat, lifeless bread that never rises properly. Test yeast freshness by mixing a small amount with warm water and a pinch of sugar. Active yeast should foam within 5-10 minutes, confirming its ability to leaven your dough effectively.
Alternatives & Substitutions
Flexibility makes this recipe accessible to different dietary needs and ingredient availability, though some substitutions work better than others in achieving that perfect crusty bread texture.
Flour Alternatives and Their Effects
Bread flour can replace all-purpose flour for a chewier, more substantial texture with increased protein content. Whole wheat flour works well when substituted for up to half the all-purpose flour, adding nutty flavor and nutritional value. However, whole wheat absorbs more liquid, so you might need to increase water slightly.
Gluten-Free Modifications
Creating gluten-free crusty bread requires specialized flour blends designed for bread making, not just any gluten-free flour mixture. Bob’s Red Mill 1-to-1 Baking Flour or King Arthur Gluten-Free Bread Flour work reasonably well, though texture will differ from traditional wheat-based bread. Add xanthan gum if not already included in your flour blend.
Yeast Substitution Strategies
Active dry yeast can replace instant yeast, but requires proofing in warm water before mixing with flour. Use the same amount, but dissolve it in a portion of the recipe’s warm water with a pinch of sugar, waiting for foaming before proceeding. Fresh yeast works too, using about three times the amount of instant yeast called for.
Salt Variations and Considerations
Fine sea salt, kosher salt, or table salt all work effectively, though measurements might need slight adjustments due to crystal size differences. Coarse salts don’t distribute evenly, creating flavor inconsistencies. Avoid salt alternatives unless medically necessary, as salt plays crucial roles beyond flavoring in bread development.
Water Quality and Temperature Factors
Heavily chlorinated water can inhibit yeast activity, so consider using filtered water if your tap water has strong chemical odors or tastes. Water temperature affects rising speed, with cooler water slowing fermentation and warmer water accelerating it. Room temperature water provides the most predictable results for timing purposes.
Enrichment Options
While traditional crusty bread uses only basic ingredients, small additions can create interesting variations. A tablespoon of olive oil adds richness, while honey or sugar provides subtle sweetness and enhanced browning. These additions change texture slightly but maintain the recipe’s fundamental character.
Flavor Variations & Creative Twists
Once you’ve mastered basic crusty bread, experimenting with flavors and additions transforms this simple recipe into an endless source of culinary creativity.
Herb and Spice Infusions
Fresh rosemary, thyme, or oregano mixed into the dough creates aromatic bread perfect for Mediterranean meals. Dried herbs work too, using about half the amount of fresh herbs. Garlic powder, onion flakes, or fennel seeds add savory complexity without overwhelming the bread’s fundamental character.
Cheese and Savory Add-ins
Grated Parmesan, sharp cheddar, or crumbled feta folded into the dough just before the first rise creates rich, savory loaves. Keep additions to about 1/2 cup to maintain proper dough structure. Chopped olives, sun-dried tomatoes, or roasted peppers provide Mediterranean flair and gorgeous color contrasts.
Sweet Variations for Special Occasions
Cinnamon and a touch of brown sugar transform this into breakfast bread, while dried fruits like cranberries or raisins add natural sweetness. Orange zest brightens the flavor profile, creating bread perfect for holiday brunches or afternoon tea situations.
Seed and Nut Enhancements
Sesame seeds, poppy seeds, or everything bagel seasoning sprinkled on top before baking add texture and visual appeal. Chopped walnuts, pecans, or sunflower seeds mixed into the dough provide protein and healthy fats, creating more substantial, satisfying bread.
Seasonal Adaptations
Fall variations might include pumpkin puree and warming spices, while summer versions could incorporate fresh herbs from your garden. Winter calls for heartier additions like roasted garlic and aged cheeses, creating comfort food that pairs beautifully with soups and stews.
Serving Suggestions & Pairings
Crusty bread’s versatility makes it suitable for countless serving situations, from casual family dinners to elegant entertaining scenarios.
Classic Accompaniments
Butter remains the gold standard for fresh crusty bread, especially high-quality European-style butter that melts into every crevice of the warm crumb. Olive oil with balsamic vinegar creates an elegant dipping sauce, while herb butter elevates simple bread to restaurant-quality status.
Soup and Stew Partnerships
Nothing complements hearty soups like crusty bread for sopping up every last drop of flavorful broth. French onion soup practically demands crusty bread for proper consumption, while tomato-based soups benefit from bread’s neutral flavor that doesn’t compete with acidic ingredients.
Sandwich and Toast Applications
Thick slices of crusty bread create substantial sandwiches that hold up to robust fillings without becoming soggy disasters. Toasted slices become the foundation for bruschetta, avocado toast, or open-faced sandwiches that showcase seasonal ingredients beautifully.
Wine and Beverage Pairings
Crusty bread pairs wonderfully with red wines, especially those with earthy, rustic character that complements bread’s fundamental wheat flavors. Beer enthusiasts will find that bread enhances hoppy flavors while providing palate-cleansing properties between sips.
Entertaining and Presentation Ideas
Slice bread into thick rounds and arrange on wooden boards with cheeses, cured meats, and seasonal fruits for impressive appetizer spreads. Small individual loaves make charming dinner party favors that guests actually want to take home and enjoy later.
Storage & Reheating Guide
Proper storage maintains crusty bread’s texture and flavor, extending its useful life beyond the first day when it tastes absolutely perfect fresh from the oven.
Optimal Storage Conditions
Paper bags preserve crust crispness better than plastic, which traps moisture and creates soggy exteriors. Store at room temperature for up to three days, keeping the cut side down on a cutting board to minimize moisture loss from the crumb.
Freezing for Long-term Storage
Whole loaves freeze excellently when wrapped tightly in aluminum foil or freezer bags, maintaining quality for up to three months. Slice before freezing if you prefer grabbing individual portions, wrapping slices in parchment paper before bagging to prevent sticking together.
Reheating Techniques That Work
A few minutes in a 350°F oven revives day-old bread, restoring crust crispness and warming the interior perfectly. Frozen slices can go directly into the toaster, while whole frozen loaves need 10-15 minutes in a moderate oven wrapped in foil.
Creative Uses for Stale Bread
Day-old crusty bread makes exceptional bread crumbs, croutons, or bread pudding where slightly stale texture actually improves the final dish. French toast benefits from bread that’s lost some moisture, creating better absorption for custard mixtures without falling apart during cooking.
Nutritional Benefits & Health Notes
Understanding crusty bread’s nutritional profile helps integrate it thoughtfully into balanced eating patterns while appreciating its place in traditional diets worldwide.
Basic Nutritional Information
Each serving contains approximately 120 calories, 0.5 grams of fat, 3 grams of protein, and 24 grams of carbohydrates based on the original recipe’s nutritional data. These numbers reflect bread’s role as an energy source, providing readily available carbohydrates for active lifestyles.
Ingredient Health Benefits
Whole grain versions provide fiber, B vitamins, and minerals often stripped from refined flours, though traditional crusty bread uses all-purpose flour for optimal texture. The fermentation process makes nutrients more bioavailable while creating beneficial compounds that support digestive health.
Dietary Considerations
This recipe naturally contains no dairy, eggs, or added fats, making it suitable for many dietary restrictions. However, it does contain gluten, requiring careful substitution for those with celiac disease or gluten sensitivities who want to enjoy homemade bread.
Frequently Asked Questions
Can I make this bread without a Dutch oven?
Honestly, you could try using a heavy pot with an oven-safe lid, but results won’t be quite as spectacular. The Dutch oven creates that perfect steam environment that gives crusty bread its signature texture. Some people use pizza stones with steam pans, but why complicate things when the Dutch oven method works so beautifully?
How do I know when the bread is actually done?
That hollow sound when you tap the bottom is your best indicator, like knocking on a door to see if anyone’s home. The bread should also feel lighter than you’d expect and have a deep golden-brown color that makes you want to photograph it for social media.
Can I use active dry yeast instead of instant yeast?
Absolutely, though you’ll need to proof it first in some of the warm water with a pinch of sugar. Wait for it to get all foamy and excited before mixing with the flour. It’s like giving your yeast a little pep talk before the big performance.
Why is my bread so dense and heavy?
Usually this comes down to old yeast that’s given up on life, too much flour from heavy-handed measuring, or not giving the dough enough time to rise properly. Patience is a virtue in bread making, even when your kitchen smells amazing and you’re dying to dig in.
Can I add herbs or cheese to this recipe?
Sure thing! Mix in about 1/2 cup of grated cheese or 2 tablespoons of dried herbs after combining the basic ingredients. Just remember that additions can affect rising time and final texture, so don’t go overboard unless you’re feeling adventurous.
How long does homemade crusty bread stay fresh?
Peak freshness lasts about 24 hours, then it gradually transitions from spectacular to merely very good over the next couple days. Store it cut-side down on a cutting board or in a paper bag to maintain that crispy crust as long as possible.
Can I make the dough ahead of time?
The dough can hang out in the refrigerator for up to three days, actually improving in flavor as it slowly ferments. Just bring it back to room temperature before shaping and doing the final rise. It’s like wine, but breadier.
What if my kitchen is really cold and the dough won’t rise?
Find a warm spot like on top of the refrigerator or near a heating vent. You can also turn your oven to the lowest setting for a minute, then turn it off and put the covered bowl inside with the door slightly ajar. Just don’t accidentally preheat your dough into oblivion.
Is it normal for the dough to be really sticky?
Yes! This is a wet dough that relies on time rather than kneading to develop structure. Resist the urge to add more flour, which will make your bread tough and dense. Use floured hands when handling, and trust that the stickiness leads to those beautiful air pockets in the finished bread.
Can I double or halve this recipe?
Absolutely, just keep the proportions the same and adjust your rising vessel accordingly. A larger batch might need slightly longer rising times, while a smaller batch could be ready sooner. The beauty of this recipe is its scalability for different household needs.
Troubleshooting Guide
Even experienced bakers occasionally encounter crusty bread challenges, but most issues have straightforward solutions that prevent future disappointments.
When Your Bread Turns Out Flat
Flat bread usually indicates yeast problems, either expired yeast that’s lost its potency or water that was too hot and killed the yeast on contact. Always check expiration dates and use water that feels neutral to the touch, not hot or cold.
Dealing with Dense, Heavy Texture
Dense bread typically results from too much flour or insufficient rising time. Measure flour carefully by spooning into cups rather than scooping, which packs flour tightly and throws off ratios. Be patient with rising times, especially in cooler kitchens where yeast works more slowly.
Fixing Pale, Soft Crusts
Inadequate oven preheating or steam issues usually cause pale crusts that lack that characteristic crunch. Make sure your Dutch oven preheats for the full 30 minutes, and resist opening the oven door during the covered baking phase when steam development is crucial.
Addressing Uneven Baking
Hot spots in ovens can create unevenly baked loaves with some areas over-done while others remain pale. Rotate your Dutch oven halfway through the uncovered baking phase if your oven has known hot spots, or consider an oven thermometer to verify temperature accuracy.
Solving Gummy Interior Problems
Cutting bread too soon after baking creates gummy texture as trapped steam hasn’t had time to escape properly. Cool completely on a wire rack for at least 30 minutes before slicing, even though the aroma makes waiting feel like torture.
Final Thoughts
Making crusty bread transforms your kitchen into something magical, where four simple ingredients become golden, crackling perfection that makes people stop mid-conversation and ask for seconds. This recipe proves that some of life’s greatest pleasures come from the most humble beginnings.
The process itself becomes meditative after a few attempts, creating rhythms that fit naturally into weekend routines or lazy afternoons when you want to fill your home with warmth and incredible aromas. There’s genuine satisfaction in creating something so fundamentally nourishing with just flour, water, salt, and yeast.
Share this bread with people you care about, because homemade crusty bread has this wonderful way of making ordinary meals feel special and bringing folks together around the table. The gift of fresh bread says “I took time to make something beautiful for you” in the most delicious way possible.
Now go impress someone (or yourself) with your new culinary skills. You’ve earned it, and your kitchen deserves to smell this amazing.


