

- Melt the Chocolate
In a microwave-safe bowl, melt the dark chocolate in 30-second intervals, stirring until smooth. Allow it to cool slightly.
- Whip Egg Yolks
In a separate bowl, whisk the egg yolks and sugar until pale and creamy. Stir in the melted chocolate and vanilla extract.
- Beat Egg Whites
In another bowl, beat the egg whites with a pinch of salt until stiff peaks form. Gently fold the egg whites into the chocolate mixture, being careful not to deflate them.
- Whip Cream
In a separate bowl, whip the heavy cream until soft peaks form, then fold it into the chocolate mixture until fully combined.
- Chill
Spoon the mousse into serving dishes and refrigerate for at least 2 hours or until set.
- Serve
Once chilled, garnish with chocolate shavings or fresh berries if desired, and enjoy your easy chocolate mousse!
The ingredient list is beautifully simple, but each component plays a crucial role in creating that perfect mousse texture. Dark chocolate with 60-70% cocoa content gives you the best balance of chocolate intensity and sweetness. Lower percentages can make the mousse too sweet, while higher percentages might make it bitter for some palates. Fresh eggs are absolutely essential here. The yolks provide richness and help create that silky base, while the whites add the light, airy quality that makes mousse so special. Don't even think about using egg substitutes for this recipe, the real thing is what makes the magic happen.
- Calories:320 kcals
- Fat:22 grams
- Protein:5 grams
- Carbohydrates:27 grams
This easy chocolate mousse is about to become your new obsession, and honestly, I’m not even sorry about it. We’re talking silky smooth, melt in your mouth, chocolate heaven that requires zero fancy pastry skills and delivers maximum wow factor every single time. If you’ve ever thought chocolate mousse was too complicated or intimidating, prepare to have your mind completely blown by how simple this actually is.
Picture this: you’ve got unexpected guests coming over, or maybe you just need something ridiculously indulgent after surviving another Monday. This easy chocolate mousse comes together faster than you can decide what to binge watch on Netflix, yet tastes like you spent hours being all fancy in the kitchen. It’s basically the ultimate dessert hack that makes you look like a culinary genius without breaking a sweat.
The best part? You probably already have most of these ingredients hanging out in your kitchen right now. No weird specialty items, no trips to fancy food stores, just pure chocolate bliss waiting to happen in your own home.
Why This Recipe is Awesome
Let me tell you why this particular easy chocolate mousse recipe is absolutely game changing. First off, it’s ridiculously foolproof. I’m talking about the kind of recipe that works even when you’re multitasking, slightly distracted, or operating on three hours of sleep. The technique is so forgiving that even if you mess up a step or two, you’ll still end up with something delicious.
What really sets this version apart is the perfect balance of richness and lightness. You get that intense chocolate flavor that makes your taste buds do a happy dance, but without that heavy, overly dense feeling that some chocolate desserts leave you with. It’s like eating a chocolate cloud, if clouds were made of pure deliciousness and didn’t float away when you tried to catch them.
The texture is absolutely divine. We’re talking about that perfect mousse consistency that’s creamy enough to feel luxurious but light enough that you can totally justify having seconds. Or thirds. I don’t judge, and neither should you. Life’s too short for dessert guilt, especially when the dessert is this incredible.
Plus, this recipe is incredibly versatile. Want to make it fancy for a dinner party? Easy. Need something quick for a weeknight treat? Done. Trying to impress someone special? This mousse has got your back. It’s like the little black dress of the dessert world, appropriate for any occasion and always makes you look good.
The Story Behind Easy Chocolate Mousse
Chocolate mousse originated in France during the 18th century, where it was considered the height of culinary sophistication. The name literally means “chocolate foam” in French, which perfectly describes that light, airy texture that makes mousse so special. Traditional French chefs would spend hours perfecting their technique, carefully folding ingredients and monitoring temperatures like they were conducting a chocolate symphony.
I discovered the magic of easy chocolate mousse during what I like to call “The Great Dinner Party Disaster of 2019.” I had invited twelve people over for what was supposed to be an elegant evening, and my elaborate dessert plan completely fell apart when my oven decided to have a midlife crisis. There I was, two hours before guests arrived, with no dessert and a mild panic attack brewing.
That’s when my French neighbor, Marie, knocked on my door with a bowl of the most incredible chocolate mousse I’d ever tasted. She literally made it in my kitchen in about twenty minutes while I watched in amazement. No fancy equipment, no complicated techniques, just pure chocolate magic happening before my eyes. She said, “Chérie, cooking should be joyful, not stressful. Simple ingredients, simple technique, magnifique results.”
That night, my guests raved about the dessert, and I’ve been making variations of Marie’s recipe ever since. What started as a disaster rescue mission became my go to dessert for everything from casual dinners to special celebrations. The beauty of this easy chocolate mousse lies in its accessibility, anyone can make restaurant quality dessert at home without needing a culinary degree.
Over the years, I’ve tweaked and perfected the technique, testing different chocolate ratios, experimenting with various folding methods, and figuring out exactly how to get that perfect silky texture every time. The secret isn’t in complicated steps or expensive ingredients, it’s in understanding how each component works together and letting the chocolate be the star of the show.
The French may have invented chocolate mousse, but this easy version proves that incredible desserts don’t have to be intimidating or time consuming. Sometimes the best recipes are the ones that bring joy without stress, which is exactly what this mousse delivers every single time.
Essential Equipment & Kitchen Tips
The beauty of this easy chocolate mousse is that you don’t need any fancy equipment to pull it off successfully. A few basic tools and you’re ready to create dessert magic. You’ll need three mixing bowls (trust me, this matters), a whisk or electric mixer, and a microwave-safe bowl for melting chocolate. That’s literally it.
Must Have Tools:
- Three separate mixing bowls (different sizes work great)
- Electric hand mixer or whisk (hand mixing is possible but more work)
- Microwave-safe bowl for chocolate melting
- Rubber spatula for gentle folding
- Individual serving glasses or bowls
Pro Equipment Tips: Using separate bowls for egg yolks, egg whites, and cream isn’t just about organization, it’s about success. You cannot whip egg whites properly if there’s even a trace of fat from yolks, and keeping everything separate ensures perfect results every time.
A stand mixer makes this process incredibly easy, but a good quality hand mixer works just as well. If you’re going the manual route with a whisk, make sure it’s a good sturdy one and prepare for a little arm workout. The results are worth it, but your biceps might remind you about it the next day.
Temperature Control Secrets: Room temperature eggs separate more easily and whip better than cold ones. Take them out of the fridge about thirty minutes before you start. However, cream whips better when it’s cold, so keep that chilled until you’re ready to use it.
Chocolate Melting Mastery: Use the microwave method for foolproof results. Thirty second intervals with stirring prevents overheating and seizing. If your chocolate gets too hot, it can cause the mousse to become grainy, so patience is key here.
Pro Chef Secrets & Advanced Techniques
After making countless batches of this easy chocolate mousse, I’ve discovered some insider secrets that’ll take your dessert from good to absolutely extraordinary. The most important technique is proper folding. When you’re incorporating the egg whites and cream, use a light hand and fold from the bottom up, cutting through the mixture and turning it over itself. This preserves those precious air bubbles that give mousse its signature texture.
The Chocolate Temperature Trick: Let your melted chocolate cool for about five minutes before adding it to the egg yolks. If it’s too hot, it’ll scramble the eggs. If it’s too cool, it might seize when mixed with other ingredients. The perfect temperature feels barely warm to the touch, like a comfortable bath rather than a hot shower.
Egg White Excellence: The secret to perfect egg whites is starting with a completely clean, dry bowl. Even a tiny bit of fat or moisture can prevent proper whipping. I like to wipe my bowl with a paper towel and a bit of lemon juice, then dry it completely. This ensures maximum volume and stability in your whites.
The Sugar Timing Secret: Add the sugar to your egg yolks gradually while whisking. This creates a smoother, more stable base and helps prevent the mixture from curdling when you add the chocolate. The mixture should become noticeably lighter in color and thicker in texture.
Folding Finesse: Never stir or whisk once you start adding the egg whites and cream. Folding is a gentle lifting and turning motion that preserves air while combining ingredients. Start by adding about one third of the whites to lighten the chocolate base, then gently fold in the rest along with the whipped cream.
Common Mistakes to Avoid
Let me save you from some seriously heartbreaking mousse disasters because I’ve made every single one of these mistakes so you don’t have to. Mistake number one: rushing the chocolate cooling process. Hot chocolate plus eggs equals scrambled eggs, and nobody wants chunks of cooked egg in their elegant dessert. Be patient and let that chocolate cool to barely warm before proceeding.
The Overbeaten Cream Catastrophe: Stop whipping your cream at soft peaks, not stiff ones. Overbeaten cream becomes grainy and can even turn into butter if you go too far. Soft peaks hold their shape but still look smooth and creamy. If you accidentally overbeat, there’s unfortunately no going back.
Deflated Dreams from Overmixing: This is probably the most common mistake people make. Once you start folding in those beautiful, fluffy egg whites, treat them like delicate flowers. Aggressive mixing or using a regular stirring motion will knock out all the air and leave you with dense, heavy mousse instead of light, airy perfection.
The Impatient Taster Trap: I know it’s tempting to taste test before chilling, but mousse needs that refrigerator time to set properly. Warm mousse is basically chocolate soup, delicious chocolate soup, but not the elegant dessert you’re aiming for. Give it those full two hours minimum.
Using the Wrong Chocolate: Chocolate chips seem convenient, but they contain stabilizers that prevent proper melting and can create a grainy texture. Stick with good quality dark chocolate bars and chop them yourself. Your mousse will thank you with silky smoothness.
Bowl Contamination Crisis: Any trace of egg yolk in your whites or any fat in your whipping cream bowl can ruin the texture. Keep everything scrupulously clean and separate until it’s time to combine ingredients.
Alternatives & Substitutions
Life happens, and sometimes you need to work with what’s available in your kitchen. The good news is that this easy chocolate mousse is surprisingly adaptable, though some substitutions work better than others. Can’t find dark chocolate? Semi-sweet chocolate works beautifully, just reduce the sugar slightly since it’s already sweeter. Milk chocolate creates a milder flavor that some people prefer, especially kids.
Dairy-Free Dreams: Replace heavy cream with coconut cream from a chilled can. Use only the thick part that separates at the top, and whip it the same way you would regular cream. The flavor will have a subtle coconut note that actually pairs beautifully with chocolate. Coconut cream doesn’t whip quite as stably as dairy cream, so serve the mousse within a day for best texture.
Sugar Alternatives: Maple syrup or honey can replace granulated sugar, but you’ll need to reduce other liquids slightly. Powdered sugar works well too and actually dissolves more easily into the egg yolks. For those watching sugar intake, erythritol or other granulated sweeteners work, though the texture might be slightly different.
Egg Concerns: If you’re worried about raw eggs, you can use pasteurized eggs, which are available at many grocery stores. The texture will be identical, and you’ll have peace of mind. Unfortunately, there’s no good substitute for eggs in this recipe since they provide both structure and richness.
Flavor Variations: Add a tablespoon of strong coffee to intensify the chocolate flavor without making it taste like coffee. A splash of rum, bourbon, or Grand Marnier creates an elegant adult version. Orange zest adds a bright citrus note that pairs beautifully with dark chocolate.
Lighter Versions: You can replace half the heavy cream with Greek yogurt for a slightly tangier, less rich version. The texture will be a bit denser but still delicious. This also adds protein and reduces calories if that’s a concern.
Flavor Variations & Creative Twists
Once you’ve mastered the basic easy chocolate mousse, a whole world of flavor possibilities opens up like a delicious, creamy treasure chest. My personal favorite variation is adding a coffee kick by dissolving a tablespoon of instant espresso powder into the melted chocolate. It doesn’t make the mousse taste like coffee, it just intensifies the chocolate flavor in the most incredible way.
The Mint Chocolate Dream: Add a teaspoon of peppermint extract to create a restaurant quality mint chocolate mousse. Start with less and taste as you go, mint can quickly become overwhelming. Garnish with crushed peppermint candies or a sprig of fresh mint for visual appeal.
Spiced Chocolate Adventure: A pinch of cinnamon, cayenne pepper, or even cardamom transforms this into an exotic dessert with warm, complex flavors. Mexican hot chocolate inspired versions with cinnamon and a tiny bit of chili powder are absolutely incredible and unexpected.
Berry Chocolate Fusion: Fold in a tablespoon of raspberry jam or fresh berry puree for a fruity twist. The tartness of berries balances the rich chocolate beautifully. You can also layer the mousse with fresh berries in individual glasses for an elegant presentation.
Boozy Sophistication: Adult versions with alcohol are always popular at dinner parties. Rum creates a tropical vibe, bourbon adds warmth and complexity, and Grand Marnier brings elegant orange notes. Use about two tablespoons per batch and add it with the vanilla extract.
White Chocolate Variation: Use white chocolate instead of dark for a completely different but equally delicious dessert. The technique remains the same, but the flavor profile becomes more delicate and sweet. This version pairs beautifully with fresh strawberries or raspberry sauce.
Serving Suggestions & Pairings
The presentation of your easy chocolate mousse can transform it from simple dessert to show stopping finale. Individual glass cups or ramekins are classic choices that let you see those beautiful layers and create an elegant, restaurant quality presentation. Wine glasses, martini glasses, or even small mason jars work beautifully too.
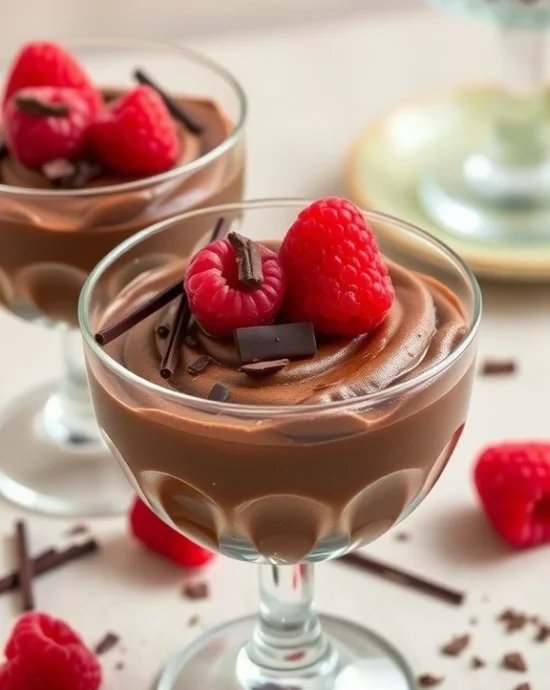
Garnish Like a Pro: Fresh berries add color, acidity, and visual appeal. Strawberries, raspberries, and blackberries all pair beautifully with chocolate. A small dollop of lightly sweetened whipped cream creates lovely contrast, while chocolate shavings or cocoa powder dusting adds sophisticated finishing touches.
Temperature Contrast Magic: Serve chilled mousse with warm accompaniments for an incredible sensory experience. A small warm chocolate cookie, a drizzle of warm caramel sauce, or even a tiny cup of hot espresso on the side creates delightful temperature contrasts that make each bite more interesting.
Textural Elements: Add crunch with chopped toasted nuts, crumbled cookies, or toffee bits. The contrast between silky mousse and crunchy elements makes every spoonful more engaging. Toasted coconut flakes add both texture and tropical flavor that works surprisingly well with chocolate.
Wine and Beverage Pairings: Port wine and chocolate mousse is a classic combination that never fails to impress. Red wines with berry notes complement chocolate beautifully, while coffee or espresso creates a café-style experience. For non-alcoholic options, try it with cold milk or sparkling water with a twist of orange.
Seasonal Adaptations: Summer presentations with fresh berries and light garnishes feel refreshing. Winter versions with warm spices, nuts, and richer accompaniments create cozy, comforting experiences. Holiday presentations with candy cane pieces or cinnamon sticks make festive table centerpieces.
Storage & Reheating Guide
Proper storage keeps your easy chocolate mousse perfect for days, making it an excellent make ahead dessert for entertaining. Cover individual servings tightly with plastic wrap, pressing it directly onto the surface to prevent a skin from forming. Properly stored mousse stays fresh in the refrigerator for up to three days, though it’s honestly best within the first day or two.
Make Ahead Magic: This mousse is actually better when made a day ahead. The flavors have time to meld and develop, creating an even more delicious result. Make it in the morning for evening dinner parties, or even the night before for stress-free entertaining.
Freezing Guidelines: While not traditional, chocolate mousse can be frozen for up to one month. The texture changes slightly, becoming more like a frozen chocolate dessert rather than traditional mousse, but it’s still absolutely delicious. Thaw slowly in the refrigerator for several hours before serving.
Transport Tips: If you need to transport mousse to another location, keep it cold with ice packs and avoid jostling too much. The delicate texture can break if shaken vigorously, though gentle movement is usually fine. Individual containers travel better than large serving bowls.
Leftover Solutions: If you somehow have leftover mousse, it makes an incredible filling for cakes or tart shells. You can also warm it gently and use it as an amazing chocolate sauce for ice cream or fresh fruit. Just barely warm it, don’t let it get hot or the texture will break.
Nutritional Benefits & Health Notes
While nobody’s claiming chocolate mousse is health food, it does offer some surprising nutritional benefits that make it a reasonable indulgence. Dark chocolate contains antioxidants called flavonoids that support heart health and may help reduce inflammation. The higher the cocoa content, the more antioxidants you’re getting, which is why using quality dark chocolate matters.
Protein Power: Eggs provide high-quality complete protein, while cream adds calcium and vitamin A. One serving of this mousse provides about 5 grams of protein, which isn’t insignificant for a dessert. The combination of protein and fat helps slow sugar absorption, preventing the rapid blood sugar spikes associated with many other desserts.
Portion Control Reality: At 320 calories per serving, this mousse is actually quite reasonable for such an indulgent dessert. Compare that to a slice of cheesecake or chocolate cake from a restaurant, which can easily pack 600-800 calories, and suddenly this seems like the sensible choice.
Mood Benefits: Chocolate contains compounds that can boost serotonin and endorphin levels, contributing to feelings of happiness and well-being. Sometimes the mental health benefits of enjoying a truly delicious dessert outweigh strict caloric concerns, especially when the portion is reasonable.
Dietary Considerations: This recipe contains eggs and dairy, so it’s not suitable for vegans or those with severe egg allergies. However, the high fat content means it’s naturally very low in carbohydrates, making it potentially suitable for those following low-carb lifestyles.
FAQ (Frequently Asked Questions)
Can I use milk chocolate instead of dark chocolate? Absolutely! Milk chocolate creates a sweeter, milder flavor that many people prefer. Just reduce the added sugar by about half since milk chocolate is already quite sweet. The texture will be slightly different but equally delicious.
What if my chocolate seizes while melting? Don’t panic! Add a tablespoon of warm cream or milk and stir gently. This usually brings seized chocolate back to smooth consistency. Prevention is better though, so use low heat and stir frequently when melting chocolate.
Can I make this without raw eggs? You can use pasteurized eggs for safety, but the texture and taste remain the same. Unfortunately, there’s no good substitute for eggs in this recipe since they provide both structure and richness. Consider egg-free chocolate mousse recipes if this is a concern.
Why didn’t my mousse set properly? Usually this happens when ingredients were too warm when combined, or the mousse wasn’t chilled long enough. Make sure chocolate cools before adding to yolks, and give it those full two hours minimum in the fridge. Also check that your cream whipped to proper soft peaks.
Can I make this ahead for a party? Yes! This mousse is actually better when made a day ahead. The flavors develop and the texture becomes even more perfect. Cover tightly and refrigerate until ready to serve. It stays good for up to three days.
What’s the difference between soft and stiff peaks? Soft peaks hold their shape but the tips curl over when you lift the beaters. Stiff peaks stand straight up and hold their shape completely. For mousse, you want soft peaks in the cream to maintain that silky texture.
Can I double this recipe? Absolutely! Use the same technique but work in a larger bowl. The timing stays the same, just make sure you have enough individual serving dishes. Large batches actually work quite well since the proportions scale evenly.
Why did my mousse turn out grainy? This usually happens when chocolate gets too hot and seizes, or when ingredients are combined too aggressively. Make sure chocolate is just barely warm and fold gently to preserve that silky smooth texture.
What’s the best chocolate to use? Good quality dark chocolate with 60-70% cocoa content works best. Brands like Ghirardelli, Lindt, or Valrhona give excellent results. Avoid chocolate chips since they contain stabilizers that can affect texture.
Can I add alcohol to this recipe? Yes! Add about 2 tablespoons of rum, bourbon, or liqueur with the vanilla extract. Popular choices include Grand Marnier, Kahlua, or dark rum. Start with less and add more to taste.
Troubleshooting Guide
Problem: Lumpy, Grainy Texture – This devastating situation usually happens when hot chocolate meets cold ingredients too quickly, causing the chocolate to seize. Prevention: Let chocolate cool to barely warm before combining with other ingredients. Always add chocolate to yolks gradually while whisking constantly. Fix: If it’s already happened, try warming the mixture gently while whisking vigorously, sometimes this smooths things out.
Problem: Dense, Heavy Mousse – When your mousse resembles chocolate pudding more than airy mousse, it’s usually because the egg whites were deflated during mixing. Solution: This is unfortunately difficult to fix after the fact, but you can still serve it as a rich chocolate cream. Next time, fold more gently and stop as soon as ingredients are just combined.
Problem: Mousse Won’t Set – If your mousse is still liquid after proper chilling time, temperatures were likely too warm during preparation. Quick fix: Place in the freezer for 30 minutes to firm up, then return to refrigerator. Prevention: Ensure all ingredients are at proper temperatures before combining.
Problem: Separated or Curdled Appearance – This happens when fats and liquids don’t properly emulsify, usually due to temperature differences. Rescue mission: Sometimes gentle warming while whisking can bring it back together. If not, strain the mixture and start over with the egg whites and cream portions.
Problem: Overly Sweet or Bitter – Taste problems are hard to fix after the fact, but you can serve with contrasting flavors. Too sweet: Serve with tart berries or unsweetened whipped cream. Too bitter: A light dusting of powdered sugar or sweet berry sauce can help balance flavors.
Advanced Presentation Techniques
Taking your easy chocolate mousse from delicious to absolutely stunning requires some presentation finesse that’ll make people think you’re a professional pastry chef. Layered presentations in clear glasses create visual drama that’s surprisingly easy to achieve. Make the basic mousse, then create a second layer with white chocolate mousse or vanilla bean cream for gorgeous color contrast.
The Professional Piping Technique: Transfer mousse to a piping bag fitted with a star tip for elegant individual presentations. Pipe rosettes into small glasses or onto dessert plates for restaurant quality plating. This technique also helps with portion control and creates consistent, beautiful servings.
Chocolate Work Magic: Learning to make chocolate shavings, curls, or even simple chocolate decorations elevates the entire dessert. Use a vegetable peeler on room temperature chocolate for perfect curls, or melt chocolate and spread it thin, then scrape with a knife for professional looking shavings.
Temperature Play: Serve mousse with contrasting temperature elements for sensory excitement. Warm chocolate sauce drizzled around the plate, a small warm cookie on the side, or even a shot of hot espresso creates delightful temperature contrasts that make each bite more memorable.
Seasonal Garnish Ideas: Spring presentations with edible flowers and fresh mint, summer versions with colorful berries and citrus zest, autumn decorations with caramelized nuts and warm spices, winter presentations with candied orange peel and cinnamon sticks. Each season offers unique garnish opportunities.
Final Thoughts
At the end of the day, this easy chocolate mousse represents everything I love about cooking: simple ingredients transformed into something magical through technique and care. It’s not about having the fanciest equipment or the most expensive ingredients, it’s about understanding how flavors and textures work together to create pure happiness in a bowl.
What makes this recipe truly special is its accessibility. You don’t need years of pastry training or professional equipment to create dessert that rivals anything you’d find in a high-end restaurant. The techniques are straightforward, the ingredients are readily available, and the results are consistently impressive.
This mousse has been my go-to for everything from casual dinners with friends to elegant dinner parties where I want to end the meal on a high note. It’s impressive enough for special occasions but simple enough for random Tuesday nights when you just need something wonderful in your life.
The beauty of mastering this recipe is that once you understand the basic technique, you can adapt it endlessly. Different chocolates, various flavor additions, creative presentations, the possibilities are truly endless. Each variation teaches you something new about how ingredients work together and how small changes can create completely different experiences.
Whether you’re feeding family, impressing friends, or just treating yourself to something special, this easy chocolate mousse delivers every single time. It’s comfort and elegance rolled into one perfect dessert that never fails to make people smile.
Now go create some chocolate magic in your own kitchen. Trust me, once you taste this mousse, you’ll wonder why you ever thought chocolate desserts were complicated. Sometimes the best things in life really are the simplest, and this mousse proves that point deliciously.


