

- Mix the Dough
In a large mixing bowl, combine the bread flour and water. Mix until no dry flour remains. Let it rest for about 30 minutes for autolyse.
- Add Starter and Salt
After the autolyse, add the active sourdough starter and salt to the dough. Mix until fully incorporated.
- Initial Fermentation
Cover the bowl with a damp cloth or plastic wrap, and let it rise at room temperature for about 4-6 hours, performing stretch and fold every 30 minutes for the first 2 hours.
- Shape the Dough
After the initial fermentation, turn the dough out onto a lightly floured surface. Shape it into a round or oval loaf, then let it rest for about 20 minutes.
- Final Shaping
Shape the dough again into a tight ball or rectangle, depending on your loaf pan. Place it seam-side down in a greased loaf pan.
- Proofing
Cover the loaf with a damp cloth and let it proof for about 2-3 hours at room temperature or in the refrigerator overnight for a slower fermentation.
- Preheat the Oven
30 minutes before baking, preheat your oven to 450°F (230°C).
- Bake
When ready to bake, score the top of the loaf with a sharp knife. Place the loaf in the oven and bake for 30-35 minutes, until golden brown and the internal temperature reads around 200°F (93°C).
- Cool
Remove the bread from the oven and let it cool in the pan for 10 minutes, then turn it out onto a wire rack to cool completely before slicing.
Many people who struggle with regular wheat bread find sourdough more digestible due to the pre-digestion that occurs during fermentation. The bacteria break down gluten proteins and other compounds that can cause digestive issues, though this doesn't make it suitable for those with celiac disease. Probiotic benefits from naturally occurring bacteria support gut health, though most bacteria don't survive the baking process. However, the prebiotic compounds they produce do survive and feed beneficial gut bacteria, supporting overall digestive health.
- Calories:160 kcals
- Fat:0.5 grams
- Proteins:5 grams
- Carbohydrates:32 grams
This sourdough sandwich bread recipe will transform your kitchen into a neighborhood bakery where the aroma alone stops people in their tracks. Picture slicing into a perfectly golden loaf with that ideal soft crumb, hearing the gentle crackle of the crust as your knife glides through. There’s something deeply satisfying about making bread from scratch, especially when it involves the ancient art of sourdough fermentation.
You might think sourdough sandwich bread sounds intimidating, but honestly, it’s more forgiving than you’d expect. Unlike those finicky artisan boules that require perfect timing and steam chambers, this recipe focuses on creating the kind of bread you actually want to eat every day. We’re talking about soft, pillowy slices perfect for morning toast, afternoon sandwiches, or late-night snacking straight from the cutting board.
The best part about mastering this technique is watching your family’s reaction when they realize you’re never buying store-bought bread again. That moment when someone takes their first bite and their eyes widen with surprise, that’s when you know you’ve unlocked something special. This isn’t just bread making, it’s creating memories one loaf at a time.
Why This Recipe Will Change Your Bread Game Forever
Let’s address the elephant in the room: most people think sourdough is either too complicated or too time-consuming for regular home baking. This sourdough sandwich bread recipe proves both assumptions completely wrong. You’re looking at active work time of maybe twenty minutes spread across two days, with the starter and time doing most of the heavy lifting.
What sets this recipe apart from typical sourdough methods is its focus on practicality without sacrificing flavor. Traditional sourdough can be temperamental, requiring precise temperatures, specific timing, and sometimes ritualistic devotion that borders on obsessive. This version embraces flexibility while still delivering that characteristic tang and superior digestibility that makes sourdough special.
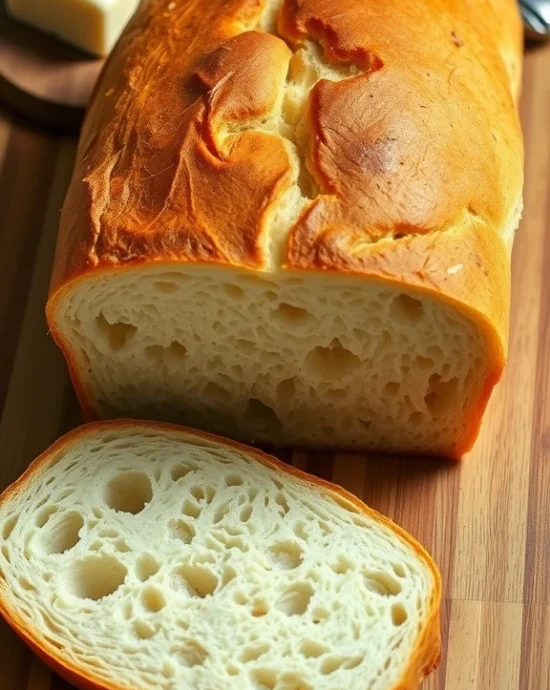
The texture achieves something magical that commercial bread simply cannot replicate. Each slice has enough structure to hold substantial sandwich fillings without falling apart, yet remains tender enough to practically melt on your tongue. The crust provides just enough chew without requiring industrial-strength jaw muscles, making it perfect for everyone from toddlers to grandparents.
Perhaps most importantly, this bread actually improves with age rather than turning into cardboard within days. Proper sourdough fermentation creates natural preservatives that keep your loaf fresh for up to a week, assuming it lasts that long once people discover your newfound baking skills.
The nutritional benefits deserve mention too. Sourdough fermentation breaks down proteins and starches in ways that make bread easier to digest while reducing its glycemic impact. People with mild gluten sensitivities often find sourdough more tolerable than commercial yeast breads, though this isn’t suitable for those with celiac disease.
The Fascinating Journey of Sourdough Through Time
Every slice of this sourdough sandwich bread connects you to thousands of years of baking history that stretches back to ancient Egypt. Archaeological evidence suggests that sourdough fermentation was humanity’s first controlled biological process, discovered probably by accident when wild yeasts found their way into stored grain mixtures. What started as necessity became the foundation of civilization itself.
My own sourdough journey began during a particularly stressful period when kneading dough became my meditation. A friend gifted me a starter named “Gertrude” that supposedly traced back to Gold Rush California, though I suspect that lineage involved more storytelling than historical accuracy. Regardless of her actual heritage, Gertrude taught me patience, consistency, and the joy of creating something from practically nothing.
The technique spread across continents through trade routes, with each culture developing distinctive characteristics based on local grains, climate, and customs. Russian black bread, German pumpernickel, and San Francisco sourdough all evolved from the same basic principle of wild fermentation, yet each developed unique flavors reflecting their environments.
During the California Gold Rush, sourdough became so essential that miners were nicknamed “sourdoughs” after their precious starter cultures. These starters represented survival itself, carefully maintained and shared among friends as valuable as gold nuggets. Many modern West Coast bakeries trace their starter lineages back to this era, creating living connections to American frontier history.
The industrial revolution nearly killed sourdough bread making as commercial yeast became cheap and widely available. Bakers could produce bread in hours rather than days, meeting growing urban demand with unprecedented speed. Traditional fermentation methods seemed obsolete compared to modern efficiency, relegated to remote areas where old ways persisted out of necessity.
Fortunately for us, the artisan bread movement of the late 20th century rescued sourdough from near extinction. Passionate bakers rediscovered the superior flavor, texture, and health benefits of slow fermentation. Home bakers embraced the meditative aspects of bread making, finding joy in processes that demanded patience rather than instant gratification.
Essential Equipment & Kitchen Tips
Must-Have Tools for Bread Success
Creating perfect sourdough sandwich bread doesn’t require a professional bakery setup, but having the right basic tools makes everything smoother and more enjoyable. A large mixing bowl gives you plenty of room for the initial mixing and kneading without flour flying everywhere. Glass or stainless steel bowls work best since they don’t retain odors or interfere with fermentation.
A kitchen scale revolutionizes your bread making accuracy more than any other single tool. Measuring flour by weight rather than volume eliminates the guesswork that leads to inconsistent results. Professional bakers always weigh ingredients because humidity, flour type, and measuring technique can dramatically affect cup measurements.
A bench scraper becomes invaluable for handling sticky dough and transferring portions without making a mess. This simple tool costs less than ten dollars but improves your bread making experience significantly. You’ll wonder how you ever managed without one once you start using it regularly.
Professional Preparation Secrets
Temperature control affects fermentation speed and flavor development more than any other factor. Invest in an instant-read thermometer to monitor dough temperature and ensure optimal conditions for yeast activity. Room temperature variations can double or halve fermentation times, so knowing your dough’s actual temperature helps predict timing accurately.
Creating a proofing environment extends your bread making season beyond perfect weather conditions. During cold months, use your oven’s proof setting if available, or simply turn the oven light on to create gentle warmth. In summer, find the coolest spot in your kitchen to prevent over-fermentation.
Workspace Organization Tips
Flour your work surface generously but strategically. Too little flour creates sticky nightmares, while too much gets incorporated into the dough and affects hydration ratios. Start with a light dusting and add more as needed during kneading.
Keep a damp towel nearby for cleaning your hands frequently during the process. Sticky fingers make everything more difficult and can lead to frustration that ruins the meditative aspects of bread making. Clean hands work more efficiently and make the entire experience more pleasant.
Pro Chef Secrets & Advanced Techniques
Understanding Fermentation Science
The magic behind exceptional sourdough sandwich bread lies in understanding the complex biochemistry of fermentation. Wild yeasts and lactobacilli bacteria work together in your starter, creating not just leavening but also the acids that give sourdough its distinctive flavor. These microorganisms break down proteins and starches, making nutrients more bioavailable while developing complex flavors impossible to achieve with commercial yeast alone.
Temperature management becomes your most powerful tool for controlling fermentation speed and flavor development. Warmer conditions accelerate yeast activity but can overwhelm bacterial acid production, creating bread that rises quickly but lacks the characteristic sourdough tang. Cooler fermentation slows the process but allows acids to develop more fully, creating deeper, more complex flavors.
Professional Texture Optimization
Achieving the perfect crumb structure requires understanding how gluten development affects final texture. Unlike artisan breads where irregular holes are desirable, sandwich bread needs even distribution of small to medium-sized air pockets. This requires thorough kneading to develop strong gluten networks that can trap gas efficiently during fermentation.
Hydration levels dramatically affect both texture and handling characteristics. Higher hydration creates more open crumb structures but can make shaping more challenging. This recipe balances hydration to provide excellent texture while remaining manageable for home bakers without professional handling skills.
Master-Level Timing Techniques
Professional bakers rely on visual and tactile cues rather than strict timing schedules because fermentation rates vary with countless environmental factors. Learn to recognize when dough has developed properly by observing its appearance, feeling its texture, and understanding how it responds to handling.
The “poke test” reveals fermentation progress more reliably than time measurements. Properly proofed dough springs back slowly when gently poked, indicating that gas production and gluten relaxation have reached optimal balance. Under-proofed dough springs back quickly, while over-proofed dough doesn’t spring back at all.
Advanced Flavor Development
Extending fermentation time through refrigeration techniques allows flavor compounds to develop more fully while fitting bread making into busy schedules. After the first rise, you can refrigerate the dough for up to 48 hours, slowing fermentation to a crawl while acids continue developing complexity.
Autolyse techniques, where flour and water rest before adding starter and salt, improve final texture and reduce kneading requirements. This rest period allows flour proteins to hydrate fully and begin forming gluten networks naturally, creating stronger dough with less mechanical development.
Common Mistakes to Avoid
The Starter Disasters
Using inactive or weak starter guarantees disappointing results no matter how perfect your technique otherwise. Your starter should double in size within 4-8 hours of feeding and smell pleasantly tangy, not vinegary or alcoholic. Weak starters produce dense, poorly risen bread that lacks proper sourdough character.
Feeding your starter inadequately before baking creates fermentation problems that compound throughout the process. Plan ahead by feeding your starter 12-24 hours before mixing dough, ensuring it reaches peak activity when you need it. Neglected starters need several feeding cycles to regain full strength.
Temperature Troubles
Hot water kills yeast and bacteria in your starter, destroying the very microorganisms that make sourdough possible. Water should feel barely warm to the touch, around 80-85°F, warm enough to encourage activity without causing thermal shock. When in doubt, use room temperature water rather than risking overheating.
Extreme kitchen temperatures create unpredictable fermentation rates that can ruin timing completely. Summer heat can cause over-fermentation in just a few hours, while winter cold might extend fermentation beyond 24 hours. Adjust expectations and timing based on your kitchen’s actual conditions rather than recipe assumptions.
Kneading Catastrophes
Under-kneading produces weak gluten development that can’t support proper rise or structure. Properly kneaded dough feels smooth and elastic, springs back when poked, and passes the “windowpane test” where you can stretch a small piece thin enough to see light through without tearing.
Over-kneading, while less common with hand kneading, can break down gluten networks and create tough, dense bread. This usually happens with stand mixers when bakers walk away and let machines work too long. Watch your dough’s development and stop kneading when it reaches proper consistency.
Shaping and Proofing Problems
Poor shaping techniques create loaves with weak structure that collapse during baking or produce uneven crumb distribution. Take time to create proper surface tension when shaping, ensuring the gluten networks align to support the loaf’s final structure.
Over-proofing leads to collapsed loaves with dense, gummy textures as over-extended gluten networks lose their ability to trap gas effectively. Learn to recognize properly proofed dough through visual cues and tactile tests rather than relying solely on timing.
Baking Blunders
Cutting into bread too soon after baking ruins texture completely as the crumb hasn’t finished setting. Hot bread might seem ready, but the interior continues cooking and setting for hours after leaving the oven. Patience during cooling prevents gummy, unpleasant textures that can’t be fixed.
Incorrect oven temperatures affect both crust development and internal cooking. Too hot creates burnt exteriors with raw centers, while too cool produces pale crusts and extended baking times that dry out the bread. Invest in an oven thermometer to verify actual temperatures match your settings.
Alternatives & Substitutions
Flour Variations and Adaptations
Whole wheat flour can replace up to 50% of the bread flour while maintaining good structure and rise. Start with smaller substitutions like 25% whole wheat to understand how it affects texture and hydration needs. Whole grains absorb more liquid and create denser crumb structures, so expect some texture changes.
Spelt flour offers interesting nutty flavors and works well as a partial substitute for bread flour. Use up to 30% spelt flour for noticeable flavor enhancement without compromising structure. Spelt contains gluten but behaves differently than wheat, creating slightly more delicate textures.
Rye flour adds complex, earthy flavors even in small quantities. Replace up to 20% of bread flour with rye for subtle flavor enhancement. Higher rye percentages require technique adjustments as rye gluten behaves very differently from wheat gluten.
Sweetener Alternatives
Maple syrup can replace honey with slight flavor modifications and identical functional properties. Both provide fermentable sugars that feed yeast while contributing subtle flavors that complement sourdough’s natural tang. Adjust liquid quantities slightly if switching between them.
Brown sugar works but provides less complex flavors than liquid sweeteners. Use 2-3 tablespoons brown sugar instead of liquid sweeteners, and you might need to increase water slightly to maintain proper hydration levels.
Sugar-free options like stevia require careful consideration as they don’t provide the fermentable compounds that yeast needs. Consider adding a tablespoon of flour to compensate for lost bulk if using artificial sweeteners.
Fat Substitutions
Butter creates richer flavors and slightly different textures compared to olive oil. Use the same quantity but melt butter before incorporating it into the dough. Butter produces more tender crumb while olive oil contributes subtle fruity notes.
Coconut oil works well but solidifies at cool temperatures, potentially creating texture irregularities if not properly incorporated. Melt coconut oil completely and let it cool slightly before adding to prevent temperature shock to your starter.
Avocado oil provides neutral flavor profiles for those avoiding olive oil’s distinctive taste. Any neutral vegetable oil works, though each contributes slightly different mouthfeel characteristics to the finished bread.
Dairy and Egg Alternatives
Plant-based milk can replace water partially for richer flavors and softer textures. Use up to 50% plant milk instead of water, choosing unsweetened varieties to avoid throwing off sugar balances. Oat milk works particularly well in bread applications.
Egg wash alternatives include plant milk mixed with a tablespoon of maple syrup for browning, or simply brushing with plain plant milk. These alternatives won’t brown quite as deeply but still provide attractive crust development.
Aquafaba (chickpea liquid) can substitute for egg wash while maintaining vegan compatibility. Use 2 tablespoons aquafaba whisked until slightly foamy for similar browning effects to traditional egg wash.
Flavor Variations & Creative Twists
Herb and Spice Infusions
Mediterranean-inspired versions incorporate dried herbs like rosemary, thyme, or oregano directly into the dough for savory complexity. Add 1-2 tablespoons dried herbs or 3-4 tablespoons fresh herbs during the initial mixing stage. These additions create bread perfect for sandwiches, toast, or serving alongside soups and salads.
Garlic lovers can add roasted garlic cloves or garlic powder for aromatic depth without overwhelming the sourdough’s natural flavors. Roasted garlic provides mellow, sweet notes while garlic powder delivers more assertive flavor. Start with modest amounts and adjust based on preference.
Seed additions like poppy seeds, sesame seeds, or everything bagel seasoning transform plain sourdough into specialty breads. Incorporate seeds into the dough or use as toppings after applying egg wash. Internal seeds distribute flavor throughout, while toppings provide textural contrast.
Sweet Variations
Cinnamon raisin versions require slightly different techniques to prevent fruit from interfering with gluten development. Add cinnamon to the flour mixture and incorporate raisins during the final kneading stages. Soak raisins briefly in warm water to prevent them from absorbing moisture from the dough.
Orange zest and cranberry combinations create elegant breakfast breads that pair beautifully with cream cheese or butter. Add zest during mixing and fold in dried cranberries carefully to avoid tearing the dough. Fresh cranberries work but may create more acidic flavors.
Chocolate chip additions sound unusual but create surprisingly sophisticated results when using high-quality dark chocolate. Add chips during final kneading stages and avoid overworking to prevent chocolate from melting and streaking the dough.
International Inspirations
Japanese-inspired versions might include black sesame seeds or nori flakes for umami complexity. These ingredients create visually striking breads with subtle oceanic flavors that complement both sweet and savory applications.
German-style additions like caraway seeds, fennel seeds, or rye flour create hearty, Northern European flavors. These ingredients pair particularly well with cured meats, strong cheeses, and pickled vegetables for authentic European sandwich experiences.
Indian spice blends like garam masala or curry powder create exotic flavor profiles that work surprisingly well with sourdough’s natural tang. Start with small amounts as these spices can become overwhelming quickly.
Serving Suggestions & Pairings
Classic Sandwich Applications
This sourdough sandwich bread excels with traditional combinations that benefit from its sturdy texture and complex flavors. Turkey and Swiss cheese gain depth from the bread’s subtle tang, while the firm crumb prevents soggy disasters common with inferior breads. Add crisp lettuce, tomato slices, and quality mustard for sandwiches that rival professional deli offerings.
Grilled cheese reaches new heights when made with homemade sourdough. The bread’s structure holds up beautifully to high heat while developing gorgeous golden crusts that provide textural contrast to melted cheese. Try combinations like sharp cheddar with caramelized onions or gruyere with sliced pears for sophisticated variations.
BLT sandwiches benefit enormously from sourdough’s ability to absorb bacon fat without becoming soggy. Toast the bread lightly to create additional moisture barriers, then layer with crispy bacon, ripe tomatoes, and fresh lettuce. The bread’s tang complements the smoky bacon while supporting hefty toppings without structural failure.
Breakfast and Brunch Ideas
French toast made with day-old sourdough produces superior results compared to ordinary bread. The bread’s density and complex flavors create rich, custard-like centers while maintaining crispy exteriors. Soak slices briefly in egg mixture enriched with cream and vanilla, then cook until golden for restaurant-quality results.
Avocado toast transforms from trendy snack to satisfying meal when built on substantial sourdough slices. The bread’s hearty texture supports generous avocado portions while its flavor complements rather than competing with delicate avocado taste. Add everything seasoning, hemp seeds, or sliced radishes for textural variety.
Simple buttered toast showcases sourdough’s flavor development beautifully. Use high-quality butter at room temperature for easy spreading, and consider finishing with flaky sea salt to enhance the bread’s natural complexity. This simple preparation highlights your baking accomplishment perfectly.
Elegant Entertaining Options
Crostini applications utilize slightly stale sourdough sliced thin and toasted until crispy. Top with spreads like ricotta and honey, goat cheese and fig jam, or classic bruschetta mixtures. The bread’s structure supports substantial toppings while its flavor enhances rather than overwhelming delicate ingredients.
Bread pudding recipes benefit from sourdough’s sturdy texture and complex flavors. The bread absorbs custard mixtures without disintegrating while contributing interesting tang that elevates ordinary bread pudding into sophisticated desserts. Consider savory versions with cheese and herbs for brunch applications.
Stuffing applications showcase sourdough’s ability to absorb flavors while maintaining textural integrity. Cube the bread and let it dry slightly before incorporating into stuffing recipes. The bread’s tang complements rich poultry while its structure prevents mushy results common with ordinary bread.
International Serving Styles
Open-faced Danish-style preparations showcase beautiful toppings while providing substantial foundations. Layer with cream cheese, smoked salmon, capers, and dill for Scandinavian elegance. The bread’s density supports generous toppings without requiring structural support from additional slices.
Bruschetta variations using sourdough create more substantial appetizers suitable for main course applications. The bread’s flavor complexity complements traditional Italian toppings while providing enough substance to satisfy hungry diners.
British-style beans on toast gains sophistication when prepared with homemade sourdough. The bread’s sturdy texture prevents soggy disasters while its flavor enhances simple comfort food combinations.
Storage & Reheating Guide
Optimal Storage Methods
Proper storage maintains sourdough sandwich bread’s quality for up to a week, significantly longer than commercial alternatives. Store completely cooled bread in breathable containers like paper bags or bread boxes rather than plastic, which creates moisture buildup that encourages mold growth. The bread’s crust helps protect the interior while allowing gradual moisture release.
Room temperature storage works best for breads consumed within 3-4 days. Find cool, dry locations away from direct sunlight or heat sources that accelerate staling. Kitchen counters work fine unless your home runs particularly warm or humid.
Slicing affects storage life significantly. Whole loaves maintain freshness longer than pre-sliced bread because less surface area is exposed to air. Slice only what you need for immediate use, keeping the remainder intact for maximum longevity.
Freezing Techniques and Best Practices
Freezing extends storage life up to three months without significant quality loss when done properly. Wrap cooled bread tightly in plastic wrap, then aluminum foil for maximum protection against freezer burn and odor absorption. Label with dates for rotation purposes.
Individual slice freezing provides convenience for single-serving needs. Arrange slices on baking sheets, freeze until solid, then transfer to freezer bags with parchment paper between layers. This method prevents slices from freezing together while maintaining easy access.
Thawing requires patience for best results. Move frozen bread to refrigerator overnight for gradual thawing that maintains texture integrity. Room temperature thawing works but can create condensation that affects crust quality.
Reviving Day-Old Bread
Slightly stale sourdough often tastes better than fresh for certain applications like toast or French toast. The reduced moisture content creates superior browning and prevents sogginess when exposed to wet ingredients. Don’t assume day-old bread needs rejuvenation.
Oven refreshing works miracles for bread that’s lost its crust crispness. Sprinkle the crust lightly with water, then warm in a 350°F oven for 5-8 minutes. This technique restores crust texture while gently warming the interior without drying it out.
Microwave reheating should be avoided as it creates rubbery textures that can’t be reversed. If you must use microwave heating, wrap bread in damp paper towels and use very short bursts to prevent texture damage.
Quality Maintenance Tips
Monitor stored bread regularly for signs of mold growth, particularly in humid conditions. Sourdough’s natural acidity provides some protection against spoilage, but proper storage remains essential for food safety.
Bread boxes require occasional cleaning to prevent mold spore accumulation that can contaminate fresh loaves. Wipe interiors with diluted vinegar solutions, then dry completely before storing new bread.
Climate considerations affect storage choices. Humid environments require more aggressive moisture control, while dry climates might benefit from slightly less breathable storage to prevent excessive moisture loss.
Nutritional Benefits & Health Notes
Nutritional Profile Overview
Each serving of this sourdough sandwich bread provides approximately 180-200 calories, with 35-38 grams of carbohydrates, 6-7 grams of protein, and 3-4 grams of fat. These values represent wholesome nutrition from simple, recognizable ingredients without artificial additives or preservatives common in commercial breads.
Protein content comes primarily from wheat gluten and contributes to the bread’s satisfying nature. While not a complete protein source, bread protein complements other dietary proteins to support overall nutritional needs. The fermentation process actually increases protein bioavailability compared to unfermented grain products.
Complex carbohydrates provide sustained energy release rather than blood sugar spikes associated with highly processed breads. Sourdough’s fermentation process breaks down some starches, creating a lower glycemic impact that benefits blood sugar management.
Fermentation Health Benefits
Sourdough fermentation creates beneficial changes that improve digestibility and nutrient absorption compared to commercial yeast breads. Lactobacilli bacteria produce lactic acid that partially breaks down gluten proteins, making the bread more tolerable for some people with mild gluten sensitivities.
Phytic acid reduction occurs during long fermentation periods, improving mineral absorption from the bread itself and foods consumed with it. This traditional process increases bioavailability of iron, zinc, and magnesium that might otherwise pass through the digestive system unabsorbed.
Prebiotic compounds develop during fermentation, supporting beneficial gut bacteria that contribute to overall digestive health. These compounds survive the baking process and provide ongoing benefits when consumed regularly as part of balanced diets.
Dietary Considerations
Gluten content remains significant in sourdough bread despite fermentation modifications. People with celiac disease must avoid this bread completely, though those with non-celiac gluten sensitivity might find it more tolerable than conventional breads. Always consult healthcare providers for individual dietary guidance.
Sodium content varies based on salt additions but remains moderate compared to many commercial breads. People following low-sodium diets can reduce salt quantities, though this affects flavor development and preservation qualities.
Blood sugar impacts are generally lower than conventional breads due to fermentation effects on starch structure. However, people with diabetes should still account for carbohydrate content in their meal planning and monitor individual responses.
Frequently Asked Questions
Can I use all-purpose flour instead of bread flour?
You absolutely can substitute all-purpose flour, though you’ll notice some differences in texture and rise. Bread flour contains more protein, which develops into stronger gluten networks that create chewier textures and better structural support. All-purpose flour works fine but produces slightly more tender, less chewy results. Consider adding a tablespoon of vital wheat gluten per cup of all-purpose flour to boost protein content if you want closer results to the original recipe.
What if my sourdough starter isn’t very active?
Don’t panic, but don’t ignore this issue either! Sluggish starters need attention before they can produce great bread. Feed your starter twice daily for 2-3 days with equal weights of flour and water, keeping it at room temperature until it doubles reliably within 4-8 hours. Cold starters from the refrigerator need several feeding cycles to regain full strength. Signs of healthy activity include doubling in size, pleasant tangy aromas, and lots of bubbles throughout.
How do I know when the bread is fully baked?
The most reliable method is using an instant-read thermometer inserted into the center of the loaf. Internal temperature should reach 190-195°F for fully baked bread. Visual cues include golden-brown crust color and hollow sounds when you tap the bottom of the loaf. If you don’t have a thermometer, the hollow sound test works pretty well, though temperature checking removes all guesswork.
Why did my bread turn out dense and heavy?
Several factors contribute to dense sourdough, and troubleshooting requires detective work. Most commonly, weak or inactive starter fails to provide adequate leavening power. Other culprits include insufficient kneading (weak gluten development), over-proofing (collapsed gluten networks), or incorrect flour-to-water ratios. Temperature extremes can also kill yeast activity or prevent proper fermentation timing.
Can I make this recipe in a stand mixer?
Absolutely! Stand mixers actually make this recipe easier and more consistent. Use the dough hook attachment and mix on low speed for 2-3 minutes until ingredients combine, then increase to medium-low speed for 6-8 minutes until the dough is smooth and elastic. Watch carefully to avoid over-mixing, which can break down gluten networks. The dough should pull away from the bowl sides but still stick slightly to the bottom when properly developed.
How long can I keep the dough in the refrigerator?
Refrigerated dough can last 2-3 days, actually improving in flavor as slow fermentation continues. After the first rise, punch down the dough, cover tightly, and refrigerate. Cold dough takes longer to come to room temperature and complete the final proof, so plan an extra 1-2 hours for the second rise. Some bakers prefer the enhanced flavor that develops during cold fermentation.
What’s the best way to slice homemade bread?
Wait at least 2 hours after baking before slicing to allow the crumb to set properly. Use a sharp serrated knife with a sawing motion rather than pressing down, which compresses the soft interior. Clean the blade occasionally during slicing to prevent drag from accumulated crumbs. Slice only what you need immediately, keeping the rest of the loaf intact for better storage.
Can I double this recipe to make two loaves?
Doubling works perfectly and is actually more efficient for your time and energy. Use a large mixing bowl and expect slightly longer kneading times to develop all that dough properly. You can shape both loaves and bake them simultaneously if your oven accommodates two 9×5-inch pans. The timing remains the same, just rotate the pans halfway through baking for even browning.
Help! My bread collapsed after I took it out of the oven. What went wrong?
Collapsed bread usually indicates over-proofing, where the gluten networks became over-extended and lost their ability to maintain structure. The dough might have looked perfect going into the oven but couldn’t support itself during the final heat expansion. Next time, watch for the “poke test” during final proofing: properly proofed dough springs back slowly when gently poked, while over-proofed dough doesn’t spring back at all.
Is it normal for sourdough to smell alcoholic or vinegary?
Strong alcoholic or vinegar smells usually indicate your starter needs attention or your fermentation went too long. Healthy starters smell pleasantly tangy, like yogurt or cheese. Alcoholic smells suggest the yeast is stressed and producing excess alcohol, often from inconsistent feeding schedules. Vinegary aromas indicate the bacteria are dominating, which happens in overly acidic conditions. Both issues resolve with consistent feeding and proper care.
Troubleshooting Guide
When Your Dough Won’t Rise
Temperature issues cause most rising problems in sourdough bread making. Cold environments slow fermentation to barely perceptible rates, while excessive heat kills the delicate microorganisms that provide leavening. Find your kitchen’s sweet spots, usually around 75-80°F, where fermentation proceeds steadily without stressing the cultures.
Starter strength directly affects rising ability, and weak starters simply can’t provide enough gas production for proper bread rise. Revive sluggish starters with consistent feeding schedules, proper ratios, and stable temperatures before attempting bread making. Strong starters double predictably and show vigorous bubble activity.
Over-kneading breaks down gluten networks that trap the gas produced by fermentation. Hand kneading rarely causes this problem, but stand mixers can overwork dough quickly if left unattended. Watch for smooth, elastic dough that passes the windowpane test, then stop mixing immediately.
Salt levels affect yeast activity significantly. Too much salt inhibits fermentation, while too little fails to control bacterial growth properly. Measure salt accurately and distribute it evenly throughout the dough to prevent localized inhibition of yeast activity.
Texture Problems and Solutions
Gummy or dense crumb textures usually result from cutting bread too soon after baking. The interior continues cooking and setting for hours after leaving the oven, and premature slicing releases steam that should be setting the crumb structure. Patience during cooling prevents texture disasters that can’t be fixed afterward.
Uneven crumb distribution creates pockets of dense areas alongside overly open sections. This typically indicates inadequate mixing or shaping problems that created uneven gluten development. Thorough kneading and proper shaping techniques ensure consistent gas distribution throughout the loaf.
Dry, crumbly textures suggest either overbaking or incorrect hydration ratios. Check your oven’s actual temperature with a thermometer, as many ovens run hot or cold compared to their settings. Adjust liquid quantities if your flour absorbs moisture differently than expected.
Crust Development Issues
Pale crusts that never develop proper color indicate insufficient oven temperature or inadequate egg wash application. Verify oven temperature accuracy and ensure egg wash covers the entire surface evenly. Steam during the first few minutes of baking can also inhibit browning.
Overly thick or tough crusts develop when oven temperatures are too high or baking times too long. Lower temperature and extend time slightly to achieve proper internal doneness without over-developing the crust. Cover with foil during the last 10-15 minutes if browning too quickly.
Soggy or soft crusts result from cooling in humid conditions or inadequate initial crust development. Cool bread on wire racks that allow air circulation around the entire loaf. Avoid covering warm bread, which traps moisture and softens crusts.
Flavor Development Problems
Insufficient tang in finished bread indicates weak starter activity or rushed fermentation times. Longer, cooler fermentation allows acid-producing bacteria more time to develop the characteristic sourdough flavors. Consider extending bulk fermentation or using less starter for slower development.
Overly sour bread results from excessive fermentation or imbalanced starter cultures. Reduce fermentation times or refresh your starter more frequently to maintain proper yeast-to-bacteria ratios. Some starters become overly acidic and need adjustment through consistent feeding schedules.
Bland or one-dimensional flavors suggest insufficient fermentation time or poor ingredient quality. Quality flour makes noticeable differences in final flavor, and longer fermentation develops more complex taste profiles than rushed processes.
Timing and Scheduling Difficulties
Unpredictable fermentation rates make scheduling challenging for busy home bakers. Learn to recognize visual and tactile cues rather than relying solely on time estimates. Properly risen dough looks puffy and feels light, regardless of how long it took to reach that stage.
Over-proofing happens when life interferes with baking schedules, but it’s not always a disaster. Slightly over-proofed dough can sometimes be gently reshaped and given a shorter second rise. Severely over-proofed dough makes better pizza dough than sandwich bread.
Temperature fluctuations throughout the day affect fermentation rates dramatically. Morning kitchens are cooler than afternoon ones, and seasonal changes require timing adjustments. Keep notes about successful timing under different conditions to build experience.
Final Thoughts
There’s something profoundly satisfying about slicing into a loaf of bread you created from flour, water, and time. This sourdough sandwich bread recipe represents more than just baking instructions, it’s a connection to centuries of human ingenuity and the simple pleasure of creating nourishment with your own hands.
What I love most about this recipe is how it fits into real life rather than demanding you reorganize your schedule around bread making. Unlike some sourdough methods that require hourly attention or precise timing, this approach works with your routine while still producing bakery-quality results that will impress anyone lucky enough to share your table.
The confidence you’ll gain from mastering this technique extends far beyond bread making. Understanding fermentation, gluten development, and timing gives you skills that apply to countless other baking projects. You’ll start noticing dough behavior in ways that seemed mysterious before, developing the intuition that separates good bakers from great ones.
Every loaf teaches you something new about your ingredients, your environment, and your technique. Some days the bread will be absolutely perfect, while others might need tweaking. Both outcomes provide valuable learning experiences that build your skills and deepen your understanding of this ancient craft.
The ripple effects of home bread making often surprise people. Family members start requesting specific meals that showcase your fresh bread. Friends begin hinting about borrowing a loaf or begging for the recipe. Your kitchen becomes a gathering place where people linger over toast and conversation, drawn by aromas that no candle can replicate.
Perhaps most importantly, this recipe teaches patience and presence in our fast-paced world. Bread making demands that you slow down, pay attention, and work within natural rhythms rather than forcing artificial timelines. These lessons extend beyond the kitchen, creating mindfulness that enriches daily life in unexpected ways.
So gather your ingredients, feed your starter, and prepare to embark on a journey that connects you to generations of bakers who understood that some of life’s greatest pleasures come from simple ingredients transformed through skill, patience, and love. Your kitchen is about to smell amazing, your sandwiches will never be the same, and you’ll have mastered a skill that brings joy to everyone who experiences its results.
Now go forth and create some carbohydrate magic that would make your great-grandmother proud. The world needs more home bakers, and this recipe is your perfect starting point for a lifetime of delicious adventures.


