- Preparation
Preheat the oven to 350°F (175°C).
- Mix Ingredients
In a mixing bowl, whisk together the sugar, eggs, lemon juice, and lemon zest until well combined.
- Stir
Add the sweetened condensed milk to the mixture and stir until smooth.
- Pour out
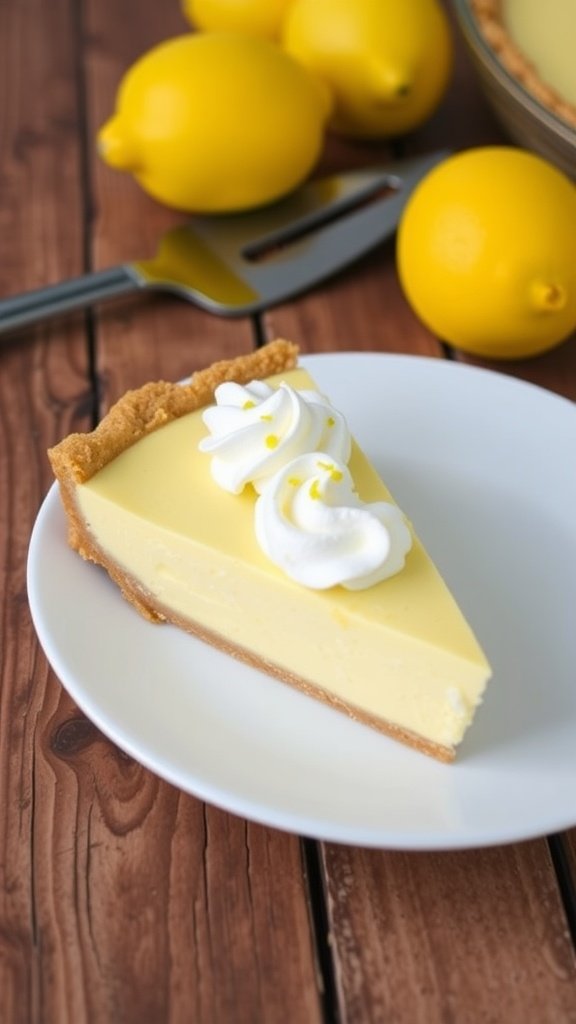
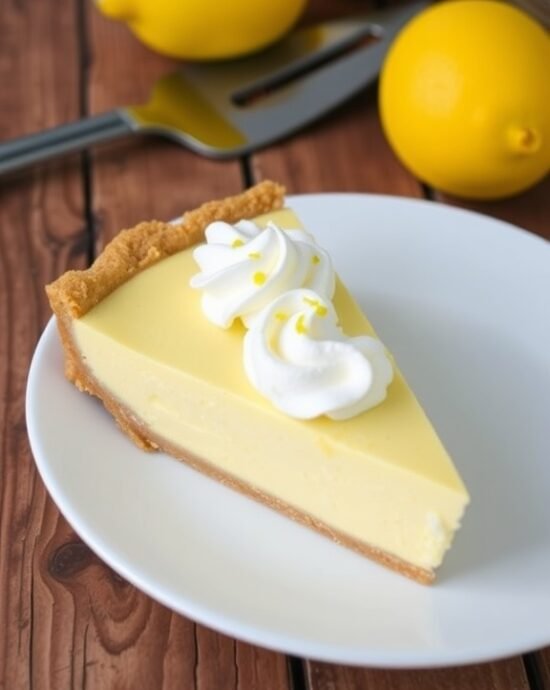
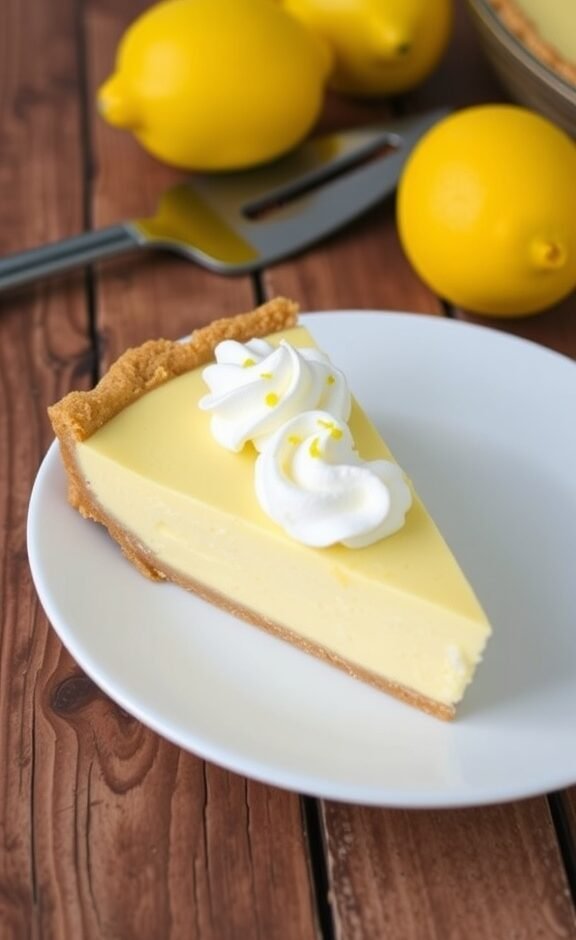
Pour the lemon filling into the pre-made graham cracker crust.
- Bake
Bake for 15-20 minutes, or until the filling is set but still slightly jiggly in the center.
- Cool out
Remove from the oven and let it cool at room temperature. Refrigerate for at least 2 hours or until chilled.
- Serve
Serve with a dollop of whipped cream on top, if desired.
- Calories:210 kcals
- Fat:7 grams
- Proteins:3 grams
- Carbohydrates:35 grams
Picture this: you’re hosting friends for dinner, dessert panic sets in, and you’ve got exactly three ingredients staring back at you from the fridge. Sounds like a nightmare, right? Wrong! This Easy Lemon Pie will save your evening and make everyone think you spent hours crafting this golden slice of heaven. Trust me, I’ve been there more times than I care to admit, frantically searching for something impressive yet doable.
Nothing beats the satisfaction of watching people’s faces light up when they take that first bite of perfectly tart, creamy lemon filling nestled in a buttery crust. This isn’t just any dessert, it’s your secret weapon for turning ordinary moments into memorable ones. Whether you’re a baking newbie or someone who’s been whipping up pies since before smartphones existed, this recipe will become your go-to crowd pleaser.
The best part about this Easy Lemon Pie? It’s so simple that you’ll wonder why you ever stressed about making dessert from scratch. Three main ingredients, minimal fuss, maximum impact. That’s the kind of math that makes sense in any kitchen.
Why This Recipe is Absolutely Brilliant
Let’s talk about why this particular Easy Lemon Pie deserves a permanent spot in your recipe collection. First off, the ingredient list is so short you could memorize it during a commercial break. We’re talking sweetened condensed milk, fresh lemon juice, and egg yolks. That’s it! No complicated custard making, no tempering, no standing over a hot stove stirring until your arm goes numb.
The magic happens through simple chemistry. When you combine these three ingredients, something beautiful occurs. The acid in the lemon juice reacts with the proteins in the condensed milk and egg yolks, creating that perfect thick, creamy texture without any cooking required for the filling itself. It’s like food science decided to throw us a bone and make something actually work in our favor.
But here’s what really sets this recipe apart from other lemon desserts: the balance. Many lemon pies either knock your socks off with tartness or disappoint with cloying sweetness. This version hits that sweet spot where the tangy lemon plays perfectly with the rich, creamy base. Your taste buds get the best of both worlds without feeling like they need to pick sides.
The texture is another winning factor. Unlike some lemon pies that end up either too runny or thick enough to use as spackling compound, this one achieves that ideal consistency. It’s firm enough to hold its shape when sliced but still creamy enough to melt beautifully on your tongue. Plus, it sets up reliably every single time, which means no more dessert disasters or last-minute panic runs to the bakery.
The Sweet Story Behind Easy Lemon Pie
Every great recipe has a story, and Easy Lemon Pie’s journey is particularly fascinating. This style of pie traces its roots back to the Florida Keys, where resourceful cooks needed to create satisfying desserts using shelf-stable ingredients in hot, humid conditions. Before refrigeration became standard, fresh dairy was a luxury, but canned condensed milk could survive the climate and still deliver rich, creamy results.
The technique actually emerged from necessity rather than fancy culinary training. Key lime pie was the original star of this method, but clever bakers soon discovered that lemons worked just as beautifully. The concept spread throughout the Southern United States, where citrus trees flourished and home cooks appreciated recipes that didn’t heat up their kitchens during sweltering summers.
I first encountered this style of pie at my neighbor’s house when I was twelve. Mrs. Henderson made it look effortless, whisking together ingredients while chatting about everything under the sun. When I tasted that first slice, I couldn’t believe something so elegant came from such a simple process. She shared the recipe with me that day, written on a flour-dusted index card that I still treasure.
Over the years, I’ve tweaked and perfected this recipe through countless experiments. Some attempts were disasters (let’s not discuss the time I thought I could substitute regular milk for condensed milk), while others led to delightful discoveries. The version I’m sharing with you represents decades of testing, adjusting, and receiving feedback from friends and family who’ve become my willing taste testers.
What strikes me most about this Easy Lemon Pie’s evolution is how it represents the democratization of dessert making. You don’t need professional training, expensive equipment, or hours of preparation to create something that rivals bakery offerings. This recipe proves that sometimes the simplest approaches yield the most spectacular results.
The cultural significance extends beyond just the recipe itself. In many Southern families, this type of pie became a symbol of hospitality and resourcefulness. Being able to whip up an impressive dessert with pantry staples meant you could always welcome unexpected guests with something special. That tradition of making people feel cared for through simple, delicious food continues today every time someone makes this pie.
Essential Equipment & Kitchen Tips
Must-Have Tools
Creating the perfect Easy Lemon Pie doesn’t require a kitchen full of gadgets, but having the right basic tools makes the process smoother and more enjoyable. A quality whisk is your best friend here. Choose one with sturdy wires that won’t bend when mixing thicker ingredients. The whisking action incorporates air and ensures your filling achieves that silky consistency we’re aiming for.
A medium mixing bowl gives you enough room to whisk without ingredients flying everywhere. Glass or stainless steel works best because they don’t retain flavors or odors. Plastic bowls can sometimes hold onto residual oils that might affect your pie’s taste, so skip those if possible.
Professional Secrets for Success
Temperature control plays a crucial role in this recipe’s success. Room temperature egg yolks blend more easily than cold ones, so pull your eggs out about thirty minutes before you plan to start baking. This simple step prevents lumpy filling and ensures smooth integration of all ingredients.
When measuring lemon juice, roll the lemons on your counter while pressing down firmly before cutting them. This breaks down the internal membranes and releases more juice from each fruit. You’ll get nearly twice as much juice using this technique compared to just cutting and squeezing.
Equipment Alternatives
Don’t have a stand mixer for whipped cream? A hand mixer works perfectly fine, though it might take an extra minute or two. In a pinch, you can even whip cream by hand with a whisk, though your arm might file a complaint afterward. The key is using cream that’s been chilled in the refrigerator, which whips faster and holds its shape better.
No pastry brush for egg wash? A clean paintbrush dedicated to kitchen use works just as well. Some bakers even use a folded paper towel to dab on egg wash, though this method uses more egg mixture than necessary.
Pro Chef Secrets & Advanced Techniques
The Science Behind Perfect Texture
Understanding what happens chemically when you combine these ingredients will elevate your pie-making skills tremendously. The proteins in egg yolks act as emulsifiers, binding the fat from the condensed milk with the acidic lemon juice. This creates a stable mixture that sets up beautifully without requiring additional thickeners like cornstarch or gelatin.
Temperature plays a critical role in this process. When the pie bakes, the gentle heat helps the proteins coagulate just enough to firm the filling without scrambling the eggs. This is why the baking time is relatively short, you’re not cooking the filling so much as setting it into its final form.
Master-Level Flavor Enhancement
Professional bakers often add a tiny pinch of salt to enhance the lemon flavor without making the pie taste salty. The salt acts as a flavor amplifier, making the citrus notes more pronounced and the sweetness more balanced. Start with just 1/8 teaspoon mixed into your filling.
Zesting one lemon directly into your filling adds an extra layer of citrus complexity. The oils in lemon zest provide a different type of lemon flavor than the juice alone. Be careful to avoid the white pith when zesting, as it can add bitter notes that compete with your carefully balanced flavors.
Troubleshooting Like a Pro
If your filling seems too thin after mixing, don’t panic. The combination needs a few minutes to fully react and thicken. Let it sit for 5-10 minutes before deciding whether you need to adjust anything. Often, what seems too liquid initially will be perfect after this brief resting period.
Cracked filling usually results from overbaking or temperature shock. If you notice cracks forming, remove the pie from the oven immediately. Small cracks can be disguised with whipped cream or a light dusting of powdered sugar. For future pies, try reducing the oven temperature by 25 degrees and baking slightly longer.
Professional Presentation Techniques
Creating clean, bakery-worthy slices requires a sharp, thin-bladed knife dipped in warm water between cuts. This prevents the filling from sticking to the blade and dragging. Wipe the blade clean with a damp towel after each slice for the most professional results.
For restaurant-style plating, warm your serving plates slightly in a 200°F oven for just 2-3 minutes. The gentle warmth enhances the pie’s aroma and makes the experience more luxurious. Never use hot plates, as this will melt your carefully set filling.
Common Mistakes to Avoid
The Overmixing Trap
Thinking more whisking equals better results is a rookie mistake that trips up even experienced bakers. Once your ingredients are combined and smooth, stop mixing. Excessive whisking can break down the proteins that help your pie set properly, leading to a filling that never quite firms up the way it should.
Temperature Disasters
Using ingredients straight from the refrigerator creates lumpy, uneven filling that no amount of whisking will fix completely. Room temperature egg yolks blend seamlessly, while cold ones resist incorporation and create stubborn clumps that ruin your pie’s silky texture.
The Lemon Juice Gamble
Substituting bottled lemon juice for fresh might seem convenient, but it’s a shortcut that costs you flavor and quality. Bottled juice often contains preservatives that can interfere with the natural thickening process, plus it lacks the bright, vibrant taste that makes this pie special.
Crust Catastrophes
Skipping the pre-baking step for your crust results in a soggy bottom that will disappoint everyone. The filling contains a lot of moisture, and an unbaked crust simply can’t handle it. Even store-bought crusts benefit from a few minutes in the oven before adding the filling.
Patience Problems
Cutting into your pie before it’s properly chilled is like opening presents before Christmas morning, tempting but ultimately disappointing. The filling needs those hours in the refrigerator to reach its ideal consistency. Warm pie equals runny slices that slide apart instead of holding their shape beautifully.
Measuring Mishaps
Guessing at measurements might work for some cooking, but baking requires precision. Too much lemon juice creates a filling that won’t set, while too little makes a pie that tastes more like sweet milk than lemon dessert. Use proper measuring cups and level your ingredients for consistent results.
Alternatives & Substitutions
Dietary Adaptations
Creating a dairy-free version of this Easy Lemon Pie requires some creativity, but it’s absolutely doable. Coconut milk (the full-fat canned variety) can substitute for sweetened condensed milk, though you’ll need to add sugar to compensate for the lack of sweetness. Use about 3/4 cup coconut milk with 1/3 cup sugar, whisking until the sugar dissolves completely.
Vegan bakers can replace egg yolks with aquafaba (the liquid from canned chickpeas) or commercial egg replacer. Three tablespoons of aquafaba equals roughly three egg yolks in terms of binding power, though the texture will be slightly different. The pie will still be delicious, just with a bit more lightness to the filling.
Ingredient Swaps That Work
Graham cracker crusts aren’t your only option, though they pair beautifully with lemon filling. Vanilla wafer crumb crusts add extra sweetness that some people prefer, while gingersnap crusts provide a spicy contrast that makes the lemon flavor pop even more dramatically.
Regular pastry crust works wonderfully if you prefer a more traditional pie experience. Blind bake it completely before adding your filling, and consider brushing the bottom with a thin layer of melted chocolate to prevent sogginess. The chocolate creates a barrier while adding a subtle flavor note that complements the lemon beautifully.
Sweetness Adjustments
Some brands of sweetened condensed milk are sweeter than others, which can throw off your pie’s balance. If your filling tastes too sweet after mixing, add an extra tablespoon of lemon juice. Conversely, if it’s too tart for your taste, whisk in a tablespoon of powdered sugar until dissolved.
Honey can partially replace some of the sweetened condensed milk for a more complex sweetness profile. Use 2 tablespoons of honey and reduce the condensed milk by about 1/4 cup. The honey adds floral notes that complement the lemon without overpowering it.
Texture Modifications
Prefer a lighter filling? Fold in one stiffly beaten egg white after combining your main ingredients. This creates a mousselike texture that’s still rich but feels less dense. Be gentle when folding to maintain the airiness that makes this variation special.
For chocolate lovers, a tablespoon of cocoa powder whisked into the filling creates an interesting twist on the classic. The result is subtle rather than overwhelmingly chocolatey, more like a hint of complexity than a different pie entirely.
Flavor Variations & Creative Twists
Seasonal Adaptations
Spring calls for adding fresh berries to your Easy Lemon Pie experience. Arrange fresh strawberries or blueberries on top of the set filling just before serving, or fold a handful of raspberries into the mixture before baking. The berries add bursts of color and complementary flavors that make each bite interesting.
Summer variations might include a layer of lemon curd between the crust and filling for extra intensity, or swirling in some pureed mango for tropical vibes. The mango’s sweetness balances beautifully with the tart lemon, creating a vacation-worthy dessert that transports you to warmer places.
International Inspirations
Mediterranean-style additions transform this humble pie into something more sophisticated. A tablespoon of fresh thyme leaves or a teaspoon of lavender buds mixed into the filling creates an herbal complexity that’s unexpected but absolutely delicious. These flavors pair naturally with lemon and add an elegant touch to dinner party presentations.
Mexican-inspired versions might include a pinch of cayenne pepper and lime zest alongside the lemon. The heat is subtle, just enough to wake up your taste buds without overwhelming the citrus flavors. This variation works particularly well with a graham cracker crust made with cinnamon-sugar instead of regular sugar.
Decadent Upgrades
Chocolate lovers can create a lemon-chocolate marble effect by gently swirling melted dark chocolate through the filling before baking. Use high-quality chocolate and let it cool slightly before adding, so it doesn’t seize when it hits the acidic lemon mixture.
Coconut enthusiasts should try adding toasted coconut flakes to both the crust and filling. Press them into your graham cracker crust before baking, and fold a handful into the lemon mixture. The tropical flavors work beautifully together, and the coconut adds textural interest that makes each bite more complex.
Adult Variations
A tablespoon of limoncello or vodka in the filling adds sophisticated flavor without making the pie boozy. The alcohol enhances the lemon flavor while adding a subtle warmth that’s particularly nice during cooler months. Make sure to add it gradually and taste as you go.
Fresh herb infusions create grown-up versions that impress at dinner parties. Steep fresh basil or mint in warm cream for ten minutes, strain out the herbs, then whip the infused cream for topping. The herbal notes provide an unexpected and delightful contrast to the sweet, tart filling.
Serving Suggestions & Pairings
Perfect Presentations
This Easy Lemon Pie shines brightest when served simply, but a few thoughtful touches can elevate it from everyday dessert to special occasion showstopper. A dollop of freshly whipped cream alongside each slice provides richness that balances the tart filling, while a sprinkle of lemon zest on top adds visual appeal and extra citrus aroma.
Fresh berry garnishes work beautifully both visually and flavor-wise. A few perfect raspberries or a small cluster of blueberries on each plate adds color contrast and provides little bursts of complementary fruit flavors. Mint leaves tucked alongside the berries create a restaurant-quality presentation that takes minimal effort.
Beverage Pairings
Coffee and tea lovers will find this pie pairs beautifully with both. The acidity in the lemon complements coffee’s bitterness, while the creamy filling provides a nice contrast to strong espresso. Earl Grey tea, with its bergamot notes, creates a citrus harmony that’s particularly satisfying after dinner.
Wine pairings might seem fancy, but they’re worth considering for special occasions. A crisp Sauvignon Blanc or Pinot Grigio echoes the pie’s bright acidity, while a slightly sweet Riesling provides a nice contrast. For dessert wines, Moscato or a late-harvest Gewürztraminer work beautifully without competing with the lemon flavors.
Occasion-Specific Ideas
Summer barbecues and picnics benefit from this pie’s make-ahead nature and refreshing qualities. It travels well in a sturdy pie carrier and provides a cooling finish to grilled meals. Consider making individual tart-sized versions for easier serving at outdoor gatherings.
Holiday dinners can accommodate this pie beautifully when you’re tired of traditional heavy desserts. Its lighter profile provides a refreshing end to rich meals, and the bright yellow color adds cheerful contrast to autumn and winter table settings.
Temperature Considerations
While this pie is typically served chilled, allowing it to come closer to room temperature for 15-20 minutes before serving enhances its flavors. The filling becomes more aromatic, and the flavors seem more pronounced when not ice-cold. However, don’t let it sit too long, or the texture will suffer.
Individual portion sizes work well for formal dinner parties. Use a 4-inch ring mold to cut perfect circles, or invest in individual tart pans for a more elegant presentation. Mini versions also allow guests to try other desserts without feeling overly full.
Storage & Reheating Guide
Proper Refrigeration Techniques
Easy Lemon Pie keeps beautifully in the refrigerator for up to five days when stored correctly. Cover the entire pie with plastic wrap, pressing it gently against the surface to prevent condensation from forming and making the filling watery. Alternatively, store it in a pie keeper or large airtight container to maintain optimal texture and prevent it from absorbing other refrigerator odors.
Individual slices can be wrapped separately for grab-and-go convenience, though they’re best consumed within three days of cutting. Use individual plastic containers or wrap each piece in plastic wrap followed by aluminum foil for the best protection against drying out.
Freezing Guidelines
This pie freezes surprisingly well for up to three months, though the texture will be slightly different after thawing. Wrap the entire pie in plastic wrap, then in aluminum foil, and finally place it in a freezer-safe container or bag to prevent freezer burn. Label with the date and contents for easy identification later.
For best results when freezing, do so without any whipped cream topping. Add fresh whipped cream after thawing for the most appealing presentation and texture. Frozen individual slices thaw in about 2-3 hours at room temperature, making them perfect for satisfying sudden dessert cravings.
Thawing Best Practices
Thaw frozen pie slowly in the refrigerator for 6-8 hours or overnight. Rapid thawing at room temperature can cause condensation issues and affect the filling’s texture. Once thawed, consume within 2-3 days for the best quality and food safety.
Never refreeze a previously frozen and thawed pie, as this compromises both texture and safety. Instead, cut the thawed pie into individual servings and keep only what you’ll eat within a couple of days.
Nutritional Benefits & Health Notes
Nutritional Profile
Each serving of this Easy Lemon Pie provides approximately 280 calories, with 12 grams of fat, 38 grams of carbohydrates, and 6 grams of protein. The exact numbers depend on your specific crust choice and portion sizes, but these figures give you a reasonable baseline for meal planning purposes.
The vitamin C content from fresh lemon juice provides immune system support, though you shouldn’t consider this pie a health food by any stretch of the imagination. It’s dessert, meant to be enjoyed in moderation as part of a balanced diet.
Ingredient Benefits
Eggs contribute high-quality protein and essential nutrients including vitamin D, vitamin B12, and choline, which supports brain function. The yolks specifically provide lutein and zeaxanthin, antioxidants that support eye health.
Lemons offer more than just vitamin C, they also contain flavonoids with anti-inflammatory properties and pectin, a type of soluble fiber. While the amounts in a single slice of pie aren’t significant, every little bit contributes to your overall nutrient intake.
Dietary Considerations
This pie contains eggs and dairy, making it unsuitable for those with corresponding allergies or strict vegan diets. However, the substitutions mentioned earlier can accommodate most dietary restrictions without significantly compromising the final result.
The sugar content is moderate compared to many desserts, thanks to the natural tartness of the lemons balancing the sweetness. However, people managing diabetes should account for the carbohydrates in their meal planning.
Frequently Asked Questions
Can I use bottled lemon juice instead of fresh?
You technically can, but please don’t hurt your pie like that! Fresh lemon juice makes such a noticeable difference in both flavor and the filling’s ability to set properly. Bottled juice often contains preservatives that can interfere with the natural thickening process, plus it tastes flat compared to the bright, vibrant flavor of freshly squeezed lemons. If you’re in a absolute pinch and only have bottled, use it, but your pie won’t be quite as spectacular.
Why is my pie filling runny even after baking?
Several culprits could be behind runny filling, and the most common is not giving the pie enough time to set in the refrigerator. This pie needs at least 4 hours of chilling time to reach its proper consistency. Other possibilities include using cold ingredients that didn’t mix properly, not pre-baking your crust, or accidentally adding too much lemon juice. The good news is that even slightly runny pie still tastes amazing!
Can I make this pie ahead of time?
Absolutely! This is actually one of those desserts that improves with time. Making it a day ahead allows the flavors to meld beautifully, and the texture becomes even more perfect. You can make it up to three days in advance, just add any whipped cream topping right before serving to keep it looking fresh and appealing.
What’s the best way to get clean slices?
The secret is a sharp, thin knife dipped in warm water between each cut. Wipe the blade clean with a damp towel after each slice, and dip it in warm water again before making the next cut. This prevents the creamy filling from sticking to the blade and dragging, giving you those bakery-perfect slices that photograph beautifully.
Can I double this recipe?
Sure thing! This recipe doubles beautifully if you’re feeding a crowd or want to make two pies. Just make sure you have enough oven space and pie pans. The baking time might need to be adjusted slightly if your oven is packed full, so keep an eye on them and look for that barely-jiggly center as your doneness indicator.
Help! My crust got soggy. Can I fix it?
Prevention is better than cure here, but if you’re dealing with a soggy crust, you can try placing the whole pie back in a 350°F oven for 5-8 minutes to crisp up the bottom. This works best if caught early. For future pies, always pre-bake your crust and consider brushing it with beaten egg white before adding the filling to create a moisture barrier.
Is it safe to eat raw egg yolks in this recipe?
The egg yolks do get cooked during the baking process, so they’re not technically raw in the finished pie. However, if you’re concerned about egg safety or serving to pregnant women, elderly individuals, or those with compromised immune systems, you can use pasteurized eggs or pasteurized egg yolks instead of regular ones.
Can I use a different type of crust?
Absolutely! While graham cracker crust is traditional and works beautifully, you can use regular pastry crust, chocolate cookie crust, or even a nut-based crust. Just make sure whatever crust you choose is pre-baked before adding the filling. Each type will give your pie a slightly different character, so feel free to experiment based on your preferences.
Why did my filling curdle or separate?
Curdling usually happens when ingredients are at very different temperatures when combined, or when the mixture gets too hot too quickly. Make sure your egg yolks are at room temperature before mixing, and if you notice any curdling starting to happen, remove the pie from the oven immediately. A little separation can sometimes be whisked smooth, but prevention is definitely better than trying to fix it afterward.
How do I know when the pie is done baking?
Look for a filling that’s set around the edges but still has a slight jiggle in the very center when you gently shake the pan. It should not be liquid or sloshy, but shouldn’t be completely firm either. The center will continue to set as it cools, so don’t overbake trying to eliminate all movement.
Troubleshooting Guide
When Your Filling Won’t Set
The most frustrating pie problem is filling that refuses to firm up properly, leaving you with something more like lemon soup than lemon pie. This usually stems from ingredient ratios being off or temperature issues during preparation. If your pie has been refrigerated overnight and still seems too loose, the most likely culprit is too much liquid or not enough binding agents.
Temperature shock can also prevent proper setting. If you added very cold ingredients to your mixture or put a hot pie directly into the refrigerator, the proteins might not have had a chance to do their job properly. Next time, let all ingredients come to room temperature before mixing, and allow your pie to cool gradually.
Fixing Texture Problems
Grainy or lumpy filling usually results from inadequate mixing or temperature differences between ingredients. If you catch this problem early, you can strain your filling through a fine-mesh sieve before pouring it into the crust. This removes any stubborn lumps and creates the smooth, silky texture you’re aiming for.
Overly dense filling might seem like a good problem to have, but it can make your pie feel heavy and unpleasant. This often happens when eggs get overworked or when too much condensed milk is used. Unfortunately, there’s not much you can do to fix an already-baked pie, but for future attempts, measure carefully and mix just until combined.
Appearance Issues
Cracked surfaces can be disguised but are better prevented. Cracks form when the filling bakes too quickly or at too high a temperature. If you notice cracks developing, immediately reduce your oven temperature by 25 degrees and tent the pie loosely with foil to slow the cooking process.
Discolored filling, usually a grayish tint, often indicates overcooking or using older eggs. While this doesn’t affect the taste significantly, it’s not particularly appealing. Fresh eggs and careful temperature control prevent this issue entirely.
Crust Catastrophes
Burnt crust edges while the filling is still underdone is a common problem that’s easily solved with aluminum foil shields. Create little foil covers for the crust edges, or use commercial pie crust shields if you bake pies frequently. This allows the filling to finish cooking without burning your beautiful crust.
Soggy bottom syndrome plagues many pie bakers, but it’s entirely preventable. Always pre-bake your crust, and consider using a pizza stone or baking steel on the bottom oven rack to provide extra heat from below. Some bakers swear by brushing the crust with beaten egg white before adding filling to create a moisture barrier.
Final Thoughts
There’s something deeply satisfying about mastering a recipe that seems almost too simple to work, yet delivers results that make people think you spent hours in the kitchen. This Easy Lemon Pie represents everything I love about home baking: it’s accessible, reliable, and absolutely delicious without requiring advanced techniques or exotic ingredients.
The beauty of this recipe extends beyond its simplicity. It’s forgiving enough for beginners yet satisfying for experienced bakers who appreciate elegant results from minimal effort. Whether you’re making it for a casual family dinner or a special celebration, this pie adapts beautifully to any occasion.
What I hope you’ll discover, as I did all those years ago at Mrs. Henderson’s kitchen table, is that the best recipes aren’t always the most complicated ones. Sometimes the most memorable desserts come from the humblest ingredients combined with just a little knowledge and a lot of love.
The confidence you’ll gain from mastering this Easy Lemon Pie will inspire you to tackle other recipes and experiment with flavors. Baking is supposed to be enjoyable, not stressful, and this recipe embodies that philosophy perfectly. Every time you make it, you’re creating more than just dessert, you’re creating moments and memories that last long after the last crumb is eaten.
So gather your three simple ingredients, preheat that oven, and get ready to impress everyone (including yourself) with your newfound pie-making prowess. The kitchen is calling, and your Easy Lemon Pie adventure awaits. Now go create some delicious magic, you’ve absolutely earned the right to feel proud of what you’re about to accomplish!