- Preheat the Oven
Crank that oven to 300°F (150°C) and give it plenty of time to reach temperature. I'm talking at least 20-30 minutes because ovens are liars and will tell you they're ready before they actually are. This low temperature is crucial for breaking down tough connective tissues without turning your ribs into jerky.
Use this preheating time to get all your ingredients organized and maybe pour yourself something nice to drink because you're about to embark on a delicious journey that requires minimal active work but maximum patience.
Position your oven rack in the middle position for the most even heat distribution. You want these ribs to cook evenly from all sides, not get crispy on top while staying tough on the bottom like some kind of barbecue mullet.
- Prepare the Ribs
Remove that pesky membrane from the back of your ribs if the butcher didn't already do it for you. Slide a knife under one corner to lift it, then grab the membrane with a paper towel (it's slippery!) and peel it off in one satisfying strip. This step is crucial for tender ribs and proper seasoning penetration.
Pat those ribs completely dry with paper towels like you're tucking them in for bed. Any surface moisture will prevent your beautiful dry rub from adhering properly, and we want every single grain of that seasoning mixture to stay exactly where we put it.
Examine your ribs for any loose bits of fat or bone fragments that might have survived the butchering process. A little fat is good for flavor and moisture, but you don't want any weird dangly bits that'll burn or create uneven cooking.
If you're working with a full rack, decide whether to cut them into individual ribs now or keep them whole. Individual ribs are easier to serve and eat, while whole racks look more impressive but require more careful handling during the wrapping process.
- Make the Dry Rub
In a bowl that's big enough to actually mix things without creating a spice explosion across your kitchen, combine all your dry rub ingredients like you're conducting a delicious orchestra. Start with the brown sugar as your base, then add each spice one by one.
Mix everything together with a whisk or fork until it's completely uniform in color. You don't want bite-sized pockets of cayenne pepper that'll make someone's eyes water, or clumps of brown sugar that create uneven sweetness.
Taste your rub mixture (carefully, because cayenne) and adjust seasoning if needed. Some people like more heat, others prefer more sweetness. This is your chance to customize before committing to the ribs.
Make extra if you're feeling ambitious because this rub is fantastic on chicken, pork chops, or even roasted vegetables. Store leftover rub in an airtight container for up to six months, though it'll probably disappear much faster than that.
- Season the Ribs
Sprinkle that gorgeous rub mixture over both sides of your ribs like you're blessing them with flavor angels. Be generous here because some will inevitably fall off during handling, and you want enough seasoning to create a proper crust.
Work the rub into all the nooks and crannies using your hands, because this is definitely a hands-on job. Make sure every surface is covered, paying special attention to the meaty parts where most of the flavor payoff will happen.
Don't just sprinkle and hope for the best, really massage that rub into the meat like you're giving your ribs a spa treatment. This helps the seasonings adhere better and penetrate deeper into the surface of the meat.
If you have time, let the seasoned ribs sit at room temperature for 30 minutes to allow the rub to start working its magic. The salt will begin drawing out moisture, which then dissolves the other seasonings and creates a flavor-packed brine that gets reabsorbed into the meat.
- Wrap in Foil
Tear off pieces of heavy-duty aluminum foil large enough to completely wrap each rack or portion of ribs with plenty of extra foil for sealing. Skimping on foil size will create frustrating wrapping situations that test your patience and vocabulary.
Place the seasoned ribs on the foil meat-side up, positioning them so you have enough foil on all sides to create a completely sealed packet. Think of this as tucking your ribs into a metallic sleeping bag where no steam can escape.
Bring the long sides of foil up and over the ribs, then fold them together several times to create a tight seal along the top. You want this seal to be completely airtight because escaping steam means escaping moisture and flavor.
Fold the short ends up and over to seal them completely, creating a packet that looks like a shiny metallic pillow. Double-check all your seals because any holes will allow precious juices and steam to escape, potentially drying out your ribs.
- Bake
Place your foil-wrapped rib packets on a baking sheet (because trust me, you don't want to deal with potential drips directly on your oven bottom) and slide them into that preheated 300°F oven.
Set a timer for 2.5 hours and then try to forget about them. This is the hardest part of the entire process because your kitchen will start smelling absolutely incredible, and you'll be tempted to peek, but resist! Opening the foil releases all that beautiful steam and moisture.
Use this time productively by preparing side dishes, cleaning up your workspace, or practicing your victory dance for when these ribs emerge in all their tender glory. You could also make a pitcher of something refreshing because you're going to want to celebrate.
The ribs are done when they're fork-tender and the meat starts pulling away from the bones slightly. If you absolutely must check, carefully open one corner of a foil packet and test with a fork, but be prepared for a face full of aromatic steam.
- Add Barbecue Sauce
Carefully remove your rib packets from the oven and increase the temperature to broil. Be extremely careful opening the foil because the steam inside is seriously hot and will fog up your glasses while potentially burning any exposed skin.
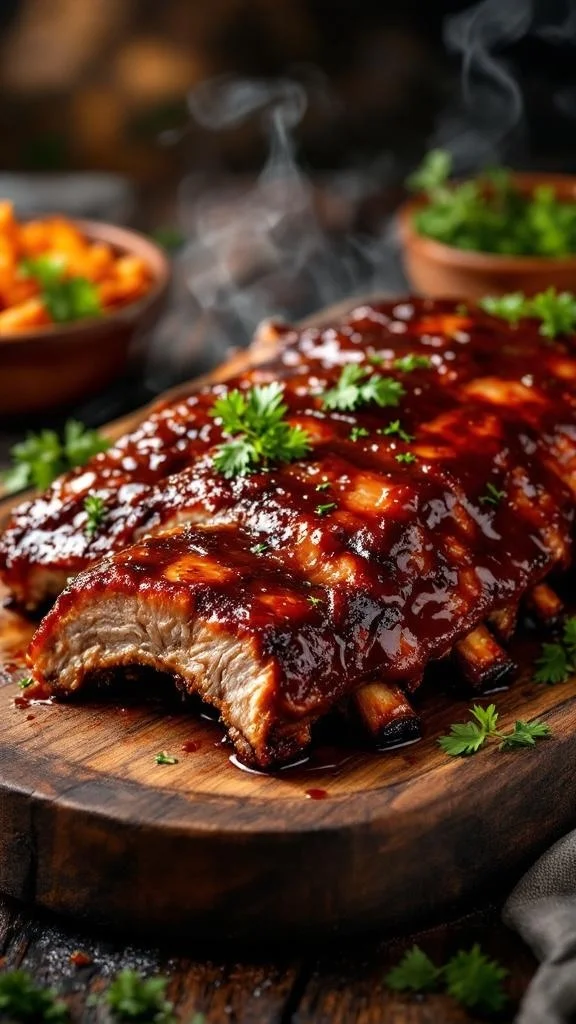
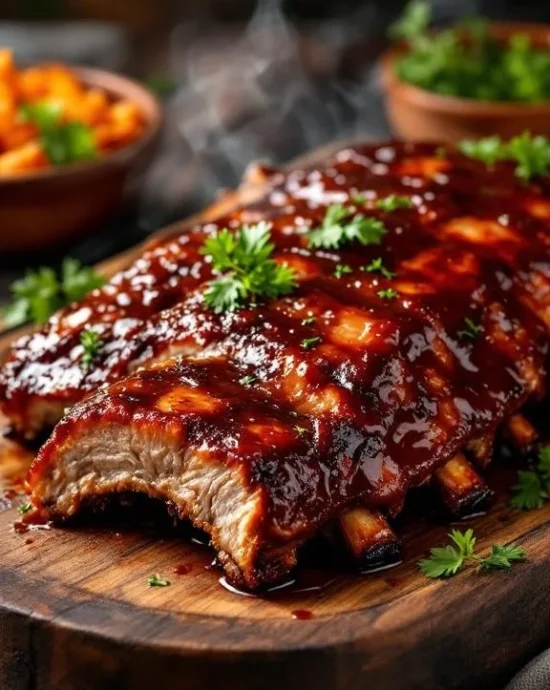
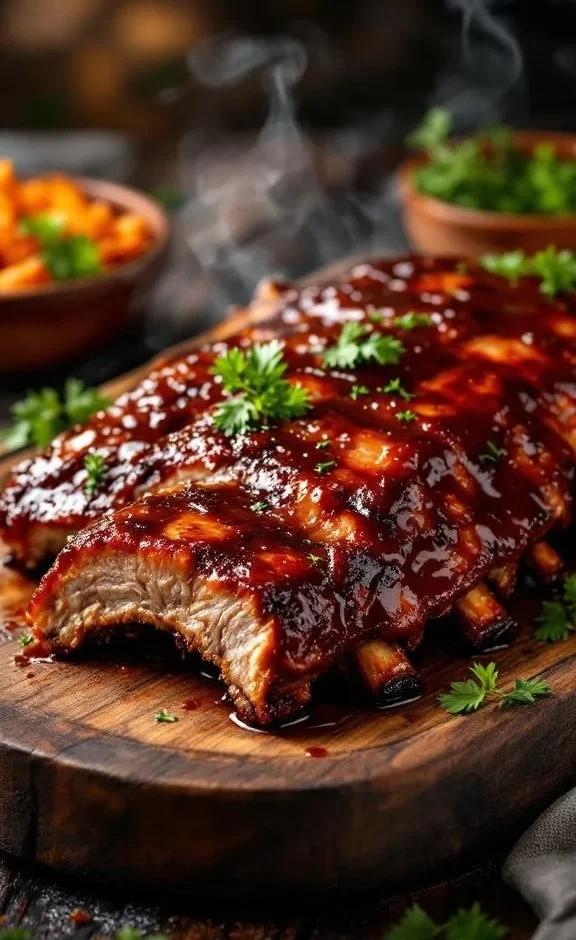
Unwrap those beautiful ribs and marvel at how incredibly tender they look. They should be glistening with their own juices and practically falling apart just from being looked at. This is the moment where you realize oven ribs are absolutely legitimate.
Brush your favorite barbecue sauce generously over all surfaces of the ribs, creating an even coating that'll caramelize into a gorgeous glaze under the broiler. Don't go crazy with the sauce because you want to enhance, not mask, all those beautiful flavors you've developed.
Transfer the sauced ribs to a clean baking sheet (or the same one if you're not picky about cleanup) and prepare for the final transformation that'll take these from great to absolutely spectacular.
- Broil for Finish
Slide those sauced ribs under the broiler for 5-10 minutes, watching them like a hawk because the line between perfect caramelization and burnt disappointment is thinner than your patience after 3 hours of waiting.
You'll know they're ready when the barbecue sauce starts bubbling and developing those gorgeous dark spots that indicate proper caramelization. The surface should look glossy and slightly charred in the most appetizing way possible.
Remove them the moment they look perfect because broilers are basically controlled fires that can go from perfect to disaster in about 30 seconds. Better to err on the side of caution than serve burnt ribs to your eagerly waiting audience.
Let those beautiful ribs rest for about 5 minutes before slicing and serving. This brief rest allows the juices to redistribute throughout the meat, ensuring every bite is as moist and flavorful as possible.
- Serve
Transfer your masterpiece to a serving platter that's worthy of the occasion, because these ribs deserve better than a paper plate unless that's all you have and you're too excited to care about presentation.
Garnish with fresh parsley if you're feeling fancy, or just serve them as they are because honestly, they look pretty spectacular already. Provide plenty of napkins because proper rib eating is necessarily messy.
Offer extra barbecue sauce on the side for people who want to customize their experience, though honestly, these ribs are so flavorful they probably don't need it. But choice is nice, and some people are sauce enthusiasts.
Stand back and accept the inevitable compliments gracefully. Yes, you made these amazing ribs. Yes, they're better than many restaurants. No, you don't need to reveal that you used your regular oven instead of some fancy outdoor setup.
- Calories:450 kcals
- Fat:30 grams
- Proteins:30 grams
- Carbohydrates:10 grams
Hey there, fellow meat lovers and kitchen adventurers! Let me blow your mind with something that’ll change your entire relationship with spare ribs: you absolutely do NOT need a fancy outdoor grill, a smoker that costs more than your car payment, or mysterious BBQ wizardry passed down through generations to create absolutely spectacular oven baked spare ribs recipe that’ll make your neighbors peek over the fence wondering what smells so incredible.
Picture this: tender, fall-off-the-bone ribs with a gorgeous caramelized crust, sitting pretty on your kitchen counter while you smugly sip your beverage of choice, knowing you just created restaurant-quality barbecue using nothing more than your regular old oven and some pantry staples that were probably already hanging out in your spice cabinet anyway.
Now, I know what you’re thinking. “Oven ribs? That’s not real barbecue!” Listen, barbecue purists can clutch their pearls all they want, but when you’re living in an apartment, dealing with unpredictable weather, or simply don’t want to stand outside flipping meat while mosquitoes use you as a personal buffet, oven ribs are about to become your new best friend.
Why This Recipe Will Make You the Neighborhood Hero
Let’s have a real talk moment about ribs, shall we? The whole mystique around barbecue has gotten completely out of hand. People act like you need a PhD in smoke science and a bank loan to afford proper equipment just to make decent ribs, which is absolute nonsense designed to make regular folks feel intimidated about cooking amazing food.
This oven baked spare ribs recipe laughs in the face of all that pretension by delivering incredibly tender, flavorful ribs using simple techniques that anyone can master. We’re talking about the kind of ribs that make people close their eyes and make those little happy sounds when they take their first bite.
The secret sauce here (pun absolutely intended) is understanding that great ribs are all about low, slow cooking and proper seasoning, not about having the fanciest equipment. Your oven can absolutely deliver the consistent, gentle heat that transforms tough cuts of meat into tender, succulent perfection.
What really sets this recipe apart is how it combines the best parts of traditional barbecue techniques with the convenience and reliability of indoor cooking. You get all the flavor development and tenderness without dealing with weather, charcoal, wood chips, or that one friend who insists on “helping” by constantly opening the grill lid.
The beauty of oven ribs is the control factor. No hot spots, no flare-ups, no guessing about temperature. Just set it, forget it, and come back to discover you’ve created something absolutely magical while binge-watching your favorite show or actually enjoying your own party instead of being chained to outdoor cooking duty.
The Surprisingly Rebellious History of Indoor Ribs
Now, before all the grill masters start sending me angry messages, let me drop some knowledge on you: cooking ribs indoors isn’t some modern shortcut invented by lazy cooks. People have been slow-roasting meat in ovens for literally centuries, long before backyard grilling became the suburban status symbol it is today.
The whole “authentic barbecue must be outdoors” thing is actually pretty recent in the grand scheme of food history. Our ancestors were smart enough to figure out that consistent, controlled heat produces better results than hoping the weather cooperates with your dinner plans.
My personal oven rib awakening happened during a particularly brutal winter when I was craving barbecue but the thought of standing outside in subzero temperatures while tending a grill seemed less appealing than eating cardboard. Out of desperation (and stubbornness), I decided to try replicating my favorite rib joint’s flavors using only my oven.
That first batch was a revelation. Not only were they incredibly tender and flavorful, they were actually more consistent than many of my outdoor attempts where weather, wind, and my own impatience had created variable results. Sometimes the best discoveries happen when we stop following arbitrary rules about how things “should” be done.
The best part about oven ribs is how they democratize great barbecue. You don’t need a yard, perfect weather, expensive equipment, or years of practice reading smoke patterns. You just need an oven, some patience, and a willingness to let low heat work its magic over time.
What I love most about this approach is how it removes all the variables that can make outdoor grilling stressful. No more worrying about running out of propane, dealing with uneven heating, or having to explain to dinner guests why they’re eating at 10 PM because the ribs “aren’t quite ready yet.
Essential Equipment & Kitchen Wisdom
Tools That’ll Change Your Rib Game
The beauty of oven ribs is how few special tools you actually need. A sturdy baking sheet becomes your best friend, preferably one with raised edges to catch any delicious drippings that might escape your foil packets.
Heavy-duty aluminum foil is absolutely non-negotiable here. Regular thin foil will tear, leak, and generally make your life miserable. Invest in the good stuff because it’s the difference between success and a smoky kitchen disaster.
A reliable meat thermometer takes the guesswork out of doneness, though honestly, properly cooked ribs will be so tender they practically fall apart when you look at them wrong. But if you’re the type who likes precision, aim for an internal temperature around 190°F.
The Art of Rib Selection
Not all ribs are created equal, and your choice here can make or break your entire rib experience. Spare ribs are meatier and more flavorful than baby back ribs, though they take longer to cook. Baby backs are more tender but can dry out more easily if you’re not careful.
Look for ribs with good marbling and avoid ones that look dried out or have been sitting under grocery store lights for who knows how long. Fresh ribs should have a nice pinkish color and shouldn’t smell funky when you get them home.
The membrane on the back of the ribs needs to go, period. This thin, silvery layer prevents seasonings from penetrating and creates a chewy texture that nobody wants. Use a knife to lift one corner, then grab it with a paper towel and peel it off in one satisfying strip.
Temperature and Timing Mastery
Low and slow is the name of the game here. We’re talking 300°F, which might seem ridiculously low if you’re used to roasting chicken at 425°F, but trust the process. Higher temperatures will give you tough, chewy ribs that require aggressive chewing and disappointed sighs.
The 2.5 to 3-hour cooking time isn’t just a suggestion, it’s the minimum amount of time needed for tough connective tissues to break down into tender, gelatinous goodness. You can’t rush this process, so plan accordingly and maybe start a good book or binge-watch series.
Room temperature matters more than you might think. Cold ribs straight from the fridge will take longer to come up to temperature, potentially throwing off your timing. Let them sit out for 30 minutes before seasoning if you remember, though it’s not the end of the world if you forget.
Pro Tips & Advanced Techniques
Rub Timing Strategies
While you can absolutely season and cook your ribs the same day, letting that rub work overnight in the refrigerator creates even deeper flavor penetration. The salt has more time to work its magic, creating a more intense flavor throughout the meat rather than just on the surface.
If you’re planning ahead, apply your rub the night before, wrap the ribs in plastic wrap, and refrigerate them. Just remember to take them out about 30 minutes before cooking to let them come closer to room temperature for more even cooking.
Some pit masters swear by applying rub in two stages: a base layer that sits overnight, followed by a final layer just before cooking. This technique creates incredibly complex flavor development that’ll have people wondering what your secret ingredient is.
Liquid Enhancement Tricks
Adding a small amount of liquid to your foil packets can create even more tender results. Try apple juice, beer, or even just water with a splash of apple cider vinegar. The liquid creates additional steam that helps break down tough connective tissues.
Keep the liquid minimal, maybe 1/4 cup per packet, because you’re creating steam, not soup. Too much liquid can wash away your beautiful rub and create mushy rather than tender ribs.
Wine works beautifully too, especially red wine that complements the rich flavors of pork. The alcohol cooks off completely, leaving behind complex flavors that make people think you’re fancier than you actually are.
Sauce Application Mastery
The timing of sauce application matters more than most people realize. Sauce applied too early in the cooking process will burn and create bitter flavors, while sauce applied at the very end creates the perfect caramelized glaze without any burnt notes.
Different sauces behave differently under the broiler. Sugar-heavy sauces caramelize quickly and can burn fast, while vinegar-based sauces are more forgiving but might not develop as much visual appeal.
Consider making your own simple barbecue sauce by mixing ketchup, brown sugar, apple cider vinegar, and your favorite seasonings. Homemade sauce tastes fresher and allows you to control sweetness, acidity, and heat levels exactly to your preferences.
Temperature Precision Techniques
Invest in a good instant-read thermometer if you’re serious about rib perfection. Ribs are done when they reach an internal temperature of 190-203°F, which might seem high but is necessary for breaking down tough connective tissues into tender gelatin.
The bend test is another reliable doneness indicator: properly cooked ribs will crack slightly on the surface when you pick them up with tongs and bend them. If they bend easily without cracking, they need more time.
Professional pit masters also use the toothpick test: a toothpick should slide into the meat between bones with no resistance when the ribs are properly tender. This technique works especially well for spare ribs with their thicker meat sections.
Creative Variations That’ll Blow Your Mind
International Flavor Adventures
Korean-inspired ribs using gochujang, soy sauce, and sesame oil create sweet, spicy, umami-packed alternatives that’ll make your taste buds do happy dances. Add some scallions and sesame seeds for authentic finishing touches.
Mediterranean versions featuring herbs like oregano, rosemary, and lemon zest create bright, aromatic ribs that pair beautifully with grilled vegetables and crusty bread. Think vacation vibes without leaving your kitchen.
Mexican-inspired rubs using chili powder, cumin, and cocoa powder create complex, earthy flavors that pair perfectly with lime-spiked barbecue sauces and cool, creamy sides like avocado salad.
Asian fusion approaches might incorporate five-spice powder, ginger, and hoisin sauce for sweet, aromatic ribs that taste like they came from your favorite takeout joint but way better.
Sweet and Savory Explorations
Maple bourbon ribs combine the sweetness of real maple syrup with the complexity of good bourbon for sophisticated flavors that appeal to grown-up palates. The alcohol cooks off completely, leaving behind rich, complex notes.
Coffee-rubbed ribs might sound weird, but finely ground coffee adds incredible depth and slight bitterness that balances sweet barbecue sauces beautifully. Use espresso grounds for the most intense flavor.
Brown sugar and bacon rub creates ultimate indulgence by combining two of the world’s most beloved flavors. Crumble cooked bacon into your rub mixture for textural interest and concentrated smoky flavor.
Fruit-forward variations using dried fruit powders or finely minced dried fruits add natural sweetness and complexity. Cherry, apple, and peach all work beautifully with pork and create unique flavor profiles.
Heat Level Customizations
Mild versions for sensitive palates might eliminate cayenne entirely and focus on sweet paprika and brown sugar for family-friendly ribs that everyone can enjoy without reaching for milk.
Medium heat options could add chipotle powder for smoky heat that builds gradually rather than hitting you immediately. Chipotle provides complexity along with warmth.
Serious heat lovers might incorporate ghost pepper powder, habanero powder, or serious hot sauce into both rub and finishing sauce. Just remember that you can always add heat, but you can’t take it away.
Regional heat styles like Nashville hot seasoning or Carolina pepper vinegar create authentic regional flavors that transport your taste buds to specific barbecue traditions without requiring actual travel.
Serving Suggestions & Perfect Pairings
Classic BBQ Side Dish Combinations
Coleslaw provides the perfect cooling, crunchy contrast to rich, tender ribs. The acidity cuts through the fat while the crisp texture provides textural variety that makes each bite interesting.
Mac and cheese creates ultimate comfort food combinations that make people close their eyes and make happy sounds. The creamy, cheesy richness complements smoky rib flavors perfectly.
Baked beans are practically mandatory at any rib feast, providing sweet, savory flavors that echo barbecue themes while adding protein and fiber to balance out all that delicious meat.
Cornbread offers the perfect vehicle for sopping up any delicious juices or sauce that might escape from the ribs. Sweet cornbread balances savory ribs, while jalapeño cornbread adds extra heat for spice lovers.
Beverage Pairing Excellence
Beer is the obvious choice, but specific styles work better than others. Malty browns and ambers complement rich rib flavors without competing, while hoppy IPAs can overwhelm subtle seasoning nuances.
Wine lovers should try bold reds like Zinfandel or Syrah that can stand up to intense barbecue flavors. The fruit-forward characteristics complement sweet barbecue sauces while the tannins cut through rich fat.
Bourbon cocktails create sophisticated pairings that elevate casual barbecue to special occasion status. Old Fashioneds or bourbon sours provide complexity that matches well-seasoned ribs.
Non-alcoholic options like sweet tea, lemonade, or even craft sodas provide refreshing contrasts to rich, smoky flavors while keeping everyone hydrated during messy eating sessions.
Seasonal Menu Planning
Summer gatherings benefit from lighter sides that don’t compete with rib richness. Fresh fruit salads, grilled vegetables, and cold salads provide refreshing balance during hot weather.
Fall menus can embrace heartier sides like roasted root vegetables, apple-based sides, or warming soups that complement cooler weather and harvest themes.
Winter entertaining might feature more substantial sides like loaded potato dishes, hearty casseroles, or warming stews that create complete comfort food experiences.
Spring menus could highlight fresh herbs, early vegetables, and lighter preparations that celebrate seasonal renewal while still satisfying hearty appetites.
Presentation and Serving Strategies
Family-style service encourages sharing and creates casual, welcoming atmosphere where people can take what they want and engage in the messily delightful experience of eating ribs properly.
Individual plating works for more formal occasions, though ribs are inherently casual food that resists overly precious presentation. Sometimes simple is better than complicated.
Buffet presentations require temperature maintenance considerations, especially for food safety with meat dishes. Chafing dishes or warming trays keep ribs at safe serving temperatures.
Outdoor serving adapts indoor-cooked ribs to patio or picnic settings, proving that great barbecue doesn’t require outdoor cooking. Just transport carefully to maintain temperature and presentation.
Storage & Reheating Mastery
Optimal Storage Strategies
Leftover ribs should be cooled completely before refrigerating to prevent condensation that can make crispy surfaces soggy. Store in airtight containers or wrap tightly in foil to prevent drying out.
Separate bones from meat if you want to maximize storage efficiency and reheating quality. Boneless rib meat reheats more evenly and can be used in other dishes like sandwiches or salads.
Storage duration for cooked ribs is typically 3-4 days in the refrigerator, though they’re rarely at their best after the first day or two. Quality degrades gradually, but food safety is the primary concern.
Portion control during storage makes reheating easier and reduces waste. Store individual or family-sized portions rather than trying to reheat entire batches that might not get consumed.
Freezing and Long-Term Storage
Cooked ribs freeze reasonably well for up to 3 months when properly wrapped. Double-wrap in plastic wrap and foil, or use freezer-safe containers with tight-fitting lids.
Raw seasoned ribs can also be frozen, either before or after the initial seasoning process. Freeze in the foil packets you’ll cook them in for ultimate convenience on busy days.
Thawing frozen ribs should be done gradually in the refrigerator for food safety. Plan ahead because thawing large portions can take 24-48 hours depending on size and packaging.
Quality expectations should be adjusted for frozen ribs. Texture changes are inevitable, though flavors remain largely intact. Consider using reheated frozen ribs in sandwiches or chopped applications.
Reheating Techniques for Quality Results
Gentle oven reheating at 300°F wrapped in foil helps retain moisture while warming thoroughly. Add a tablespoon of liquid (water, broth, or barbecue sauce) to create steam.
Microwave reheating works for quick individual portions, though texture won’t be as good as oven methods. Use lower power settings and cover with microwave-safe lids to retain moisture.
Grilling reheated ribs can actually improve them by adding fresh char and caramelization. Brush with fresh sauce and grill over medium heat just until heated through and slightly charred.
Repurposing leftover ribs into other dishes often works better than straight reheating. Chopped rib meat makes excellent barbecue sandwiches, pizza toppings, or additions to mac and cheese.
Nutritional Benefits & Health Considerations
Essential Nutritional Components
Spare ribs provide substantial protein content at approximately 30 grams per serving, making them satisfying main course options that contribute significantly to daily protein requirements.
Each serving contains roughly 450 calories, reflecting the rich, fatty nature of spare ribs while providing sustained energy and satisfaction that makes them worthwhile indulgences.
Fat content of 30 grams per serving comes primarily from natural pork fat, providing both saturated and monounsaturated fats that contribute to flavor, satisfaction, and various bodily functions.
Carbohydrate content remains low at about 10 grams per serving, coming primarily from the brown sugar in the rub and any barbecue sauce additions, making ribs suitable for various low-carb approaches.
Protein and Mineral Benefits
High-quality complete protein from pork provides all essential amino acids needed for muscle maintenance, repair, and various metabolic functions throughout the body.
B-vitamins, particularly B12, thiamine, and niacin, support energy metabolism and nervous system function while contributing to overall nutritional adequacy beyond just calories.
Minerals like zinc, selenium, and phosphorus support immune function, antioxidant activity, and bone health, making ribs more nutritionally substantial than just indulgent treats.
Iron content helps prevent anemia and supports oxygen transport throughout the body, particularly important for people with higher iron needs or absorption challenges.
Health-Conscious Modifications
Trimming visible external fat before cooking reduces overall calorie and fat content while maintaining flavor and tenderness from internal marbling and slow cooking methods.
Reducing sugar in rubs and choosing lower-sugar barbecue sauces can significantly decrease carbohydrate and calorie content while maintaining essential flavors.
Portion awareness helps enjoy rich foods like ribs while maintaining balanced eating patterns. Smaller portions paired with plenty of vegetables create satisfying meals without overindulgence.
Cooking method modifications like removing foil earlier in cooking can reduce fat retention while still producing tender results, though some moisture loss is inevitable.
Balanced Meal Integration
Pairing ribs with high-fiber vegetables and whole grains creates more nutritionally balanced meals that provide sustained energy and various essential nutrients beyond just protein and fat.
Timing rib consumption earlier in the day allows for better energy utilization and digestion, especially for people who are sensitive to heavy evening meals.
Frequency considerations suggest treating ribs as occasional indulgences rather than regular meal staples, balancing enjoyment with overall dietary variety and nutritional adequacy.
Hydration importance increases when consuming rich, salty foods like seasoned ribs. Plenty of water helps with digestion and prevents dehydration from high sodium content.
Frequently Asked Questions (The Real Talk Section)
Can I make these ribs without foil? You can, but you’ll lose the steam-braising effect that makes them incredibly tender. Try using a covered roasting pan with a tight lid instead, or accept that they’ll be less tender but still delicious with a firmer texture.
What if I don’t have 3 hours to wait? Unfortunately, there’s no safe shortcut for properly tender ribs. You could cut them into individual pieces to reduce cooking time slightly, but you still need at least 2 hours for food safety and tenderness.
Can I use baby back ribs instead of spare ribs? Absolutely! Baby backs are more tender and cook faster, so reduce the time to about 2-2.5 hours. They’re also more expensive but have less fat, so they can dry out more easily if overcooked.
My ribs turned out tough. What went wrong? Usually this means not enough cooking time or too high temperature. Ribs need that full 2.5-3 hours at 300°F to break down properly. Higher temperatures make them tough instead of tender.
Can I add liquid smoke for more BBQ flavor? Sure! Add a teaspoon to your rub or barbecue sauce for extra smokiness. But don’t go overboard because liquid smoke is potent stuff that can quickly become overwhelming and artificial-tasting.
What’s the best barbecue sauce to use? Honestly, whatever you like! Sweet sauces caramelize beautifully, while vinegar-based sauces add tang. Avoid sauces with lots of chunks that might burn under the broiler.
Can I make these ahead for a party? Yes! Cook them completely, then refrigerate and reheat gently in foil at 300°F until warmed through. They won’t be quite as perfect as fresh, but still delicious and much more convenient.
How do I know when they’re really done? The meat should be pulling back from the bones slightly, and a fork should twist easily in the thickest part. Internal temperature should be around 190-203°F for maximum tenderness.
Can I double this recipe? Absolutely! Just make sure all your ribs fit in your oven with adequate air circulation. You might need to rotate pans halfway through cooking for even results.
What if I don’t like spicy food? Just reduce or eliminate the cayenne pepper in the rub. The other seasonings provide plenty of flavor without heat. You can always add hot sauce on the side for people who want it.
Troubleshooting Guide (When Things Go Sideways)
Texture and Tenderness Problems
Tough, chewy ribs usually indicate insufficient cooking time or too high temperature. Next time, lower your heat to 275°F if your oven runs hot, and don’t rush the process. Tenderness can’t be forced, only coaxed with time and proper heat.
Dry ribs suggest overcooking, poor foil sealing, or starting with low-quality meat. Check your foil sealing technique and consider adding a splash of liquid to your packets. Some cuts are naturally drier and benefit from extra moisture.
Mushy, falling-apart ribs indicate overcooking or too much liquid in the foil packets. While tender is good, complete disintegration means you’ve gone too far. Reduce cooking time by 30 minutes next time and use less liquid.
Seasoning and Flavor Issues
Bland ribs usually mean underseasoning or poor-quality spices. Be generous with your rub and check spice dates. Old spices lose potency quickly. Don’t be afraid to taste your rub mixture and adjust.
Overly salty results often come from using too much salt or not accounting for salty barbecue sauces. Reduce salt in your rub if you’re using commercial barbecue sauce, which often contains significant sodium.
Burnt or bitter flavors typically result from too high broiling temperature or too long under the broiler. Watch your ribs like a hawk during the final broiling stage. Sugar-heavy barbecue sauces can go from caramelized to charcoal in seconds.
Cooking Process Complications
Foil tears during cooking create steam leaks that can dry out your ribs. Use heavy-duty foil and seal carefully. If you discover tears after cooking, the ribs might still be salvageable but won’t be as tender as they could have been.
Uneven cooking where some parts are perfect while others are tough suggests poor oven heat distribution or overcrowding. Make sure ribs aren’t overlapping and consider rotating pans halfway through cooking.
Sauce that won’t caramelize properly might indicate a wet surface or insufficient broiler heat. Pat ribs dry before saucing and make sure your broiler is fully preheated. Some ovens have wimpy broilers that need extra time.
Safety and Storage Issues
Ribs that don’t reach proper internal temperature create food safety concerns. Always verify doneness with a thermometer, especially with thicker cuts. When in doubt, cook longer rather than risk illness.
Improper cooling and storage can lead to spoilage or foodborne illness. Cool ribs quickly and refrigerate within 2 hours of cooking. Don’t let them sit at room temperature during long parties.
Reheating problems often stem from trying to rush the process with high heat. Gentle reheating maintains quality better than aggressive microwaving or high-temperature blasting that creates tough, dried-out results.
Final Thoughts (Your Rib Victory Awaits!)
Congratulations, rib warrior! You’ve just discovered one of the best-kept secrets in the barbecue world: that incredible ribs don’t require fancy outdoor equipment, perfect weather, or years of practice reading smoke signals. Sometimes the most satisfying cooking victories come from proving that simple techniques and quality ingredients can create extraordinary results.
The beauty of these oven-baked spare ribs extends far beyond their incredible taste (though that’s certainly worth celebrating). They represent the democratization of great barbecue, proving that anyone with an oven and some patience can create restaurant-quality results without investing in expensive equipment or developing mysterious grilling superpowers.
What I love most about this recipe is how it removes all the variables that make outdoor barbecue stressful while delivering all the satisfaction that makes barbecue so beloved. No weather worries, no fuel concerns, no standing over hot grills while everyone else enjoys the party. Just set your oven, relax, and emerge hours later with perfectly tender ribs that’ll make your neighbors wonder what your secret is.
The real magic happens when you serve these beauties and watch people’s faces light up with that first bite. The surprise, the delight, the inevitable question about how you made them so tender and flavorful. That’s when you get to casually mention that you used your regular old oven, just like the culinary rebel you are.
Remember that great cooking is about understanding techniques, not following arbitrary rules about what equipment you “should” use. These ribs prove that creativity and patience matter more than having the fanciest setup. Sometimes the best discoveries happen when we question conventional wisdom and try our own approaches.
So go forth and spread the gospel of oven ribs! Your friends and family are about to discover that amazing barbecue can happen any time, in any weather, using equipment they already own. And when they inevitably ask for your secret, you can smile mysteriously and tell them it’s all about low, slow heat and refusing to let tradition limit your delicious possibilities.
Now excuse me while I go preheat my oven because writing about these ribs for the past hour has created serious cravings that can only be satisfied by actual fall-off-the-bone perfection wrapped in caramelized barbecue sauce. That’s the mark of a truly great recipe: when even thinking about it makes you hungry enough to start cooking immediately.